
Installation Guide


INSTALLATION
Figure 3
guidelines should be snapped on the oor ½ tiles width on one side of either or both center lines as required. (See Figure 2)
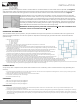
After the border widths have been determined and the center starting lines have been snapped spread the recommended
adhesive on the center lines leaving portions of the lines at center and near each wall uncovered as shown in Figure 3.
Spread the adhesive over one‐half the area and after it is ready, start laying tile from the right
angle formed in the center of the room by center lines. Lay toward the two corners of the room
as shown. Always refer to your guide lines as you progress with laying tile so that any mistake
can be corrected before it is too late. Sometimes it’s necessary to compromise on the rightness
of joints to make allowances for unevenness or waves of the suboor. Take care to place tile as
accurately as possible without sliding them into place. If grouting tile please leave appropriate
spacer between tiles and follow instruction for use of Array‐Grout.
IMPORTANT: All ooring must by rolled with a minimum 100‐lb roller after installation. Use a
hand roller in areas not reached with a 100‐lb. roller.
VERSAILLES PATTERN TILES
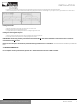
The Versailles Pattern (French pattern). Proper installation and layout is important. The material must have a grout line of
3mm for proper placement. Use of 3 mm spacers is required to achieve proper grout line size and to ensure the tiles are
spaced evenly.
a. The pattern is composed of
44% 16" x 16" tiles
33% 16" x 24" tiles
11% 8" x 16" tiles
11% 8" x 8" tiles
b. Instructions – Use a 3mm spacer to separate the tiles as the pattern is constructed.
c. Place one 8‐inch by 8‐inch tile in the center.
d. Position two 16‐inch by 16‐inch tiles with one above where the right edge of the larger tile is ush with the
right edge of the smaller tile, and one to the left so that the top edge of the second larger tile is ush with the
top edge of the smaller tile.
e. Place one 8‐inch by 16‐inch tile on the bottom of the section so that the 8‐inch edge presses against the 16‐
inch square tile and half of the 16‐inch edge is pressed against the base edge of the square tile.
f. Place a 16‐inch by 24‐inch tile in the corner created by the rectangular tile from Step 3 and the square tile
from Step 1 so that the 16‐inch edge runs horizontally, extending out to the right of the structure.
g. Position a 16‐inch by 16‐inch tile immediately below the 16‐inch by 24‐inch tile so that the left edge of the
square tile is pressed against the short edge of the rectangular tile.
h. Lay a 16‐inch by 24‐inch tile with the 24‐inch side running horizontally immediately to the left of the tile from
and pressed against the base of the rectangular tile and half of the base of the rst 16‐inch square tile.
i. Place an 8‐inch square tile against the last half of the base of the rst 16‐inch tile and against the left edge of the 16‐inch by 24‐inch tile.
j. Place an 8‐inch square tile immediately above the rst 16‐inch square tile with a 16‐inch square tile right above the 8‐inch tile.
k. Position an 8‐inch by 16‐inch tile with the 16‐inch edge pressed against the 8‐inch square tile and the original 16‐inch square tile.
l. Position the last tile, an 8‐inch square tile, so that the right edge is ush with the right edge of the top‐right 16‐inch by 24‐inch tile. The 8‐ inch tile must be
on top of the large rectangle with the right edges ush to complete the overall design.
6. ARRAY GROUT
Array‐Grout, with a unique formula, offers stain resistance color consistency and a smooth texture for easy spreading and
clean‐up.
a. For Grouting Shaw groutable tiles. Can also be used on vitreous, semi‐vitreous or absorptive tile including ceramic, mosaic, quarry, cement, porcelain,
brick, mini‐brick, precast terrazzo and natural stone.
b. Stain resistant, premixed, no shade variance, resists mold and mildew.
c. Use on oors, countertops, walls, and ceilings.
d. For interior installations only.
COVERAGE
1. 1/16“ Grout joint approximately 500 sqft/gallon.
2. 1/8“ Grout joint approximately 300 sqft/gallon.
3. 1/4“ Grout joint approximately 140 sqft/gallon.
LIMITATIONS
a. Shaw Array‐Grout should not be installed, when ambient temperature is below 60° F and above 90° F. Shaw Array‐Grout should be kept at room
temperature for 24 hours before installation.
b. Some types of glazed ceramic tile, marble and stone can be scratched, stained or damaged when grouted with pigmented or sanded grouts. Generally
white grout is best suited for grouting white or light colored marble or granite. Follow tile manufacturer’s recommendations. Test a small area prior to
use. Certain tile with high absorption, surface porosity or rough textured surfaces and certain types of porcelain may require sealing prior to grouting to
prevent staining.
5
shawoors.com
For reference purposes only if printed or downloaded.