
How to Guide


Dur-A-Bead®
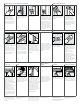
Corner Bead
Trim length 1/2 in. shorter
than the wall height by
cutting through each
flange with metal snips,
then bend and snap.
Hold metal cornerbead
firmly against corner
and mechanically fasten
through small holes every
9 in. on flange.
Lightly sand to remove
high spots. Then use an
8 in. or larger knife for
outside corners (4-6 in.
knife for inside corners)
to apply finishing coat,
feathering approximately
2 in. beyond previous
coat. Let dry; sand lightly.
Drive all mechanical
fasteners below nose of
corner bead. Be careful
not to dent the metal.*
*Screws can dimple and
bulge metal bead.
Finishing Guide
Tools and Materials
– Drop cloths
– Drywall finishing knives
(4, 5, 6, 8, 10, 12 in.)
– Drywall hammer
– Drywall hand sander or pole sander with
150-grit sandpaper or 220-grit mesh cloth
– Drywall screws or nails
– Dust mask
Outside Corners Method A
– Joint compound
– Metal snips
– Mud pan or bread pan for
compound
– Screwgun
– USG Sheetrock® Paper
Joint Tape
– Sponge (small cell
polyurethane)
– Tape measure
USG Sheetrock
™
Paper
Faced Metal Bead
and Trim
Outside and Inside
Corners
Measure wall height to be
covered by bead. Using
metal snips, cut bead
1/2 in. shorter than the
wall height. Cut first from
one side and then the
other; bend and snap.
Using a 4 in. knife, apply
an all purpose or taping
compound to wallboard
surfaces, extending
compound just wider
than the trim.
Press paper faced metal
bead in place and embed
by running a knife over
each side with even
pressure at a 45° angle.
Once bead is in place,
use a 4 in. knife to apply
a thin layer of compound
over the paper facing,
while pressing out
excess compound and
eliminating air bubbles.
A damp sponge may
be used to remove
excess compound
beyond the blade edge.
Allow to dry.
Using a 6 in. knife for
outside corners (4 in.
for inside corners),
apply another coat of
all purpose or topping
compound. Keep this
coat as smooth as
possible, feathering
out approximately 1 in.
beyond previous coat.
Let dry.
When finishing drywall, be sure to use quality USG Sheetrock® Brand joint
compounds, bead and trim. Follow these simple steps to ensure smooth, strong
joints and professional results for a variety of projects.
USG Sheetrock® Joint Compound
Options
READY-MIXED
– Plus 3® Lightweight All Purpose
Joint Compound
– Lightweight All Purpose Joint
Compound with Dust Control
– Taping Joint Compound
– Topping Joint Compound
POWDER
– Durabond® Setting-Type Joint
Compound
– Easy Sand™ Lightweight Setting-Type
Joint Compound
Don’t allow flanges to
spread beyond 90°
angle.
Apply all purpose or
taping joint compound
with 8 in. knife onto one
flange, working down
entire length. Hold knife
at 45° angle and smooth
compound. Compound
should extend onto
panel a minimum of 4 in.
Repeat for other flange.
Allow first coat to dry
overnight. Apply second
coat of all purpose or
topping joint compound
with 8 in. knife,
feathering slightly
beyond first coat. Allow
second coat to dry
overnight. Sand lightly
if necessary. Apply
third coat with 10 in.
knife, feathering slightly
beyond second coat.
Outside Corners Method B