
How to Guide


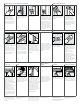

Inside Corners
Use a 5 in. knife to apply
a thin layer of all purpose
or taping joint compound
on both sides of corner.
Extend compound
slightly beyond area to
be covered by tape.
Next, fold joint tape
along center crease and
lightly press into position
with your fingers.
Tightly embed tape as
with other joints.
Allow first coat to dry
overnight. Apply joint
compound down length
of one side using a
5 in. knife. Scrape o
any compound that laps
on to the second side.
Feather out beyond first
coat and allow to dry.
After first side is dry,
apply compound on
other side, and feather.
Apply an even coat of
all purpose or taping
compound over the
length of the joint with a
6 in. knife.
Center and lightly press
in joint tape with fingers.
Draw 6 in. knife firmly to
tightly embed tape, but
keep sucient amount of
joint compound beneath
tape to prevent blistering.
Inside Corners USG Sheetrock Joint Tape Flat Joints First Coat
Second Coat
Third Coat
Remove excess joint
compound from edge
and apply as a thin coat
over the tape.
Allow first coat to dry
overnight. Scrape o
bumps, ridges and other
imperfections with
knife. Be careful not to
damage.
For best results, apply
medium pressure and
hold knife at a 45° angle
to panel. Joint compound
should be thinned
slightly with water for
easier application. For
one gallon of compound,
add water in 2 oz.
increments.
For tapered joints, apply
all purpose or topping
joint compound to the
length of the joint using
an 8 in. or 10 in. knife.
Joint compound should
extend 2 in. beyond first
coat for a total width of
7 in. to 10 in.
For butt joints, apply a
7-8 in. coat of joint
compound to each side
and feather. Compound
should extend beyond
first coat for a total width
of 14 in.
Allow joints’ second
coat to dry overnight.
If necessary, remove
imperfections with knife
or sandpaper. Apply a
thin finishing coat of
all purpose or topping
compound with a 10 in.
or 12 in. knife.
Press knife firmly so
joint compound fills
depressions but does
not significantly add to
thickness. Feather edges
at least 2 in. beyond
second coat. Allow third
coat to dry overnight.
Do not sand unless
necessary. If you do
sand, always wear an
appropiate dust mask,
use fine-grit sandpaper
and be careful not to
scu the panel paper.
When only minimal
sanding is needed, try wet
sanding with a sponge.
It eliminates dust and
does not scu the surface
paper. Use a small- celled
polyurethane sponge
similar in appearance to
carpet padding. Saturate
sponge and wring to
prevent dripping. Rub
joints to remove high
spots, using as few
strokes as possible. Clean
the sponge frequently
during use.
Do not store joint
compound in direct
sunlight or where
freezing conditions may
occur. Clean tools with
warm, soapy water.
Prior to painting, apply
USG Sheetrock® First
Coat Primer or a flat latex
paint.
After prime coat is dry,
apply USG Sheetrock®
Wall and Ceiling Texture
or a good quality interior
paint.
Priming
Finishing Up
Storage and Cleanup
Painting and Texturing
Trademarks
The trademarks USG, DUR-A-BEAD,
DURABOND, EASY SAND, PLUS 3,
SHEETROCK, the USG logo, the design
elements and colors, and related marks
are trademarks of USG Corporation or
its aliates.
Notice
We shall not be liable for incidental
and consequential damages, directly
or indirectly sustained, nor for any loss
caused by application of these goods
not in accordance with current
printed instructions or for other
than the intended use. Our liability is
expressly limited to replacement of
defective goods. Any claim shall be
deemed waived unless made in
writing to us within thirty (30) days
from date it was or reasonably should
have been discovered.
Safety First!
Follow good safety/industrial hygiene
practices during installation. Wear
appropriate personal protective
equipment. Read MSDS and literature
before specification and installation.
Manufactured by
United States Gypsum Company
550 West Adams Street
Chicago, IL 60661
For Product Information and
Literature
800-USG-4YOU (874-4968) / usg.com
R26/8-15 © 2015 USG Corporation and/
or its aliates. All rights reserved.
Printed in U.S.A.
Sanding
For each fastener
depression, apply all
purpose or topping
compound horizontally
with a 5 in. knife.
Next, raise knife blade
to an upright position
and wipe o excess with
a right angle stroke.
Compound should be
level with panel surface.
Allow to dry overnight.
Scrape o bumps, ridges
and other imperfections
with knife. Be careful not
to damage.
Apply another coat to
fasteners in same manner
as first coat.
Fasteners