
Installation Guide


Trademarks The trademarks USG, SHEETROCK,
the USG logo, the design elements and colors, and
related marks are trademarks of USG Corporation
or its aliates. Notice We shall not be liable for
incidental and consequential damages, directly
or indirectly sustained, nor for any loss
cause by application of these goods
not in accordance with current printed
instructions or for other than the
intended use. Our liability is expressly
limited to replacement of defective
goods. Any claim shall be deemed
waived unless made in writing to us
within thirty (30) days from date it
was or reasonably should have been
discovered. Safety First! Follow good safety and
industrial hygiene practices during handling and
installation of all products and systems. Take
necessary precautions and wear the appropriate
personal protective equipment as needed.
Read material safety data sheets and related
literature on products before specification and/
or installation.
Manufactured by
United States Gypsum Company
550 West Adams Street, Chicago, IL 60661
Product Information See usg.com for the most
up-to-date product information.
800-USG-4YOU (874-4968) / usg.com
R24/8-15 © 2015 USG Corporation and/or its
aliates. All rights reserved. Printed in U.S.A.
Tools and Materials
– Drop cloths
– Drywall finishing knives
– Drywall hammer
– Drywall nails or screws
– Dust mask
– Marking pencil
– Metal tape measure
– Portable work light and
extension cord
– Safety goggles
– Step ladder
– 4 ft. T-square
– Utility (keyhole) saw
– Utility knife & extra blades
Optional
– Panel adhesive and
caulk gun
– Panel lifter
– Screwgun
Installation Guide
USG Sheetrock® Brand gypsum panels (drywall) are specially formulated to ensure
easy scoring, clean snapping and enhanced strength from core to face.
Planning the Job
Measure walls and ceilings to determine the square
footage of each area being covered. Divide the
calculated area by the square footage of the panels
to be used (4 ft. x 8 ft. = 32 sq. ft., 4 ft. x 10 ft. = 40
sq. ft., 4 ft. x 12 ft. = 48 sq. ft.) to determine the
number of panels needed.
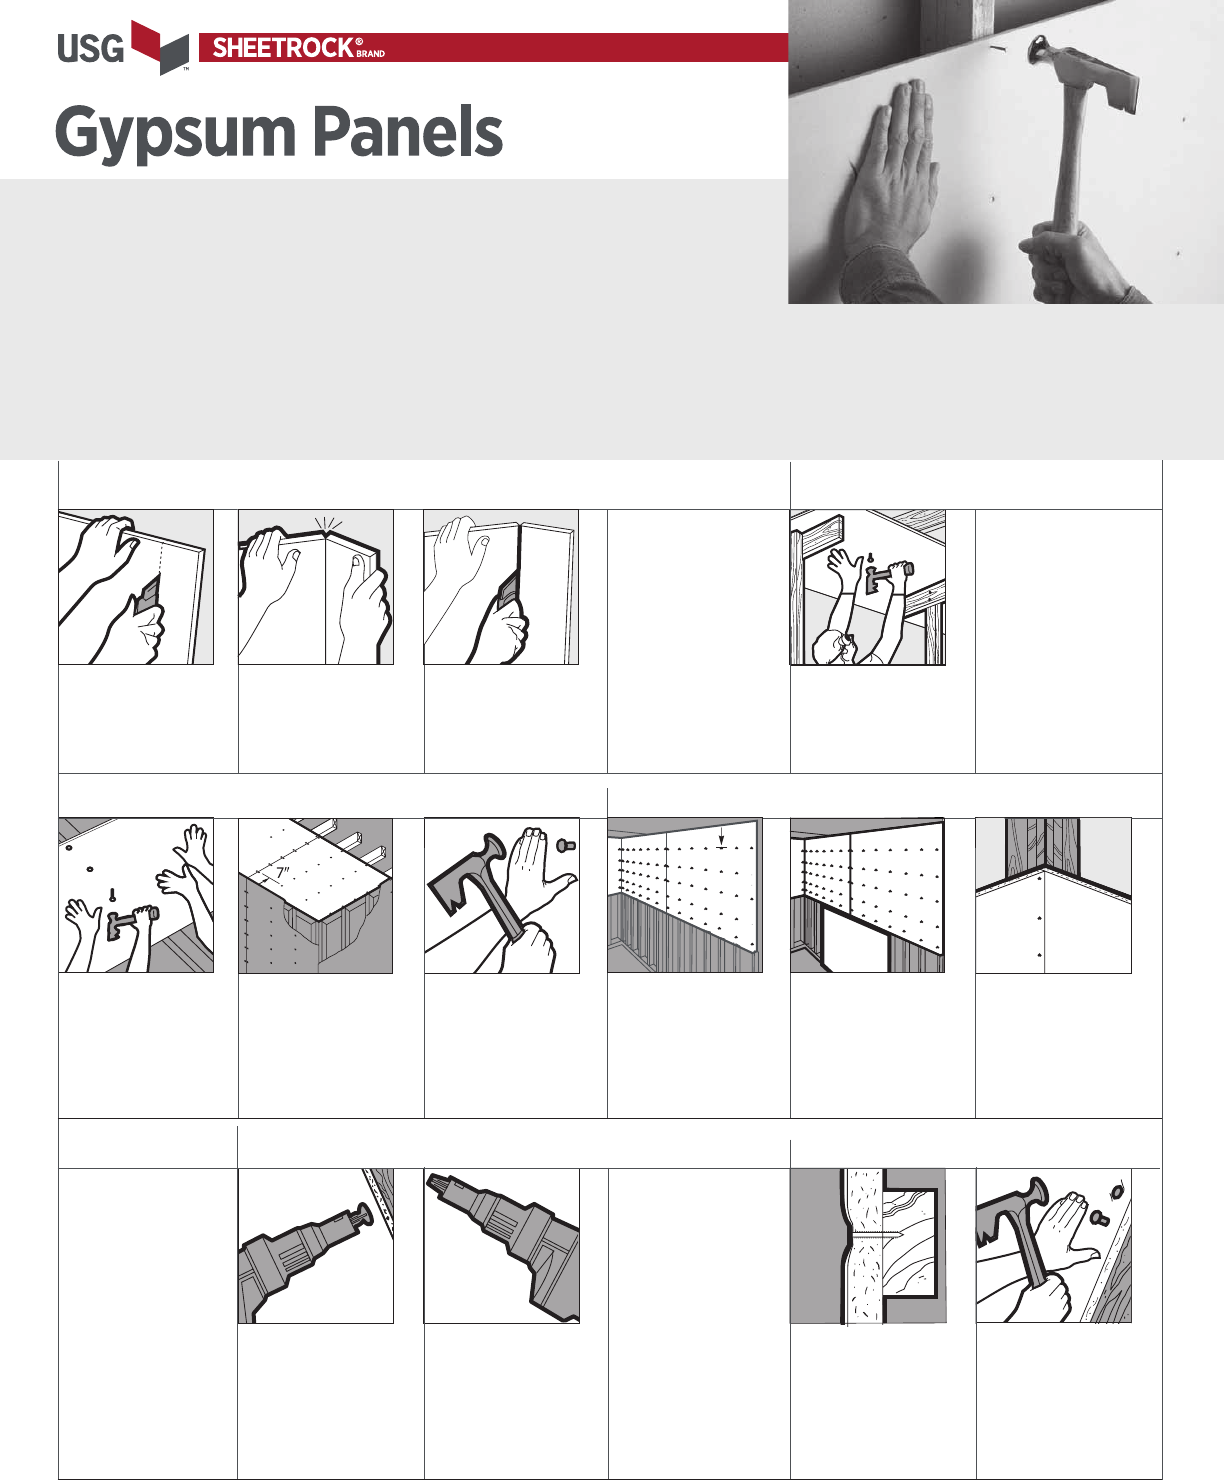
How to Cut Panels Score and Snap How to Install Panels Ceilings First...
Measure and mark panel
cuts with a T-square, then
use a utility knife to score
through paper face and
lightly into the core.
Grasp board on both sides
of the cut and snap away
from you.
Cut back paper to separate.
Sand or rasp to smooth cut
edge. Keep edge as square
as possible.
Note: Carefully measure
and draw openings for
electrical boxes and other
cutouts to ensure proper
positioning. Use utility saw
for best results.
T-braces — 1x4s nailed to
2x4 uprights that are
1/2 in. longer than floor-
to-ceiling height — ease
installation.
Optional: Rent a panel lifter.
If not using T-braces or a
panel lifter, two or more
people are needed to hold
each panel in place for
proper attachment.
Apply ceiling panels first,
starting at one corner.
Ensure that first sheet
is square on joists. Firm
contact with joists is
essential for good ceiling
attachment.
Hold panel tight against
framing and fasten to studs,
fastening center of panel
first and work toward edges.
Fasteners along panel edges
should be at least 3/8 in. in
from board edge.
Apply panels horizontally
to wall studs. Starting at
one corner, install top row
first. Position tight against
ceiling panels and apply
first nails 8 in. from the top
of the wall.
Stagger lower panels so the
vertical joints will be oset.
For inside corners, fit first
panel into corner, butt
second panel against first
and fasten the end of the
second panel to stud.
Space 1-1/4 in. drywall
screws 12 in. apart on
ceilings, 16 in. apart on
walls. For 1/2 in. - and
5/8 in. -thick panels, use
1-1/4 in. Type W bugle
head screws.
Use a screwgun or drill with
a screw depth control bit.
Sink screws just below the
panel surface, leaving the
paper intact. Ensure that
fasteners are properly sunk
by drawing a knife across
the surface.
Optional: Adhesive
attachment. Before
installing panels, apply
adhesive to clean, oil-free
framing, per instructions on
adhesive cartridge. Nails
or screws are still required
when adhesive is used.
Space nails 7 in. apart on
ceilings, 8 in. apart on
walls. For 1/4 in.-, 3/8 in.-,
and 1/2 in. -thick panels,
use 1-1/4 in. wallboard nails;
for 5/8 in. thick panels, use
1-3/8 in. wallboard nails.
Note: For outside corners,
lap panels to ensure a solid
backing for corner bead.
Avoid joints directly above
or below windows and
doors.
How to Attach Panels Screw Attachment
...Then Walls
Nail Attachment
Hold panels tight against
framing and fasten to studs
using conventional single
nail or screw application.
Apply the first nails or
screws approx. 7 in. from
the wall and at each joist.
Hammer nail until head is
seated in shallow dimple.
If nail breaks face paper,
drive in a second nail
2 in. from the first.
8