
Instructions / Assembly


7
5. Plug motor into the back of the electrical control center.
6. Connect the thermostat wire (not included) to the 2 posts located on the side of the control center. For convenience, you
might consider locating the wall thermostat next to your existing thermostat in your home. The thermostat MUST be installed
for the furnace to operate.
7. Plug the 3 pronged grounded plug into a grounded electrical outlet..
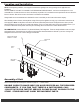
The lter box requires one 20” x 25” x 1” lter (not included, but available at most hardware and home centers).
See diagram for proper installation lter box. With the connection of the thermostat, chimney pipe and ductwork, your furnace installation
is complete.
Inspect your lter regularly and replace the lter every 30 days during heating season for maximum efciency.
Chimney Types and Recommendations
See Diagram on page 8.
Safety requirements demand that your Shelter Furnace be connected to “Class A” HT2100 All Fuel, or stainless-lined masonry chimney
ONLY.
By denition, “Class A” refers to either a lined masonry chimney or all fuel factory-built chimney. Although experts have expressed
differing opinions as to which system is the best, it is a matter of what you nd most suitable. Regardless of your choice of chimney type,
for models SF2600 and SF3100, a minimum 6-inch diameter chimney is needed. In order to create the most effective draft, the chimney
size should not exceed 12 inches, with a maximum .08 water column inches of draft. The ue draft can be measured with the use of a
draft gage or manometer. If there is more than .08 water column inches of draft, it can be adjusted with the installation of a ue damper.
The stovepipe required to connect the furnace to the chimney should be a minimum of 24 gauge black or stainless steel. NEVER USE
GALVANIZED PIPE. Horizontal run should not exceed 5 feet and should have a minimum rise of 2 inches per foot. No installation should
have more than 2 elbows, a 45° elbow is recommended over a 90° elbow.
As a safety precaution, all pipe selections should be fastened together with a minimum of 3 sheet metal screws. For your convenience,
the crimped male ends of the pipe should point toward the furnace to form drip-free connections, thereby reducing the possibility of
creosote leakage from the joints. Installing a non-UL-listed heat reclaimer in the pipe is not recommended because it reduces the stack
temperature thus causing creosote formation. Installing a manually operated cast iron damper in the stovepipe between the furnace
and the chimney pipe is recommended. The addition of a damper will greatly assist in regulating the re and achieving optimum results.
Always install a tee with clean-out cap to the chimney outlet on the back of the furnace. This allows for easier cleaning of the chimney
system. Never use a 90° elbow off the back of the furnace.
When using a masonry chimney, you must line the chimney with a stainless steel liner. The stainless steel liner will keep the chimney
temperature hotter for better draw and signicantly reduce the creosote formation in the chimney. If using this method, a 6-inch stainless
liner should be used for models SF2600 and SF3100.