ShelterIt™ 12'x24'x8' Instant Shelter INSTRUCTION MANUAL # 71224 Parts Alert! If you have a question or if there are missing parts, please call: 203-591-9032 or email Service@shelterit.com Monday-Friday 9:00am-5:00 p.m. EST Missing parts will be sent to you via courier. Visit ShelterIt.com for instructional video DO NOT RETURN TO STORE! Please read instructions fully before beginning assembly! Visit Shelterit.
TABLE OF CONTENTS SAFETY CAUTIONS…….....................................................3 PARTS LIST.........................................................................4 ASSEMBLY INSTRUCTIONS.............................................5-17 LIMITED WARRANTY...........................................................18 SAFETY and PRE-ASSEMBLY CAUTIONS READ PRIOR TO ASSEMBLY! DO NOT ASSEMBLE OR DISASSEMBLE THE STRUCTURE ON A WINDY DAY.
9. Do NOT use barbeque grills, smokers or other flammable equipment under or inside any shelter. 10. Do not cook, smoke, use flammable devices, refuel or store flammable materials in this shelter. Never use or ignite an open flame in the shelter. Open flames must be kept a safe distance away from the shelter. 11. No snow accumulation should be allowed on the shelter. Monitor continuously for accumulated snow on the roof. Snow or ice accumulation may cause your shelter to collapse.
PARTS LIST 12x24x8 -4- !
Assembling the Frame Visit Shelterit.com for installation Video Diagram A below represents the completed Frame Assembly once steps 1- 4 are completed. Note: 2 or more people are required for safe and accurate assembly. When assembling the frame HAND TIGHTEN the bolts for the cross rails where the Square are located in Diagram A. When putting the cover and doors on, they will need to be temporarily removed and retightened.
Step 1 – Collect your Tools Tools required to assemble the shelter include: Safety Glasses – 1-pair per participant 1-Adjustable wrench or box wrench 1-Rubber mallet (to be used to ensure all pipes are fully inserted) 1-Step stool or ladder – shelter is 8’ tall 1-Hammer to set bolts Some of the tubes are manufactured with square small dents on one end to act as pressure points to insure the tube fit snug. Assembly Tip: Using a hammer, tap the bolts to wedge them slightly into the opening.
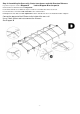
Step 3: Assembling the Cross rails, Center truss braces and side Structural X braces Layout the roof parts as shown in Diagram D Look at Diagram B for the part #s Connect all cross rails front to back in Diagram D. Use 2” bolts and nuts to assemble the top cross rails for roof and the truss brace steel rods . Use the 3” bolts to connect the side cross rails to the side bent tubes. Hand tighten the nuts that are in the square box locations until after the doors are installed and then retighten.
Step 4: Attaching the upright Legs a. There are four corner legs and 6 middle legs. Assemble the four corner leg tubes for first. Please refer to Diagram H. b. Installing the upright legs.This is accomplished by lifting the side of the shelter while the other side remains resting on the ground. c. Have your 2” bolts ready. d.
Visit Shelterit.com for installation Video Step 5.
- 10 -
INSTALLING THE FRONT AND BACK PANEL Visit Shelterit.com for installation Video Starting from the peak, disconnect the Cross Rail from the 3-way top connector. Place exposed Rope at the top of the panel over the 3-way connector and under the cross pole as shown in Detail P above.. At each corner remove the Cross Rail and pull the door fabric around to the inside, placing the 3-way connector through the opening in the fabric as shown in Detail O. Reconnect the cross rails.
This will tighten the doors to the frame. After making the door snug Detail 19 22 & 28 You can pull all around the inside corners of the door too even the door on the frame. The bottom of the door should be just above the eye hook and above the bottom corner leg This will insure the door will not rub on the ground and wear it out Detail 23. Pull up on the rope again so the door is tight on the frame and tie a few knots to secure the rope Repeat the same for the back panel.
Step 6. Installing the Covers Visit Shelterit.com for installation Video Installation Tip: Visually check all pipes of the frame to ensure they are fully inserted into the next pipe before installing cover. Pipes may separate during installation of end covers and prevent proper installation of the main cover Two people, each positioned approximately one-third into the center of the cover, carefully pull the cover over the frame. When reaching the peak use a step stool or ladder to pass over this height.
Step 7: Installing Lower Cross Rails into the main cover The shelter cover is manufactured with heat-welded pipe pocket sleeves along the lower wall of each side (white color faces inside the shelter, Disconnect the lower cross rails and clamps and insert the cross rails in the pockets of the cover and reassemble the clamps to the frame hand tight. Both sides of cross rails on the shelter should be approximately equal heights from the ground.
- 15 -
Cover Tensioning Visit Shelterit.com for installation Video Find the ropes coming out of the 4 corners of cover with the big loops with yellow……label You will see 2 red….. labels on the rope before the big loop Detail 20 & 24 Hook the cover rope that has the 2 red …... labels in the same eye hook that you used for the door on the outside of the shelter Detail 20 After hooking to rope to the eye hook with red ….. label , bring the rope under the door Detail 23 Hook the big loop with the yellow…...
Step 8: Square and Anchoring the Shelter a) Ensure the frame is in the final desired location. b) Check the measurement of 12’ in the front and back of the shelter. c) Take a diagonal measurement, cross-corner to cross-corner. When these two measurements are equal the shelter is square. If not equal, tap the corner leg of the longer measurement with the rubber mallet, in the direction of the diagonally opposite leg to push (decrease) the length of the distance.
LIMITED WARRANTY This product is guaranteed for 1 year from the date of original retail purchase against defects in materials and workmanship. Subject to the conditions and limitations described below, this product, must be returned with proof of purchase within the stated warranty period and if covered under this warranty, will be replaced (fully or partially with the same model or one of equal value or specification) at the Manufacturer’s option.