
Instructions / Assembly


- 6
-
Step 1 – Collect your Tools
Tools required to assemble the shelter include:
Safety Glasses – 1-pair per participant
1-Adjustable wrench or box wrench
1-Rubber mallet (to be used to ensure all pipes are fully inserted)
1-Step stool or ladder – shelter is 8’ tall
1-Hammer to set bolts
Some of the tubes are manufactured with square small dents on one end to act as pressure points to insure the tube fit snug.
Assembly Tip: Using a hammer, tap the bolts to wedge them slightly into the opening. When tightening the self-locking nuts, ensure to
draw the bolt heads into the holes of the pipe so that the head of the bolt when fully tightened is flush with the pipe. Failure to do so may
cause bolts to tear the shelter’s cover.
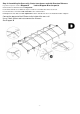
Step 2: Assembling the Roof Visit Shelterit.com for installation Video
Layout the roof parts as shown in Diagram C. Look at B above for the part #s
Connect all parts as shown in Diagram
C to form the peak of the shelter frame. Use 2” bolts and nuts to assemble the roof and the center
truss brace rods together .
Put the truss rod on the round head side of the bolt when connecting to the frame
see Diagram F.
Inst
all all carriage bolts with nuts facing into the center, inside of the frame to insure the cover does not tear