8' x 30' SUPER MAX CANOPY Assembly Instructions DESCRIPTION 18' x 30' Super Max Canopy - 12 Leg - White MODEL # 26767 RECOMMENDED TOOLS Please read instructions COMPLETELY before assembly. This shelter MUST be securely anchored. THIS IS A TEMPORARY STRUCTURE AND NOT RECOMMENDED AS A PERMANENT STRUCTURE. Before you start: 2+ individual recommended for assembly, approximate time 2 hr. 1-800-524-9970 150 Callender Road Watertown, CT 06795 www.shelterlogic.
ATTENTION: This shelter product is manufactured with quality materials. It is designed to fit the ShelterLogic® Corp. custom fabric cover included. ShelterLogic® Corp. Shelters offer storage and protection from damage caused by sun, light rain, tree sap, animal - bird excrement and light snow. Please anchor this ShelterLogic® Corp. structure properly. See manual for more anchoring details. Proper anchoring, keeping cover tight and free of snow and debris is the responsibility of the consumer.
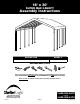
18' x 30' Super Max Canopy - 12 Leg - Parts List - Model #26767 Quantity Part # Swedged Rafter Poles 71.2 in. / 180,9 cm 12 802105 Swedged Rafter Poles 38.4 in. / 97,5 cm 12 802104 Swedged Leg Poles 75.9 in. / 192,8 cm 12 10043 Cross Rails 69.6 in.
1. LAY OUT ROOF FRAME Assembly is easiest if you lay out the roof parts as shown in the location you intend to erect the shelter. Start by assembling the center peak then assemble each side.
2. CONNECT ROOF FRAME 10017 01010 10017 802103 NOTE: Install all carriage bolts with the nut toward the center of the frame. 07000 3. PLACE COVER OVER ROOF FRAME Place cover over frame so the grommetted portion is facing down. The valance will cover the frame eaves. Leg Pole Assembly 4. ATTACH LEGS TO FEET A. Connect a leg pole (10043), to each foot plate (10050). Align holes. B. Insert one long pin (10052) through all eight legs to secure base foot. Repeat with each leg.
5. ATTACH LEGS TO ROOF FRAME After assembling the legs, lay them next to the canopy near each of the 3 and 4 way connectors. Attach all legs to one side first. Let the other side of roof frame rest on the ground. Repeat for opposite side. NOTE: See diagram. Insert one middle leg on one side of the frame, swedged end up. Insert the rest of the legs on that same side. Repeat for the opposite side. 10043 10050 6.
8. TIGHTEN THE COVER WITH TWIST TITE™ Twist-Tite™ Tighten Cover A. Wrap the cord with plastic ball and "S" hook at the corners of the cover around the corner leg poles. Insert "S" hook into the hole of the corner leg poles. Twist each leg pole until the cover becomes tight. Twist the leg poles equally to ensure the cover stays aligned during tightening. B. Secure the leg poles with the Twist-Tite™ Set.
5,5 x 9,1 m TENTE SUPER MAX™ LES TRADUCTIONS FRANÇAISES D'INSTRUCTION D'ASSEMBLAGE DESCRIPTION 5,5 x 9,1m Tente Super Max™ - 12 Pied - Blanc MODÈLE Nº 26767 OUTILS RECOMMANDÉS Lire TOUTES les instructions avant de monter. Cet abri DOIT être bien ancré. Ceci est une structure temporaire, il n'est pas recommandé d'en faire une structure permanente. Avant de commencer: Il faut 2 personnes ou plus pour le montage qui prend environ 2 heures. 1-800-524-9970 150 Callender Road Watertown, CT 06795 www.
5,5 x 9,1m Super Max Canopy™- 12 Pied - Liste de Pièces - Modèle nº 26767 Quantité Pièces : Poteau de Chevrons, Raffiné 71.2 po. / 180,9 cm 12 802105 Poteau de Chevrons, Raffiné 38.4 po. / 97,5 cm 12 802104 Poteau de Jambe, Raffiné 75.9 po. / 192,8 cm 12 10043 Rails Transversal 69.6 po.
1. ÉTALER LE CADRE DU TOIT : L’assemblage est plus facile si on étale les pièces de tuyau comme montré à l’endroit ou on veut mettre l’abri. Les pièces ci-dessous forment le cadre, commençant au centre du toit puis on monte chaque côté.
2. BRANCHER LES TUYAUX : 10017 01010 10017 802103 REMARQUE: Installer toutes les visses de façon a ce que les boulons soient dirigés vers le centre de la charpente. 07000 3. PLACER LA COUVERTURE : Placer le toit sur le cadre pour que la partie avec les œillets soit tournée vers le bas. La couverture couvre les avancées du cadre. 4. ATTACHEZ LES JAMBES AUX PIEDS A. Connectez les poteaux de jambe (10043), à chaque pied (10050). Alignez les trous. B.
5. ATTACHEZ LES JAMBES À LA CHARPENTE DU TOIT Assembler les sections droites et les poser à côté de l’abri près des connecteurs à 3 et 4 voies. Attachez toutes les jambes à un côté d'abord. Permettez l'autre côté de reposé au sol. Attachez les jambes à l'autre côté. REMARQUE: Voir le diagramme. Insérez une jambe centrale d'un côté de la charpente, bouts cannelés vers le haut. Insérez le reste des jambes de ce même côté. 10043 10050 6.
8. SERREZ LA COUVERTURE AVEC TWIST TITE™ Twist-Tite™ Serrez la Couverture A. Enroulez la corde avec la boule en plastique et le crochet de «S» aux coins de la couverture autour des poteau. Insérez le crochet de «S» dans le trou des poteaux faisants le coin de jambe. Tordez chaque poteau de jambe jusqu'à ce que la couverture soit bien tendue. Tordez les poteaux de jambe de façon égale pour assurer que la couverture soit bien alignée. B. Fixez les poteaux de jambe avec la Twist-Tite™.