8' W x 8' H or 10' H Round Style Shelter Assembly Instructions Description 8' x 8' x 8' Round Style Shelter - Gray 8' x 8' x 10' Round Style Shelter - Gray Recommended Tools Please read instructions COMPLETELY before assembly. This shelter MUST be securely anchored. THIS IS A TEMPORARY STRUCTURE AND NOT RECOMMENDED AS A PERMANENT STRUCTURE. Before you start: 2+ individual recommended for assembly, approximate time 3 hr. 1-800-524-9970 150 Callender Road Watertown, CT 06795 www.shelterlogic.
ATTENTION: This shelter product is manufactured with quality materials. It is designed to fit the ShelterLogic®, LLC custom fabric cover included. ShelterLogic®, LLC Shelters offer storage and protection from damage caused by sun, light rain, tree sap, animal - bird excrement and light snow. Please anchor this ShelterLogic®, LLC structure properly. See manual for more anchoring details. Proper anchoring, keeping cover tight and free of snow and debris is the responsibility of the consumer.
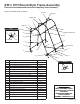
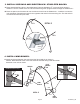
8'W x 8'H Round Style Frame Assembly Please read and understand instructions completely before assembly. Layout out frame parts as shown.
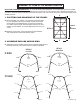
8'W x 10'H Round Style Frame Assembly Please read and understand instructions completely before assembly. Layout out frame parts as shown.
ASSEMBLY OF PEAK STYLE GARAGE SHELTER NOTE FOR FRAME EXTENSION KIT: 8’ x 8’ is the base frame dimension. Your model may have more middle ribs than shown in the illustrations. You will receive one extra rib for every extra 4 feet of building length that you purchase. The basic frame assembly will remain the same. The cover will be the correct size for the length of the building ordered. 8' 1. Plotting and squaring up the Frame: A.
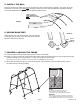
3. Install Side Rails and ShelterLock™ Stabilizer Blocks: A. Place assembled first end rib in the staked area. Place the ShelterLock™ on the upright as shown in Detail D. From the outside of the rib insert the bolt through the upright and then through the ShelterLock™. B. Place the plain end of the side rail over the bolt and nest it into the ShelterLock™. Install the nut onto the bolt and tighten. Repeat these steps for the opposite side and all of the remaining ribs.
5. Install Top Rail: Place the first top rail under each end rib and secure it with a bolt as shown in Detail F. The same cross rail should lay on top of the all middle ribs. Secure the rails to the frame with the hardware indicated in Detail F. The top rail attached to the last rib will be installed under the pipe. Install the Top Rail OVER all Middle Rib(s) UNDER First and Last Ribs 02030 02031 DETAIL F 10210 802630 6.
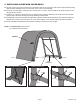
. Door and solid End panel installation A. Hold end panel at the top center with white inner surface facing inside of the shelter. Wrap the edges of the fabric panel around the end rib and pass the rails through the pre made slits in the fabric. B. Disconnect top rail from the end rib. The top cross rail should pass through the slit in the fabric, and be inbetween the webbing and rib frame. Cut slit as needed to get cover tight. Repeat Step B for side cross rails and wind braces. C.
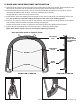
. INSTALLING COVER AND COVER RAILS A. Lay the cover on the ground next to the frame with inside of the cover (the side with the pipe pockets) facing down and the webbing on the front and rear of the corner of the building. B. Pull cover over the frame, making sure to center cover on frame. There should be an equal amount of over- hang at all four corners. C. Insert the “S”- Hook on ratchet into hole on the leg bend. Insert the webbing into the spindle of the ratchet and pull tight.