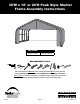
30'W x 16' or 20'H Peak Style Shelter Frame Assembly Instructions FOR SIZES: 30' W. x 16' H. 30' W. x 20' H. Recommended Tools Please read instructions COMPLETELY before assembly. This shelter MUST be securely anchored. THIS IS A TEMPORARY STRUCTURE AND NOT RECOMMENDED AS A PERMANENT STRUCTURE. Before you start: 3+ individual recommended for assembly.Assembly time is dependent upon the size of your building. Allow approximately 15 minutes for every foot in building length.
ATTENTION: This shelter product is manufactured with quality materials. It is designed to fit the ShelterLogic®, LLC custom fabric cover included. ShelterLogic®, LLC Shelters offer storage and protection from damage caused by sun, light rain, tree sap, animal - bird excrement and light snow. Please anchor this ShelterLogic®, LLC structure properly. See manual for more anchoring details. Proper anchoring, keeping cover tight and free of snow and debris is the responsibility of the consumer.
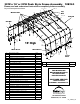
0'W x 16' or 20'H Peak Style Frame Assembly 10B163 Please read and understand instructions completely before assembly. Lay out frame parts as shown.
30'W x 16' or 20'H Peak Style Frame Assembly 10B163 Please read and understand instructions completely before assembly. Lay out frame parts as shown.
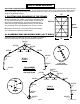
Basic Frame assembly NOTE FOR FRAME EXTENSION KIT: 30' x 20' x 16' is the base frame dimension. Your model may have more middle ribs than shown in the illustrations. You will receive one extra rib for every extra 4 feet of building length that you purchase. The basic frame assembly will remain the same. The cover will be the correct size for the length of the building ordered. 30' 1. Plotting and squaring up the Frame: A.
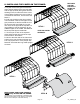
2b. Assemble End and middle Ribs (20 ft. high): Assemble end and middle ribs as shown in Detail B and Detail C. Securely fasten all of the joints with the hardware indicated. 800383 800391 800384 800384 800385 800390 800386 800385 800389 800386 DETAIL B End Ribs 800438 800438 #11131 2 3/4" Bolt All Connections 800435 20 ft. high MODEL ONLY 800435 See previous page for 16ft.
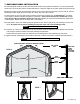
3. Install Side Rails and ShelterLock™ Stabilizer Blocks: DETAIL D A. Place assembled first end rib in the staked area. Place the ShelterLock™ on the upright as shown in Detail D. From the outside of the rib insert the bolt through the upright and then through the ShelterLock™. 11104 B. Place the plain end of the side rail over the bolt and nest it into the ShelterLock™. Install the nut onto the bolt and tighten. Repeat these steps for the opposite side and all of the remaining ribs.
5. Install Top Rail: Place the first top rail under each end rib and secure it with a bolt as shown in Detail F. The same cross rail should lay on top all of the middle ribs. Secure the rails to the frame with the hardware indicated in Detail F. The top rail attached to the last rib will be installed under the pipe. Install the Top Rail OVER all Middle Ribs UNDER First and Last Ribs DETAIL F 11134 11133 6. Install easy-hook earth Anchors: A.
7. END Door panel installation A. Hold end panel at the top center with white inner surface facing inside of the shelter. (If you purchased the white cover, the inner face has the visible weld seams.) Wrap the edges of the fabric panel around the end rib. B. Disconnect top rail (the horizontal pipes that run from front to back along the top) from the end rib. Pull the webbing (the black strap) below the cross rail. Attach top cross rail to end rib. C.
8. Installing the Cover on the Frame: A. Lay the cover on the ground next to the frame with the inside of the cover (the side with the pipe pockets) facing down and the webbing on the front and rear of the corner of the building. Position the cover so that it is centered on the frame, front to back. See Detail J. B. Fold over the side so the pipe pocket is now accessible. Insert a cover pipe into the pipe pocket slot, at the first middle rib from the front and the first middle rib from the rear.
9. Sliding cover rail assembly: A. After cover is installed and centered on frame, Insert PN (11105) Sliding cover rail into pocket on cover top. B. Inside slits/pockets in cover top, bolt 3 and 4 Way Clamps, cover and cover rail together and in to place on the frame. See Detail N. NOTE: Round head of carrage bolts should be touching cover. C. On end panels look for open slit and insert clamps inside shelter. D. Pull cover top tight and tighten bolts.
10. Securing Your Cover: A. Insert the “S”- Hook on ratchet into hole on the leg bend. Insert the webbing into the spindle of the ratchet and pull tight. Wind the ratchet so that the webbing overlaps itself. B. Insert the webbing end through the spindle of the ratchet and pull tight. See Detail P. Wind the ratchet until the webbing overlaps itself. Repeat these steps on the opposite side, then repeat this on the back side of the shelter. C.