
Instructions / Assembly


05_10B163_0EPage 12
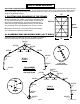
10. SECURING YOUR COVER:
A. Insert the “S”- Hook on ratchet into hole on the leg bend. Insert the webbing into the spindle of the ratchet
and pull tight. Wind the ratchet so that the webbing overlaps itself.
B. Insert the webbing end through the spindle of the ratchet and pull tight. See Detail P. Wind the ratchet until
the webbing overlaps itself. Repeat these steps on the opposite side, then repeat this
on the back side of the shelter.
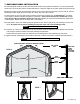
C. When all of the corners are secured, adjust the cover front to back so that it is centered. When the cover is
centered, tighten all of the ratchets. Do this in an “X” pattern to be sure it is tightened evenly. See Detail O.
D. Install the bottom cover rails (11102 and 11104) by inserting them into the pipe pockets on each side of the
cover. A 6” opening allows webbing to wrap around cover rail and base rail to secure cover. Tighten webbing
using ratchet as shown in Detail P.
DETAIL O
DETAIL P
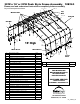
NOTE: CHECK THAT YOUR COVER IS CORRECTLY PLACED ON THE FRAME.
The ShelterLogic
®
logo should line up on the left front and right rear corners near the top rail. If the logo is not legible, the
cover has not been put on the frame correctly.
Check and
tighten Ratchets
and Cross Rails
monthly to ensure
the cover is tight.
Cover Tightening Tip
WARNING: Serious injury to persons or property could result if cover is installed and shelter is not
completed and is left unattended. Shelter must be securely anchored until completed.
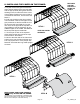
SLOT CENTERED IN
POCKET, SLIDE WEBBING
THROUGH SLOT AND
RATCHET AS SHOWN. THEN
TIGHTEN COVER DOWN,
STARTING AT ONE END
WORKING TO OPPOSITE
END ON BOTH SIDES.
ASSEMBLED
COVER RAIL
DETAIL Q
SEE DETAIL Q
DOOR AND COVER OF
SHELTER REMOVED
FOR CLARITY
Thread Webbing Into Ratchet
Webbing and Ratchets Securing Cover