
Instructions / Assembly


05_10B163_0EPage 9
Thread Webbing Into Ratchet
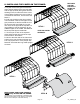
Webbing and Ratchets Securing End Panel
DETAIL I
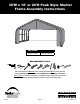
A. Hold end panel at the top center with white inner surface facing inside of the shelter. (If you purchased the
white cover, the inner face has the visible weld seams.) Wrap the edges of the fabric panel around the end rib.
B. Disconnect top rail (the horizontal pipes that run from front to back along the top) from the end rib. Pull the
webbing (the black strap) below the cross rail. Attach top cross rail to end rib.
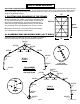
C. Remove the nut from the side rail and carefully pull the side rail away from the ShelterLock
™
(pull away
only enough to pass the webbing through the connection). If this connection has the wind brace on it re-
move the wind brace end before pulling the side rail. Replace the cross rail and wind brace. Replace the
nut and tighten. Repeat this on the other side. See Detail H.
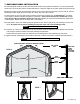
D. At the bottom, where the webbing exits the pocket on each side of end panel, pull webbing to remove the
slack. Be careful not to pull the webbing through the other side of the webbing pocket.
E. Insert the “S”- Hook on ratchet into hole on the leg bend. Insert the webbing into the spindle of the ratchet
and pull tight. Wind the ratchet so that the webbing overlaps itself.
Position the end panel so that it is centered on the building before fully tightening the end panel.
F. Tighten ratchets, alternating from one side to the other, until the end panel is centered and tight (Detail I).
7. END DOOR PANEL INSTALLATION
SIDE
CROSS RAILS
WEBBING
ZIPPERS
TOP CROSS
RAIL
WRAP END
PANEL
EDGES
TO INSIDE
OF FRAME
WRAP END PANEL EDGES TO INSIDE OF FRAME
INSIDE VIEW OF END RIB SIDE VIEW OF END RIB
WIND
BRACE
NOTE:
Keep Zippers closed when tightening end panels.
DETAIL H
NOTE:
Do Not insert any pipes into these pockets.