LED TV USER MANUAL MUAV6530Y-65864 Please read this User Manual carefully to ensure use of this product and keep this manual for future reference
Contents Safety and warnings......................................................................................1-3 Introduction................................................................................... ..............4 Installation...................................................................................................5-8 Wall Mount ...................................................................................................9 General Description...................................
SAFETY AND WARNINGS IMPORTANT SAFETY INSTRUCTION WARNING Never place a television set in an unstable location. A television set may fall, causing serious personal injury or death. Many injuries, particularly to children, can be avoided by taking simple precautions such as: – Using cabinets or stands recommended by the manufacturer of the television set. – Only using furniture that can safely support the television set. – Ensuring the television set is not overhanging the edge of the supporting furniture.
SAFETY AND WARNINGS This symbol indicates that this product incorporates double insulation between hazardous mains voltage and user accessible parts. When servicing use only identical replacement parts. This marking indicates that this product should not be disposed with other household wastes throughout the EU. To prevent possible harm to the environment or human health from uncontrolled waste disposal, recycle it responsibly to promote the sustainable reuse of material resources.
SAFETY AND WARNINGS IMPORTANT SAFETY INSTRUCTIONS Important Safety Instructions 1) Read these instructions. 2) Keep these instructions. 3) Heed all warnings. 4) Follow all instructions. 5) Do not use this apparatus near water. 6) Clean only with non abrasive dry cloth. 7) Do not block any ventilation openings, install in accordance with the instructions. 8) Do not install near any heat sources such as radiators , heat registers, stoves, or other apparatus (including amplifiers) that produce heat.
SAFETY AND WARNINGS High voltages are used in the operation of this television receiver. Do not remove the cabinet back from your set. Refer servicing to qualified service personnel. Never stand on, lean on, or suddenly push the television or its stand. You should pay special attention to children. Serious injury may result if it falls. To prevent fire or electrical shock hazard, do not expose the television receiver to rain or moisture.
INTRODUCTION Antenna Accessories Main features 43" wide screen for a complete home theater experience Super slim LCD TV with LED backlight 3840 x 2160 native resolution for UHD performance Integrated ATSC TV tuner for HDTV broadcast reception Beautiful color depth with a contrast ratio of 1200:1 HDMI ® inputs for true digital connections Infrared Remote Control...................1 User’ s M anual ............................... 1 Battery(AAA) ........................ ......... . 2 Screws..................
INSTALLATION Front panel 1: Remote control sensor. 2: Indicator LED: RED 3: Key board STANDBY. 1 3 2 ≤8m 1 3 2 5 4 7 6 8 9 0 CH INFO OK EXIT VOL CH CC/SUBTITLE ASPECT PICTURE MTS/AUDIO TTS SOUND KEYBOARD The keyboard is located at the bottom left near the right side of signal indicator. Rocker 1 2 3 SOURCE MENU V- 4 V+ 5 CH- CH+ Standby 1. Middle Button: press longtime for “power” function; press once for “source” function 2. Up/Down: CH+/3.
INSTALLATION Antenna ADAPTER (NOT SUPPLIED) OUTDOOR OR INDOOR ANTENNA OUTDOOR OR INDOOR ANTENNA (NOT SUPPLIED) PLUG 75Ω CABLE ANTENNA OR CABLE TV TWIN-LEADER FEEDER (300Ω) Note: Aerial connections:F connector. Input impendance:75 unbalanced. Power connection Please note: After unpacking, allow the TV to reach ambient room temperature before connection the TV to the mains power socket. Connect the power cord plug to the mains power socket. PRESET MODE (HDMI) RESOLUTION V.Freq.(Hz) 1 800*600 60 H.
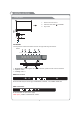
INSTALLATION Base Stand Assembly Instruction The base stand Prepare to place the TV with the display side down on a flat surface. Due to the size and weight of this TV, the use of 2 people is recommended when moving it. Ensure the table or desk you use provides a flat, totally clean surface, and use a soft cloth between the face of the TV and the table to protect the TV's screen. 1.
INSTALLATION AV Equipment You can use the rear input terminals as follows. HDMI1(ARC) USB2.0 USB2.0 HDMI V/YPbPr AUDIO R B G R W R B G R W VIDEO EQUIPMENT with YPbPr R 4 3 2 1 HEADPHONE COAXIAL W G B R WAN LAN HDMI3 HDMI2 RF HDMI Video Equipments: VCR, Multi Disc Player, DVD Player, Camcorder, Video Game, etc. Video format that YPbPr supports: 480i, 576i, 480p, 720p, 1080i, 1080p, 2160p.
Wall Mount Instruction for Wall Mount A wall mount kit (purchased separately) would allow you to mount your JVC TV on the wall. For detailed information on installing the wall mount, refer to the instructions provided by the wall mount manufacturer. It is strongly recommended to contact a technician for professional assistance for wall mount installation. JVC is not responsible for any damage to the product or injury to yourself or others resulting from the wall-mounting.
General Description Overview of remote control 1 2 3 4 5 6 7 8 9 0 CH INFO OK EXIT VOL CH CC/SUBTITLE ASPECT PICTURE MTS/AUDIO TTS SOUND Loading batteries: 1) Remove the lid of the battery compartment. 2) Insert 2 size AAA batteries with polarities as indicated inside the compartment. 3) Replace the lid. Note: 1) A loading of batteries should be last one year under normal use.
General Description Overview of remote control 1. POWER: Turn the TV on and off. 2. MUTE: Press this button to cut off the sound of the TV set temporarily, press again to resume. 3. Digital Buttons(0-9, -): Directly select channel with digital buttons. 4. CH 1 2 3 4 5 6 7 8 9 : Switch to the previous program. 6. VUDU: Press it to show channel list and favorite 0 CH 5. YouTube: If network connects, press this key to view YouTube directly. INFO list on screen. 7.
General Description Overview of remote control 17. PICTURE: Select picture mode. 18. VOL+/-: Press these buttons to adjust the volume. 19. CH˄/˅: Press these buttons to change channel upward or downward. 20. DIGITAL MEDIA PLAYER CONTROL BUTTON: Include play/pause, stop, backward, forward is used in USB mode . Please refer to relevnat instructions in the section of multimed player. 1 2 3 4 5 6 7 8 9 0 CH INFO 21.
General Description Installing Batteries in the Remote Control Installing Batteries 1 Open the battery compartment cover on the back side. 2 Insert two 1.5V AAA size batteries in correct polarity. Don´t mix old or used batteries with new ones. 3 Closed the cover. Point the remote towards the remote control sensor of the TV and use it within 8 meters. Put the used batteries into the recycling bin since they can negatively affect the environment.
External Connection Connecting VCR These instructions assume that you have already connected your TV to an antenna or a cable TV system. Skip step 1 if you have not yet connected to an antenna or a cable system.
External Connection Connecting a Camcorder The rear panel jacks on your TV make it easy to connect a camcorder to your TV. They allow you to view the camcorder tapes without using a VCR. Each Camcorder has a different back panel configuration. When connecting a Camcorder or DVD, match the color of the connection terminal to the cable. 2 Audio Cable (Not supplied) White Red L Video R Green AUDIO White Red Y/V Pb Green Pr Camcorder V/YPbPr 1 Video Cable (Not supplied) 1.
External Connection Connecting Digital Audio System This connection can only be made if there is a HDMI Output connector on the external device. HEADPHONE COAXIAL LAN HDMI3 HDMI2 RF HDMI Cable (Not supplied) What is HDMI? HDMI, or high-definition multimedia interface, is a next-generation interface that enables the transmission of digital audio and video signals using a single cable without compression.
External Connection Connecting PC The rear panel jacks on your TV make it easy to connect a Digital Audio System to your TV. TV Rear Panel Digital Audio System (Black) (Not included) COAXIAL HEADPHONE COAXIAL LAN HDMI3 HDMI2 RF 5.1 CH audio is possible when the TV is connected to an external device supporting 5.1 CH. Connect an OPTICAL Cable between the OPTICAL jacks on the TV and the Digital Audio Input jacks on the Digital Audio System.
Basic Operations Menu Operation 1 Input Setup Input Source Press key on the remote control to enter "INPUT SOURCE" menu. There are these options for you to select: "TV", "AV","Component", "HDMI1", “HDMI2", “HDMI3", “USB". Use t /u key to select a input source and press OK key to confirm.
Basic Operations Menu Operation ( To increase the volume, press VOLr key; ( To decrease the volume, press VOLs key; Mute Mute Press “ ” and the sound cuts off. The MUTE icon will appear in the lower-left corner of the screen. To resume sound, press the “ ” button again, or simply press the VOLr key. 4 Current Channel Information Press “INFO” key on the remote control to view current channel information, the indications of channel information are listed in the following table.
Menu system instruction Picture 1. Press key to display the main menu on the screen. 2. Press p /q key to select "Picture" option. 3. Press u key to enter "Picture" submenu. 4. You can also press the PICTURE key on the remote control to select one of the picture settings. Picture Sound Function Time Picture Mode Options Your TV has four picture settings (Sports, Normal,Mild,Save, User) that are preset at the factory.
Menu system instruction Sound 1. Press key to display the main menu on the screen. 2. Press p /q key to select "Sound" option. 3. Press u key to enter "Sound" submenu. 4. You can also press the SOUND key on the remote control to select one of the sound. Sound Mode Equalizer Balance 0 AVL Surround Sound Sound Mode You can select the type of the special sound effect to be used when watching a given broadcast.
Menu system instruction SOUND Digital Audio Output This is used to set digital audio output. 1. Press p /q key to select "Digital Audio Output” option. 2. Press p /q key to select “Auto” or “PCM”. Audio Language You can set the first and secondary language for audio. DAP DAP This is used to set DAP. 1. Press p /q key to select "DAP” option. 2. Press u key to enter “DAP” submenu. HDMI ARC Turn on or turn off the HDMI ARC function.
Menu system instruction Function DTVi Turn on/off ginga function CEC Link Setup CEC Link Setup 1. Press p /q key to select “Link Setup” option. 2. Press OK or u key to enter “Link Setup” submenu. Enable Link: Press t /u to turn on/off the link setup. Auto Power On: When this option is “On” and the TV is in standby mode. To turn on the DVD can also turn the TV at the same time. Auto Standby: When this Option is “On” and the TV is on, to turn off TV can also turn the DVD into standby mode.
Menu system instruction Time key to display the main menu on the screen. 1. Press 2. Press p /q key to select "Time" option. 3. Press u key to enter "Time" submenu. Off Time On Time Off Time In "Off Time” item, press u button or OK button to enter the submenu, set the day & time to turn off the TV set. Sleep Timer Auto Sleep Auto Sync Clock --:-- On Time In "On Time” item, press u button or OK button to enter the submenu, set the time to turn on the TV set, when the TV set is in the standby mode.
Menu system instruction Options 1. Press key to display the main menu on the screen. 2. Press p /q key to select "Option" option. 3. Press u key to enter “Option" submenu. OSD Language OSD Language 1. Press p /q key to select “OSD Language" option. 2. Press OK or u key to select a proper language for OSD OSD Time Set the preferred amount of time for the OSD to be displayed on the screen. Closed Caption 1. Press p /q key to select “Closed Caption" option. 2. Pressp /q key to select CC mode.
Menu system instruction Parent Control The "Parent Control" feature automatically locks out programming that is deemed inappropriate for children. The user must first enter a Password before any of the lock restrictions can be set up or changed. /q key to select “Parent Control" option. 1. Press p 2. Press OK or u key to enter “Parent Control" submenu, "Enter Password" menu will appear,enter your 4-digit password to enter “Parent Control” submenu (the \ default password is 0000, and the universal password i
Menu system instruction Parent Control Canada French 1. Press p /q key to select "Canada French " option. 2. Press OK key to open Canada French menu. RRT Setting 1. Press p /q key to select "RRT Setting " option. 2. Press OK key to open RRT Setting menu. Parent Control Set Password USA TV USA MPAA Canada English RRT Reset 1. Press p /q key to select "RRT Seset " option. 2. Press OK key to open RRT Seset menu. Block Unrated TV 1. Press p /q key to select “Block Unrated TV " option. 2.
Menu system instruction Channel Before your television can begin memorizing the available channels, you must specify the type of signal source that is connected to the TV (i.e. an antenna or a cable system). 1. Press key to display the main menu on the screen. 2. Press p /q key to select "Channel" option. 3. Press OK or u key to enter "Channel" submenu. Antenna Auto Seacin Program Edit DTV Manual Search ATV Manual Search Signal Information Antenna 1.Press p /q key to select "Antenna" option. 2.
Menu system instruction Channel Favorite(Yellow) button This function can help store the favorite program then these programs can be quickly selected. 1. Select the program which is favorite. 2. Press “Fav”(Yellow) Button, the favorite mark is displayed at the left side of the program and this program is store into the Favorites. 3.To cancel the Favorite function, enter the program edit menu, select the program and press “Fav”(Yellow) button, the favorite mark at the left side of the program disappears.
Network Setting 1.Press the “ ” to enter, then pitch on the ”Options”,and press “OK” or click the right button to enter the submenu. Picture OSD Language Sound OSD Time Function Closed Caption Reset Time Network Configuration Options Software Update(USB) Parent Control Channel Internet Update Check Network Update Information User Mode 2.Pitch on the "Network Configuration",and press "OK" or click right button to enter the "Network Configuration". STATUS WIFI LAN Fail MODE: LAN IP: 172.16.
Network Setting STATUS WIFI LAN Network Configuration IP Netmask Gateway DNS Static 172. 016. 067. 130 255. 255. 254. 000 172. 016. 066. 254 172. 016. 064. 081 Setting 4.If shows "Success",the "WLAN" on the bottom right corner will turn to green from red, and it means the network connect successfully; If shows "Fail", it means the network can not connect, please check whether the net wire and router connect successfully or not. WIFI LAN STATUS Network Configuration IP Netmask Gateway DHCP 169.
Network Setting Pitch on the "Setting",press the "OK" to confirm. If shows "Success", the "WIFI" on the bottom right corner will turn to green from red, and it means the network connect successfully; If shows "Fail", it means the network can not connect, please check whether the wireless router connects successfully or not. STATUS WIFI LAN Scan AP SSID Password Not Connected Network Configuration DHCP IP Netmask Fail000. 000. 000. 000 Gateway 000. 000. 000. 000 DNS 000. 000. 000. 000 000. 000.
Internet Press “ ” key to enter internet interface 1. NETFLIX Use arrow key to Select button, then press “ OK” key to enter NETFLIX. Sign in Get ready to watch thousands of TV shows and movies. Enter your email address 2 3 4 5 6 7 8 9 0 q w e r t y u i o p a s d f g h j k l z x c v b n m ê Email address l l 1 @gmail.com @yhoo.com.tw @hotmail.com !#$ @ Back com x ³ Next Remember Email Need help signing in? Visit http://help.netflix.
Internet Press p key to enter search interface, input the keyword and then press “OK” to search videos. 3.VUDU Use arrow key to Select button, then press “OK” key to enter VUDU. VUDU Discover, Watch & Collect the Latest Movies & TV 4.pandora Use arrow key to Select button, then press “OK” key to enter pandora.
Internet 5.Twitter Use arrow key to Select button, then press “OK” key to enter Twitter. Input the right Email and password, then select “Authorize app” button and press “OK” key to log in. Use arrow key to browse the pages. press “ press “EXIT” key to exit twitter. Red key: log in or log out twitter. Green key: refresh current page. Yellow key: write new tweet. Blue key: Search tweet.
Internet 6.Facebook Use arrow key to Select button, then press “OK” key to enter Facebook. Input the right Email and password, select “log In” button, then press “OK” key to log in. Press arrow key to browse the pages and press “OK” key to view. Press “ ” key to return the main menu. Press “EXIT” key to exit Facebook. Red key: log in or log out Facebook. Green key: refresh current page. Yellow key: sign “like” or “unlike” for current content. Blue key: view comments and add comments. 7.
Internet 8.Screencast Use arrow key to Select button, then press “OK” key to enter Screencast.
Digital Media Player Introduction This TV is embedded with one USB port digital media player. It can find the devices support USB1.1/2.0,including flash disk, USB hard disk and digital camera. It supports functions as: Display pictures. Play music files, Play video files, Display text files. Notice: 1. In order to avoid affecting the user's viewing experience, please use the better quality and shorter USB cable. 2. Play, preview some of the non-standard files may appear abnormal, please understand.
Troubleshooting If you have any problem, check the couter measures for each symptom listed below. The following symptoms may have been . caused by inappropriate adjustment rather than actual malfunction of the unit. If the trouble persists, contact the Customer Care Centre, see back page for contact details. Symptoms No power No picture Good picture but no sound Possible solutions Please check the power cord plugged in and that the power outlet works.
Troubleshooting Channel cannot be selected Check if the channel has been blocked in the main menu settings. USB not playing Please check connecting USB cable and power supply is connected. Hard drive has not been formatted. Please make sure USB disk is compatible and the multimedia data formats are supported. Picture is distorted, Compression of video contents may cause distortion macroblock, small block, especially on fast moving pictures such as sports and action dots, pixelization, etc movies.
Reference Picture defects and the reason -41-