005 WR30 Wirelless N 300Mbp 3 ps Wi-Fi Routerr User Guide 1
Copyrig ght stateme ent Is the reg gistered trad demark of Shenzhen S MTC M Co., LT TD. All the products and d product names mentioned m h herein are th he trademarks or registe ered tradem marks of theirr respective holders. Copyright of the wh hole productt as integrattion, includin ng its accessories and ssoftware, be elongs to Shenzhe en MTC Co., LTD.
Im mportant Safety In nstructio ons 1.Do not open this product p or atttempt to service it; it ma ay expose you y to dange erous high voltage or other rissks. 2.Do not operate this product near water. ot place or operate o this product nea ar a radiator or a heat re egister. 3. Do no 4.Do not expose this product to o dampness,, dust or corrrosive liquid ds. ot connect this producct or discon nnect it from a wall socket s durin ng a lightniing or a 5.Do no thundersstorm. 6.
Preface e Tha ank you for choosing MTC! Please read this user guide be efore you sttart! This us ser guide instructss you to insstall and co onfigure you ur device. This T user guide g applie es to PW50 00X, The WR3005 5 is used ass an example e throughout this user guide. g This usser guide uses the following f formats to t highligh ht special messagess: ICON Desccription T This format is used to highlight information of i importance nterest.
Conte ents Importan nt Safety Instructions............................................................................................................................ 3 Preface ............................................................................................................................................................. 4 Contentss ............................................................................................................................................................
3.7.5 Remote WEB ........................................................................................................................... 53 3.7.6 WAN Ping ................................................................................................................................ 55 3.8 Routing .............................................................................................................................................. 55 3.9 Traffic Contro ol .........................................
Chapter 1 Introduction 1.1 Prroduct Overview O w Con ngratulationss on your pu urchase of th his outstanding 300Mbp ps Wi-Fi routter. This dev vice is a 300Mbp ps Wi-Fi Acccess Point which w creattes a wireless network allowing for greater ra ange and mobility.. As a Wi-Fi Acccess Point, it can transmit wireless s data at the e rate of up to 300Mbp ps.
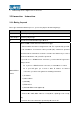
Chap pter 2Connectingg Mechanism 2.1 Ap ppearan nce 2.1.1Th he produccts front panel p The LE ED indicato or displays informatio on about the device’s status.
LE ED Na ame Sta atus Indication O Off WP PS is disable ed or conneccted WPS Ne egotiation is in n progress th hrough LE ED Blin nking Wi‐Fi Protected d Setup. The e device is po owered on S Solid S SYS The e device is po owered off orr is L LED O Off down. WA AN connectio on succeeds. S Solid W WAN L LED No o WAN connection. O Off Data is being traansmitted.
¾ Inte ernet Explore er 8 or highe er versions or o Firefox 2.3Co onnection Instrruction 2.3.1 Getting G Prepared Before you y start the e installation process, yo ou need to prepare p the following f things: Item D Description Router Find it in yourr package. Power adapter Find it in yourr package. PC Should have installed IE8 8 or higher browser. b D DHCP, PPOE E or Static IP P Internet Co onnection Tyype: 1..
3.. Ethernet Cable: C This can c be found in the product packag ge. You will need it to o connect yo our PC to this device 2.3.2 In nstallmen nt Environ nment Please follow f thes se rules whe en install an nd use: Notte z Envvironmental factor will ha ave influencce on the dis stance of wirreless transm mission. 2.3.3 Hardware H Connectio on Notte z Beffore connectting, please make sure that you ca an surf the in nternet in yo our compute er to use the reticle provided by ISP..
2) If yo ou use Resid dential broa adband, put the network k line into the WAN portt and follow the step 3-4 as a graphical shown to connect c yourr device. Set Step ps: ① Connnect the moodem. ② Please connectt reticlewhatt you ever coonnected too the computter with the rrouter's WAN port. ③ Usee another reticle to connnect your computer Etheernet port witth the routerr’s any LAN port. ④ Connnect the router’s power adapter. And the hardw ware connecction is finished.
③ Clicck Network andSharing g Center. ④ Clicck Change adapter a settings.
⑤ Clicck Local Areea Connecttion and seleect Properties. ⑥ Select Internett Protocol Version V 4 (T TCP/IPv4) and click Pro operties.
⑧ Clicck OK on thee Local Areea Connection Properties windowtto save yourr settings Notte z If yo ou need to configure c the e IP addresss manually, please p set th he PC’s IP address and router IP add dress in the same subne et, because the router’s s default IP is 192.168.1.1, the subn net mask is 255.255.255 2 .0, so your IP should se et 192.168.1.XXX; XXX cannot be 1.
C Chapter 3 Configu uring the e Device Manuallly 3.1 Log in the Router R 1. To acccess the Ro outer’s Web b-based Utility, launch a web browsser such as Internet Ex xplorer or Firefox. 2. Enterr “http://192 2.168.1.1”. Press P “Ente er”. ( You ca an login to the device’’s page thro ough the following g two domaiins: “mtc.settup.cn” or “w wr3005.setup.
Tips s z Deffault Passwo ord is “admin n” z The e default language is EN N. You can change c the la anguage be etween Engliish and Fren nch. Ô out Web page layo ge have:prrimary & seccondary navvigation bar、configuratiion zone、help informattion zone Web pag four pa arts,as sho own: Notte z Devvice does no ot support web w page, function displa ay will appe ear abnorma al, please reffer to the actu ual situation n of equipme ent software.
No N Name 1 Prrimary 2 Seccondary Descripttion User can easily Select functionss in the navigation bar S the re esults displayyed in the co onfiguration menu, Select section 3 configuration zone Con nfigure and view v area.
Cha ange the ressolution of th he screen th he help inform mation may become “?” as above shown, s if you wan nt to refer the e help inform mation pleasse click the symbol. s Notte Change the resolution of the sccreen or log gin by small screen term minal, the “navigation ba ar menu” may beccome “ ” as a above sh hown, if you want to refe er the “navigation bar me enu” please click the symbol.
Close C the sccan function Close Scan n Apply Applicattion current page configuration Cancel Cance el current pa age configurration Save Save e current pag ge configura ation Refresh Refres sh current pa age configurration Add Add item i Delete Delete e item resetOO OB resum med to not configured c m mode Backup Ba ackup curren nt informatio on Upgrade Upgrade current informatio on Reboot Reboot th he device Clear Clea ar current pa age informattion Connect Allow con nnection Discon
Here are e two modess Router and d AP: Tips s z The e default mo ode is Route er. You can change c the operation o m mode on the quick setup page. 1) Rou uter mode configure c Plug Inte ernet cable to WR3005W WAN port. Set step ps: ① Seleect “Router””. ② Clickk “NEXT”. ③ You can select “Dynamic “ IP P”, “Static IP P”, “PPPOE E” mode. ④ Clickk “NEXT” to configure the wireless information. ⑤ Clickk “NEXT”. ⑥ Clickk “Save” to coonfirm.
⑥ Clicck “Save” to confirm youur settings. Kn nowledge Expansion E z AP: The most basic b mode of multi-function is Access Point. In n this mode,, the AP will act as a ntral hotspott for differen nt wireless LAN L clients.In this mod de, this devvice connectt with up cen leve el router via Ethernet ca able, and after connecte ed, this devicce send wire eless signal,, you can surff the Interne et through co onnection with the wirele ess signal.
¾ Con nnection Cllients: displays the num mber of DHC CP clients. ¾ Sys stem Versio on:Firmware e Version. ¾ Run nning Time e: Displays the t time durration indicating how lon ng the route er has been up since starrtup. Up time e is recounte ed and rene ewed upon poweroff. p ¾ Sys stem Time: Current sysstem time on n this device. The device e automatica ally synchron nizes the system time witth Internet tiime servers. Tips s z Run nning time iss total time the t router is turned on 3.3.
¾ Gatteway: Obta ained from IS SP. ¾ Prim mary DNS Server:Obta S ained from IS SP. ¾ Sec condary DN NS Server: Obtained O fro om ISP. ¾ Con nnection Duration: Acccess metho od for dynam mic IP or PP PPOE serverr and router and ISP con nnection is properly p time ed. Tips s WA AN IP/Subne et Mask/Ga ateway/Prim mary DNS Server/Seco S ondary DNS S Server: Th his types of inform mation appe ears only if the router su uccessfully connects c to Internet via a a PPPoE or o DHCP (dynamiic IP) conne ection.
¾ LAN N MAC Add dress: The router’s r physsical address s. Tips s z The e default IP address a is 192.168.1.1. z The e default Sub bnet mask value v is 255..255.255.0 z If th he router as a DHCP server, here sh hown as ena abled.Otherw wise disable ed 3.3.4 Wireless W S Status Parame eters Speciffication: ¾ SSIID Name:T The name offWireless. ¾ BSS SID: The MA AC Addresss of Wirelesss. ¾ Cha annel:The e Channel off Wireless. ¾ Sec curity Mode e: Encryption n schemes.
Kn nowledge Expansion E z AuttoSelect: Under U the “A AutoSelect” the t wireless s signal will choice the user numb ber is the leasst channel to o improve th he efficiencyy of the signa al, it works for f most casses. z If yo ou choice other o mode, the channe el will not change all the e time not m matter the ch hannel is goo od or bad. 3.
1、Conffiguration the Internet acccess Sup pport Static IP mode、D Dynamic IP(D DHCP)、PP POE. Instrucction WA AN Connection Type If your IS SP provides s you with an Etherne et cable fro om the incoming Internet side IP information (IP P address, subnet Static IP mode ateway IP address, a DN NS server a address), yo our ISP mask, ga uses a sta atic IP conne ection.
Parame eters Speciffication: ¾ Con nnection Ty ype: Select Static IP. ¾ IP Address/Su A ubnet Mask k/WAN subnet mask/G Gateway/Primary DNS Server/Secondary DNS S Server: Enter E the ISP P information n you gathered inGettingPrepared. ¾ Clicck Save to save s your se ettings. Tips s z MTU better to choose c the default d value es. namic IP mo ode. 1.2>Dyn Set Step ps: ① Clicck “Networkk Settings”.. ② Select“WAN Seettings”. ③ Select Connecttion Type “D Dynamic IP””. ④ Clicck“Save” to confirm.
Tips s z MTU better to choose c the default d value es. OE 1.3>PPO Set Step ps: ① Clicck “Networkk Settings”.. ② Select “WAN Settings”. S ③ Select Connecttion Type “P PPOE”. ④ Entter the ISP loogin UserNaame,the IS SP login Pas ssword. ⑤ Clicck“Save” to confirm.
Kn nowledge Expansion E z MTU: Maximum m Transmisssion Unit. It is the size of the large est data packet that can n be sent ove er the network. The defa ault value is 1500. The com mmon MTU sizes s and ap pplications are a listed in the table be elow. MTU A Application 1500 T Typical for co onnections that do not use u PPOE orr VPN. 1492 U Used in PPO OE environments. 1472 M Maximum sizze to use forr pinging. (La arger packets are fragm mented.) 1468 U Used in some e DHCP envvironments.
3.4.2 WAN W Parameters Set Step ps: ① Clicck “Network k Settings”.. ② Select “WAN Parameters” P ”. ③ Select Negotiattion Mode tyype. ④ Clicck“Save” to confirm. Parame eters Speciffication: ¾ Neg gotiation mode:you m can set the va alue to match h with the sttatus Tips s 1. The router r opera ates in “Auto o-negotiation n” (or Auto) mode by de efault. Usua ally, it works for most cases. ome situatio ons, you might need to t change the t port mo ode. For exxample, if th he cable 2.
3.4.3 MAC M Add dress Clon ne Som me ISPs (In nternet Servvice Provide ers) require end-user's MAC addrress to acce ess their networkk. This featurre copies yo our current PC's P MAC ad ddress to the e router. Set Step ps: ① Clicck “Networkk Settings”. ② Clicck “MAC Ad ddress Clon ne”. ③ Youu can set thiss page from m three methods: 1、 To Restore R to Factory F Deffault MAC 1> Clickk “Restore to o factory De efault MAC” 2> Clickk Save to sa ave your setttings.
Kn nowledge Expansion E 1. Resto ore toFacto ory Default MAC: M Reset the router’s s WAN MAC C to factory d default. 2. Clone e MAC: Cliccking this button copiess the MAC address of the computter that you are now usin ng to the rou uter. Also, yo ou can man nually enter the t MAC ad ddress that yyou want to use. You havve to use the e computer whose w MAC C address is allowed by your ISP 3.
Parame eters Speciffication: ¾ Wirreless: wireless “Enable e” or “Disablle”. ¾ SSIID: It is the unique u name eof the wireless network and can be modified. ¾ Bro oadcast (SS SID): Selectt “Enable” to o enable th he router’ SS SID to be sscanned by wireless devvices. The de efault is ena abled. If you disable it, th he wireless devices d musst know the SSID for com mmunication n. ¾ BSS SID:This is the t MAC ad ddress of the e device's wireless interfface.
devvice's MAC address. a You u can find it on the label attached on the bottom m of the device. 2. If you u are not an advanced user, u it is advvisable to only change the SSID (n name of the network) and d channel an nd leave other items uncchanged. nowledge Expansion E Kn Network k Mode (802 2.11 Mode): Select a co orrect mode according to t your wirelless clients. z 11b b: This netw work mode delivers d wire eless speed up to 11Mb bps and is o only compattible with 11b b wireless cliients.
¾ Sec curity mode e:WPA – Personal、WP PA2 – Personal、Mixed WPA/WPA2 2 – Personal. Security mode Disab ble WPA – Pe ersonal WPA2 – Personal P Instruction Not open o this fun nction Supp port AES and d TKIP ciphe er types Supp port AES, TK KIP and TKIP P+AES cipher types Both WPA-Perso onal and WPA2-Person W nal secured Mixe ed WPA/WPA A2 – Person nal ess clients can c join yourr wireless ne etwork.
Parame eters Speciffication: ¾ WP PA Algorithm ms: Wi-Fi Prrotected Acccess Algorith hms. ¾ Pas ss Phrase: The T default is 12345678 8. Kn nowledge Expansion E 1. WEP: (Wired Equivalent Privvacy)is the wireless transmission of o data betw ween two de evices for encryption, to preve ent illegal ussers wiretapp ping or invad de the wirele ess networkk. 2. AES: (Advanced encryption standard) iss an iterative e, symmetricc key group p password.If selected, wirelesss speed can reach up to o300Mbps. 3.
Tip ps z Reccommended d that you choice c “WPA A-Personal” + ”AES” mode m , makke sure the wireless efficciency and ensure the e security of o wireless network. Meanwhile, M a avoid some e kind of wire eless netwo ork card doe es not suppo ort security mode, causse cannot cconnect the wireless netw work. 3.5.3 WPS W Settin ngs Set Step ps: ① Clicck “WLAN Settings”. S ② Select “WPS Settings”.
The WP PS provides below methods: ¾ PBC:Using g routers and physical or o logical buttton on a wirreless devicce to connec ct WPS.
Parame eters Speciffication: ¾ The Wirele ess Access Control C is ba ased on the MAC addre ess of the wireless adapter to determ mine whethe er it communicates with h the Router or not; 1. Select“Off” to allow all wireless clie ents to join your y wireless network. ow”allow ONLY the spe ecified wirele ess clients to o join your w wireless netw work. 2. Select “Allo ock” disallow w ONLY the e specified wireless w clien nts to join yo our wireless network. 3.
Set Step ps: ① Select Allow. ② Entter the MAC address of the wirelesss device you want to resstrict. Here inn this exampple, enter 00:12:35:EC:DF:25. ③ Clicck Add to addd the MAC address to the MAC adddress list. ④ Clicck Save to save s your se ettings.
Tip ps z The e bandwidth here refers to the channel bandwid dth instead of o wireless cconnection rate. z You u can know whether w the ere are unau uthorized accesses to yo our wirelesss network by y viewing the wireless clie ent list. 3.6 LA AN Settinggs Click“LA AN Settings””enter the LA AN Settings page, here you can con nfigure LAN port info an nd DHCP Server and a DHCP List L & Bindin ng. 3.6.1LA AN Settinggs Thiss page is to configure th he basic parrameters for LAN ports.
④ Clicck “Save” and wait for the t router re eboot automatically. Parame eters Speciffication: ¾ MA AC Address:It displayss the Routerr’s LAN MAC C address. ¾ IP Address:It A t displays the Router’s LAN L IP addrress. ¾ Sub bnet Mask:iit displays th he Router’s LAN subnett mask. Tip ps 1. Defau ult IP addresss and subnet mask are e respectively 192.168.2 2.1 and 255.255.255.0. 2. Be su ure to make a note of an ny changes you y apply to o this page.
② Select “DHCP Server”. S Parame eters Speciffication: ¾ DHCP Server:S Select whether enable or o disable th he DHCP se erver feature e. ¾ art IP Addre ess and End d IP Addres ss: You can n specify the e starting and ending ad ddress of Sta the IP address pool here. These T addre esses should d be part of the same IP P address subnet as the router’s LAN IP addresss.
1. Lease L time will be rene ewed autom matically upo on expiry. No N additiona al configurattions are n needed. 2. Iff you are no ot an advancced user, the e default DH HCP server settings s are recommend ded. In orderr to use the function of the router's DHCP serv ver, LAN in the compute er's TCP/IP protocol must be e set to “auto omatically ob btain IP”. 3.6.3 DHCP D List & Bindingg Set Step ps: ① Clicck “LAN Setttings”. ② Select “DHCPL List& Bindin ng”.
the same IP ad ddress each h time when it accesses s the DHCP server. Resserved IP ad ddresses cou uld be assign ned to serve ers that requ uire permane ent IP setting gs. Static Assignment A t Applicatio on Example: To have a PC at the e MAC addre ess of 44:37 7:E6:4F:37:3 3B always re eceive the sa ame IP addrress of 192.168 8.1.200 Parame eters Speciffication: ¾ Entter the last number n of the IP address you want to t reserve, for f example, 200.
3.7 Exxpert Setttings Click “E Expert Settings” enter the t Virtual Server S confiigure page ,here you can set “URL L Filter”, “Port Ra ange”, “DMZ Z Settings”,, “DDNS”, “R Remote WE EB”, “WAN Ping”. P 3.7.1 URL U Filter Thiss section is to set URL filtering f acce ess. If you want w to enab ble this functtion, please activate the checckbox. Selecct one policyy from the drop-down menu m and enter a policy name in the e field. Of course, you can sett the access restriction in n details (e.g g.
Set Step ps: ① Entter a Policy Name N ② Entter the Start IP and End IP here for example:1992.168.1.1000 ③ Entter part of orr the entire domain d name of the web b site you wish to restricct. Separate different dom main namess or domain name key k words with a com mma, for e example, "Y YouTube, Hollywood.com m" ④ Select time andd day ⑤ Clicck “Save” to save your settings. s Tip ps 1. Differrent URL striings must be e separated with a comma. To matcch all websittes, use * (a asterisk) 2.
the routter's firewall blocks inbo ound traffic from the In nternet to yo our compute ers except replies r to your outtbound traffic. You can use u the Portt Forwarding g feature to create exce eptions to this rule so that you ur friends can n access the ese files from m external networks. n When accessing a yo our PC from m Internet, type t "protoc col://xxx.xxx.xxx.xxx:porrt number" into i your browserr’s address or location field. f The prrotocol and port are the e ones used d by the serrvice and "xxx.
Parame eters Speciffication: ¾ Start/End Port: Enter the start/end s porrt number which w rangess the Extern nal ports use ed to set the server or In nternet appliccations. Herre in this exa ample, enterr 21. ¾ A Enter the IP ad ddress of the e PC where you want to set the app plications.He ere in this IP Address: exa ample, enterr 192.168.1.100. ¾ Pro otocol: Speciify the proto ocol required d for the serv vice utilizing g the port(s)). Select the protocol (TC CP/UDP/Both h) for the ap pplication.
⑤ Clicck“Save” to confirm. c Tip ps z The e DMZ Settin ngs screen allows a one lo ocal computter to be exp posed to the e Internet forr use of a spe ecial-purpose e service su uch as Intern net gaming or o videoconfferencing. z DMZ hosting fo orwards all th he ports at the t same tim me to one PC C. Notte 1. DMZ host posess a security risk. A com mputer config gured as th he DMZ hosst loses muc ch of the nd becomes vulnerable to attacks frrom external networks. prottection of the firewall an 2.
Set Step ps: ① Clicck “Expert Settings” S ② Select “DNNS” ③ Select “Enable”” ④ Addd “Serve pro ovider”. ⑤ Entter the “Userr name” andd “Password d” ⑥ Entter “Domain n Name” ⑦ Clicck “Save”to confirm. c Tip ps 1. To use the DDNS S feature, yo ou need to have an acco ount with one e of the Servvice Provide ers in the wn menu firrst. drop-dow 2. This router r suppo orts five DDN NS service providers: p DynDNS.com D m and 88ip.ccn and 3322.
¾ Dom main name: Enter the effective e reg gistered dom main name. 3.7.5 Remote R W WEB This secction is to alllow the netw work adminisstrator to ma anage the ro outer remote ely. If you wa ant to access the t router re emotely, plea ase select “Enable”. Set Step ps: ① Clicck“Expert Seettings”. ② Select “Remotee WEB”. ③ Entter the Port ④ Clicck “Save” to confirm. Parame eters Speciffication: ¾ Porrt: The mana agement po ort to be ope en to outside e access. Tip ps 1.
2. Make e sure yourr WAN IP address a (Intternet IP ad ddress) is a public IP address. Private IP addressses are not routed r on the e Internet. 3. It is unsafe u to ma ake your rou uter remotely accessible e to all PCs on external network. For F better security,, we suggesst that only enter e the IP address a of the t PC for re emote mana agement Remote e Web Mana agement Ap pplication Example: E To accesss your router (WAN IP address: 17 72.16.87.160 0) at your ho ome from the e PC (210.16.87.
3.7.6 WAN W Pingg The e ping test iss to check the status off your intern net connectio on. When disabling the test, the system would w preve ent the ping test from WAN. W Set Step ps: ① Select the e “Expert Se etting” ② Select the e “WAN Ping” ③ Select the e “Enable” 3.8 Ro outing In this page you can n view the ro outing table information.
¾ Des stination IP P: The IP address a of the final de estination. “0.0.0.0” “ ind dicates any network seg gment. ¾ Sub bnet Mask: The subnett mask for th he specified destination. ¾ Gatteway: This isthe next router r on the e same LAN N segment ass the router to reach. ¾ Inte erface: The interface be etween yourr router and the final desstination. 3.9 Traaffic Conttrol Trafffic control iss used to lim mit communiication spee ed in the LAN N.
Tip ps 1. 1M=128KByte/s. 2. The volume of uplink u trafficc/downlink traffic t should d not be larger than th hat allowed on your router's WAN (Intern net) port. Yo ou can ask your y ISP to provide p the volume v of In nternet traffic c. 3. The bandwidth b fo or ADSL/DSL L line usually refers to th he download d bandwidth h Bandwiidth Contro ol Applicatio on Example e: You sha are a 4M-bro oadband servvice with your neighbor (at 192.168.1.102).
Set Step ps: ① EnaableTraffic Control: Chheck the Enaable box to enable the Traffic T Contrrol feature. ② IP Range: R Ente er the last number n of th he IP addres ss. Here in this examplle, enter 101 in both boxxes. ③ Up:: Set a limit to regulate upload u band dwidth of PC Cs on the LA AN. Here in tthis example e, enter 32 in i first boxess, and 256 in second bo ox. ④ Dow wn: Set a lim mit to regula ate download d bandwidth h of PCs on the LAN. ⑤ App ply: Check to t enable the current rule.
Tip ps Con nfigured time e and date info will be lost l if the de evice gets disconnected d from powe er supply. Howeve er, it will be updated au utomaticallyy when the device reco onnects to IInternet. To activate time-bassed features (e.g. firew wall), the tiime and da ate info sha all be set ccorrectly firs st, either manually or automa atically Set Step ps: ① Clicck “System Tools”. ② Select “Time Settings”.
3.10.2 Backup/R Restore Parame eters Speciffication: ¾ Bac ckup: Click this button to t back up th he router's configuration c ns. ¾ Res store: Click this button to t restore th he router's co onfigurations. Set Step ps: ① Clicck “System Tools”. ② Select “Back/R Restore”. ③ “Baackup” to keeep parametters. ④ Clicck “Browse”” to add an file f ⑤ Clicck “Save” Notte The e default con nfiguration file name is “RouterCfm. “ .cfg”. Do incclude the file e name suffix x of “.
3.10.3 Restore to t Factoryy Set Step ps: ① Clicck “System Tools”. ② Select “Restorre to Factorry”. Parame eters Speciffication: ¾ Thiss “Restore” button is to o reset all co onfigurations s to the defa ault values. It means the Range Extender will lo ose all the settings s you have set. So S please note n down th he related settings s if neccessary. ¾ Deffault Passw word: admin ¾ Sub bnet Mask:2 255.255.255 5.0 ¾ Deffault IP:192.168.1.
2> >You cannott access Inte ernet and your ISP or our o technica al support asks you to reset r the router. 3.10.4 Firmware eUpgrade The e router pro ovides the fiirmware upg grade by clicking the “Upgrade”aftter browsing g for the firmware e upgrade packet. Afte er the upgra ade is completed, the rou uter will rebo oot automattically. Set Step ps: ① Clicck “System Tools” ② Select “FirmwaareUpgradee” ③ Clicck “Browse””, select the upgrade filee ④ Clicck “Upgradee”, and wait for it to com mplete.
3.10.5 5 Reboot When a certain feature does d not takke effect orr the device e fails to fu unction correctly, try ng the device e. rebootin ¾ Reb booting the Wifi W Router is to make th he settings configured c g into effect or to set th go he Range Extender again n if setting fa ailure happens. 3.10.
Set Step ps: ① Clicck “System Tools” ② Select “Changee Password d” ③ Entter “Old Passsword”“New w Password d”and“Conffirm New Pa assword” ④ Clicck “Save” to save you seettings. Tip ps z z The defa ault login pa assword is admin. a e valid passw word must be b between 3~12 characters and on nly include letters, numbers and The und derscore 3.10.7 System Lo og The secction is to vie ew the syste em log. Clickk the “Refres sh” to updatte the log. Click the e “Clear” to clear the sccreen.
Set Step ps: ① Clicck “System Tools” ② Select “System m Log” ③ Clicck “Refresh”” can updatee the informaation ④ Clicck “Clear” too clear the sccreen 65
A Appendix x 1 Con nfigure PC P TCP/IP Setting gs Windo ows 7 ① Clicck Start -> Control C Pan nel.
② Clicck Network and Interneet. ③ Clicck Network andSharing g Center.
④ Clicck Change adapter a settings. ⑤ Clicck Local Areea Connecttion and seleect Properties.
⑥ Select Internett Protocol Version 4 (T TCP/IPv4) and click Pro operties.
⑦ Select Obtain an IP addreess automattically and click OK.
⑧ Clicck OK on thee Local Areea Connection Properties windowtto save yourr settings.
Windo ows XP ① Right-clickk My Networrk Places and select Prroperties. ② Right click Local Area a Connectio on and selec ct Propertie es.
③ Select Inte ernet Protoc col Version n 4 (TCP/IPv v4) and clickk Properties s. ④ Select Obttain an IP address auto omatically and click OK K.
⑤ Click OK on o the Locall Area Conn nection Pro operties windowto save your setting gs. 2 Troublesho ooting The Troubleshootting provid des answe ers to com mmon prob blems rega arding the Router Adapterr: 1.The System S LED D does not light up. Ans. Ch heck the follo owing: a)Make sure that the Router Ad dapter is pro operly plugge ed into a pow wer outlet. ugging anoth her electric d device into itt. b)Make sure the power outlet iss active (worrking) by plu ug the Routter Adapter to the pow wer outlet.
a) Make e sure that the Ethernet cable (R RJ-45) is pro operly conn nected to th he Router Adapter’s A Ethernet port. b) Make e sure that the other end e of the Ethernet ca able (RJ-45 5) is properlly connecte ed to the compute er LAN card or to you Cable/xDSL C E Ethernet porrt. c) Make e sure your computer c LA AN card is prroperly insta alled and con nfigured. d) Make e sure your Cable/xDSL C broadband access is working w and configured c ccorrectly.
WR3 3005_XXXX XXX(where XXX XXXX is the last six charracters in the devic ce's S SSID MAC C address) You can find itt on the label attacched to the device.
② Selecct Manage Wireless Ne etworks.
③ Selecct the wirelesss network and click Re emove netw work.
Windo ows XP ① Right-click My Ne etwork Plac ces and sele ect Propertiies. ② Right click Wirele ess Networrk Connection and then n select Properties.
③ Click Wire eless Netw works, sele ect the wirreless netw work name under Pre eferred works and then t click the Remove button. b netw 5 Safety S an nd Emisssion Stattement Warrning: Chan nges or mo odifications to this unit not expre essly appro oved by the e party resp ponsible for compliance could void the t user’s authority to operate o the e equipment.
com mmunicationss. Howeverr, there is no guarante ee that inte erference w will not occu ur in a partticular installation. If thiss equipment does cause e harmful intterference to o radio or tellevision rece eption, whicch can be determined d by turning the equipm ment off an nd on, the user is enco ouraged to try t to correcct the interferrence by one or more of the followin ng measure es: ¾ Reorient orr relocate the receiving antenna. ¾ Increase th he separation between the t equipme ent and receiver.