
User's Manual

(1) Prepare the UAV:
Keep the UAV in horizontal condition.
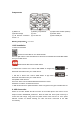
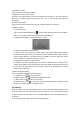
(2) Adjust the camera’s pitch angle:
As shown in the figure below, the camera supports 5 pitch angles: 0° (the lens faces the
front), 15° in elevation (push the lens up), or -30°, -60° or -90° in depression (push the
lens down).
(3) Power on the UAV:
Long press the power switch for 3s until the red power indicator is turned on.
(4) Start the flight:
(a) Take Off / Land
Tap the quick takeoff/landing icon “ ”, and the UAV will take off to the 1.5m altitude.
Tap such icon again, and the UAV will land to the takeoff point.
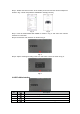
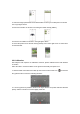
(b) Flight Control Mode – Joystick Mode (U.S. hand)
(c) Flight Control Mode – Motion Mode
In motion mode, tap and hold the motion button and tilt the mobile phone forward,
backward, left or right to control the UAV to fly forward, backward, left or right. Slide the
motion button up/down to increase/reduce the altitude of the UAV. Slide the motion
button left/right to change the heading of the UAV.
(d) Flight Control Mode – Headless Mode
In headless mode, the operating steps are not much different from in remote control
modes. The heading can be changed freely. No matter which angle the UAV has turned
to, the end in the same direction as the remote control will be considered as its tail by
default (easy to operate).
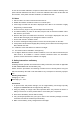
(5) Start shooting/recording:
The UAV supports 4 shooting/recording modes:
(a) Single shot: tap “ ” to shoot one photo.
(b) Normal video: tap “ ” to start/stop recording the video.
(c) Short video: tap “ ” to record a 12s video.
(d) Rotary camera: tap “ ” to rotate the heading clockwise by 360°, throughout which
process, the camera keeps recording the video.
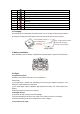
VII. Sharing
Enter the album, select the photos/videos to be shared and tap [Download]. Disconnect
the mobile phone from the UAV’s Wi-Fi hotspot and connect it to your data traffic network
or Wi-Fi network. Tap the album icon on the AEE ZONE and select the photos/videos to
be shared.
1. Select [Camera Album] as shown in the left figure below.