. . . . . S41B AEE . . User manual aee.com Contents Precautions.................................................................................................... 2 Preface .......................................................................................................... 2 Warranty ........................................................................................................ 2 List of Accessories .......................................................................................
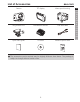
List of Accessories aee.com Camera TFT display Water-proof housing Plug bracket unit Flat Adhesive Mount USB data cable Quick start guide CD-ROM Moisture-proof foam The accessories you've received may be slightly different from above. The package is subject to change without further notice.
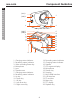
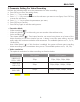
Component Guideline aee.com EN DE ES PT IT EL FR NL PL CS DA HU SV FI NO RU ( L1 ) 1 5 ( L2 ) 2 3 4 6 ( L3 ) 7 ( L4 ) 8 9 10 11 12 13 17 18 19 20 21 22 23 24 25 26 14 15 16 1. Charging status indicator 2. Recording status indicator 3. Video recording/Power key 4. Microphone 5. Lens 6. Tripod mount 7. Charging status indicator 8. Recording status indicator 9. Up key 10. Down key 11. OK key 12. Left arrow key 13. Right arrow key 14. Recording status indicator 15. Charging status indicator 16.
aee.com 2.
aee.com EN DE ES PT IT EL FR NL PL CS DA HU SV FI NO RU 3.
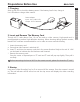
Preparations Before Use aee.com 1. Charging EN Start up the unit to check the battery power. If the battery level is low, charge it. Use USB cable to charge video camera: Power adapter Input: 100~240V 0.5A Output: DC 5V 2000mA 2. Insert and Remove The Memory Card Though all TF cards above Class 10 can be used on video camera, high-speed card is recommended to perform high-definition shooting.
Video Modes aee.com EN DE ES PT IT EL FR NL PL CS DA HU SV FI NO RU 1. Basic Operations of Video Recording a. b. c.
aee.com 3. Parameter Setting For Video Recording EN Perform the following steps to set the parameters for video recording: a. Press "M" key to enter the setting menu; b. Press "+" / "-" key to select " "; c. Press "<" / ">" key to move cursor to the sub-menu you want to configure, Press "OK" key to enter the sub-menu; d. Press "<" / ">" key to select the parameters you want; e. Press "OK" key to confirm; f. Press "M" key again to exit the setting menu.
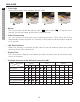
aee.com EN DE ES PT IT EL FR NL PL CS DA HU SV FI NO RU • View Angle Optional view angle: Wide, Medium, Narrow, Small. : Wide : Medium : Narrow • Bitrate This unit provides two bit rate options: high " " and normal " selected, you will get clearer picture with increased file size). : Small ". (If high bit rate is • Video Content Loop You can activate or deactivate loop recording function.
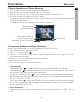
Photo Modes aee.com 1. Basic Operations of Photo Shooting a. b. c. d. - EN Turn on video camera to enter recording standby mode; Cast the lens to the subject and preview it on the display; Press the "Shutter" key once to switch the working mode to "photo modes"; Press the "Shutter" key again to shoot one photo.
aee.com EN DE ES PT IT EL FR NL PL CS DA HU SV FI NO RU • Display Time You can choose to display or not display the photo shooting time at the bottom right corner of the photo.
Settings aee.com To set parameters, perform the following operations a. Press "M" key to enter the camera setting menu; b. Press "-" / "+" key to select " "; c. Press "<" / ">" key to move blue cursor to the sub-menu you want to configure, Press "OK" key to confirm; • Warning Tone Adjust the loudness or mute of buzzer. three modes are available: Off, Medium(50%) and Standard(100%). • Status Indicator Activate or deactivate the status indicators. three modes are available: Off and On.
Playback aee.com EN DE ES PT IT EL FR NL PL CS DA HU SV FI NO RU 1. Operating Procedure for Playback a. Press the "playback" key to enter playback interface; b. Press "Video recording" key to select the file type and press "OK" key to confirm; : View video files : View photo files : View all video/audio/photo files c. Press "<" / ">" / "+" / "-" key to move the cursor to the thumbnail of the file you want to play back; d. Press "OK" key to enter the playback interface and press "OK" key to play it.
aee.com - When playing audio files, the functions of various keys are listed as below: Key - Functions Key + Decrease volume; Press it to return to the file preview interface; OK Functions Increase volume; Play/pause. 2. Delete Files a. Under file playback or thumbnail preview mode, move the cursor to the file icon you want to delete; b. Press "M" key to enter file operation mode and move the cursor to "Delete file"; c. Press "OK" key to confirm; d.
Accessory Application aee.com EN DE ES PT IT EL FR NL PL CS DA HU SV FI NO RU Water-proof Housing and Moisture-proof Foam In order to avoid and reduce the dewing on the glass of the water-proof house, we suggest inputting the moistureproof cotton inside the water-proof case in big temperature range environment.
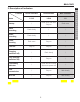
Specifications aee.com Description Specifications Visual angle 130° Aperture f/2.4 Digital zoom ratio 4X Pixel 8 million Video recording format MP4 Audio recording format WAV Photo format JPG (JPEG) WiFi-Distance/Mobil Device 100 Meter (Max.) Storage medium Up to 64GB external TF card Standard battery capacity 1250mAh Recharging duration USB Cable: About 3.5 hours Maximum video recording time About 3.0 hours (Max.) Maximum audio recording time About 5.0 hours (Max.
Tips aee.com EN DE ES PT IT EL FR NL PL CS DA HU SV FI NO RU 1. When the unit is in used for long period, it is natural that its surface temperature will rise. 2. If you will not use the unit for long period, it is suggested that you charge it once every 6th month to maintain the performance of battery. 3. Use of digital zooming function during shooting will have slight impact on the image quality. 4. The visual angles under different modes will be slightly different. 5.
FCC Information and Copyright This equipment has been tested and found to comply with the limits for a Class B digital device, pursuant to part 15 of the FCC Rules. These limits are designed to provide reasonable protection against harmful interference in a residential installation. This equipment generates, uses and can radiate radio frequency energy and, if not installed and used in accordance with the instructions, may cause harmful interference to radio communications.