English User's Manual 2.4GHz Wireless Remote Control Camera Kit Model: 601LD 2.4GHz Wireless Camera BT601 2.4GHz Wireless Receiver LR255 Please read this manual carefully and thoroughly before any attempt to install and operate this product and retain it for your future reference.
This device complies with Part 15 of the FCC Rules. Operation is subject to the following two conditions: (1) This device may not cause harmful interference. (2) This device must accept any interference received, including interference that may cause undesired operation. Changes or modifications not expressly approved by the party responsible for compliance could void the user's authority to operate the equipment.
EU Environmental Protection Waste electrical products should not be disposed of with household waste. Please recycle where facilities exist. Check with your Local Authority or retailer for recycling advice.
TABLE OF CONTENTS INTRODUCTION Notice Approval Information (FCC/CE) Restrictions Maintenance PRODUCT Package Contents Feature Locations Adapter INSTALLATION & USAGE Installation Receiver Remote Control Function Channel Looping Setup 1~3 1 1~2 3 3 4~6 4 5 6 7~10 7~8 9 10 SPECIFICATIONS 11 TROUBLESHOOTING 12
INTRODUCTION Thank you for your interest and support in our product and purchasing this wireless camera kit. This product works at ISM-2.4GHz frequency band, which could be legally used worldwide without permission. We feel confident that you will be pleased with the quality and features of this product. The camera features one CMOS image sensor and a transmitting module to capture the image and transmit them wirelessly. The receiver features a receiving module to receive and output AV signals.
FCC This equipment has been tested and found to comply with the limits for a Class B digital device, pursuant to Part 15 of the FCC rules. These limits are designed to provide reasonable protection against harmful interference in a residential installation. This equipment generates, uses and can radiate radio frequency energy and, if not installed and used in accordance with the instructions, may cause harmful interference to radio communications.
Restrictions 1. DO NOT use this product to violate one's privacy. Monitoring one's activities without consent is illegal and this product is not designed and manufactured for such purpose; 2. DO NOT put this product near any medical equipment. Radio waves might potentially cause breakdown of electrical medical equipment. So this product should be placed at least 1 feet away from any heart pacemaker. Radio waves might potentially influence heart pacemaker and lead to respiratory disturbance; 3.
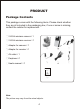
PRODUCT Package Contents This package comes with the following items. Please check whether they are all included in the packaging box, if one or some is missing, contact the retailer for replacement. ① 2.4GHz wireless camera×1 ② 2.4GHz wireless receiver×1 ③ Adapter for camera×1 ④ Adapter for receiver×1 ① ② ③ ④ ⑤ ⑥ ⑤ AV cable×1 ⑥ Earphone×1 ⑦ User's manual ×1 ⑦ Note: The picture may vary from the actual objects.
Adapter This product always conforms to the authenticated AC adapter.
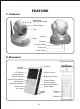
FEATURE 1. Camera Rotate Axis (by Remote control) Infrared Lights Lens Antenna Base Indicator Channel Switch Power Jack Power Switch 2.
INSTALLATION & USAGE Installation 1. Locate the camera to a specific position. 2. Connect the camera to the adapter (DC 9V 1.5A) and then slide the power switch to ON position. The power indicator lights up. 3. Connect the receiver to the adapter (DC 9V 1.5A) and slide the power switch to ON position. Notes: This receiver can also work on dry battery. Please load 4 AAA batteries to the battery compartment with their polarities matched.
The AC adapter will work instead of batteries after it is plugged. If the receiver is left unused for a long time, please unplug the adapter and remove the batteries. 4. Set the channel of receiver same as that of camera by pressing the channel button continuously, and the pictures are displayed on the LCD screen. Note: For more clear pictures, please connect the receiver to a monitor/TV with AV cable. Monitor/TV 5. Adjust the brightness and volume of the receiver to a satisfied level.
Receiver Remote Control Function The receiver can remote control the power and direction of the camera. The operation is as below. Remotely control the camera's power Press the CAM. ON/OFF button on the receiver to power on the camera; press the button again to power off. Note: If the channel indicator CH1 on the receiver lights up, the camera at channel 1 can be remote controlled. Remotely control the camera's direction 1.
Channel Looping Setup The receiver supports up to 3 cameras working at the same time. You could press and hold the CHANNEL button on the receiver for 2 seconds to enable the automatic looping function. The channels are shown on the monitor/TV one by one every 5 seconds. Press the CHANNEL button on the receiver again to exit the looping function. You can press the CHANNEL button to manually select the channel.
RECEIVER CAMERA SPECIFICATIONS Imaging Sensor CMOS Total Pixels View Angle Minimum Illumination Transmission Frequency Transmission Power Modulation Type Bandwidth Power Supply Consumption Current Horizontal Rotating Angle Vertical Rotating Angle Unobstructed Effective Range Night Vision Range Dimensions(W × D × H) Weight LCD LCD Resolution Receiving Frequency Intermediate Frequency Demodulation Type Receiving Sensitivity Power Supply Consumption Current Dimensions(W × D × H) Weight Operating Tempera
TROUBLESHOOTING When you experience the operation problems, please check and try the following yourself before claiming that it is the defective product or consulting the experienced technician. Trouble No image Snowflake Image Shaded picture Possible Solution No sound Noisy sound Normal sound 1. Check the power supply. 2. Make sure that both the camera and receiver are connected with power adapter. 1. Check the receiver channel setting to make sure that the channel is set to match the camera. 2.