English User's Manual Wireless Back-up Kit Weather-proof Model:002CF Please read this manual thoroughly before any attempt to install and operate this product and retain it for your future reference.
Approval Information (FCC/CE) PRODUCT Features Package Contents Feature Locations INSTALLATION & USAGE Camera Installation Find Reversing Power Find Anode +12V SPECIFICATIONS TROUBLESHOOTING 2~3 4~5 4 4 5 6~11 6~7 8 10 12 13 EU Environmental Protection Waste electrical products should not be disposed of with household waste. Please recycle where facilities exist. Check with your Local Authority or retailer for recycling advice.
INTRODUCTION Thank you for purchasing our car back view monitor. This product works at ISM-2.4GHz frequency band, which could be legally used worldwide without permission. We f eel confident that you will be pleased with the quality and features of this product. The product is made of alloyed shell and special weather-proof enclosure that protect it against power and water sprays. It passed the IP65 testing. The product offers a new solution and experience for drivers.
while working. These standards and indexes are certificated by academic organization and represent the cogitative research of the scientific workers who continuously explore and annotate the involved fields. So we believe that our products are safe for customers. Approval Information All our products meet the requirements of approval FCC or CE, and are granted the FCC or CE certification. They are authorized to bear FCC or CE mark.
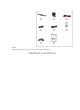
Features » 380TV lines clear picture display » 95° view angle for wide eyeshot» IP65 water resistance design for outdoor usage » Automatically start up the rear view images while reversing » 2.4”LCD screen display for vivid and bright images» Easy installation, suitable for cars and buses Package Contents This package comes with the following items. Please check whether they are all included in the packaging box, if one or some is missing, contact the retailer for replacement.
Note: The picture may vary from the actual object.
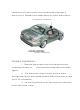
INSTALLATION We strongly recommend you ask qualified technician or maintenance engineer to install this device.
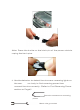
installation of this monitor may cause battery leakage or short circuit. Please follow steps below to install the product. LCD Monitor Installation Camera Installation Camera Installation 1 Remove the screws from the license bracket, locate the camera on the license bracket and screw them tightly. 2 Put the power wires in order and put them through the hole of the license bracket then place them on the trunk for connection. 3 Connect the black pin of the camera to the black pin of the power cable.
Note: Press the buckle on the black pin of the power cable to unplug the black pins. 4. Use the detector to detect the wire near reversing lights on the rear car body to find reversing power then connect the wire correctly.
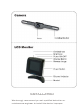
Power Jack
Find Reversing Power How to use the detector to find the power from the reverse power? 1 Step on the reverse gear. 2 Clip the pincers to the metal of the car body. 3 Use the red pen to find the power by thrusting into the tape. Make sure the penpoint touch the wire core. 4 If the LED light is on, find out the light wires. 5 Push the switch to the parking and use the red pen to detect it, if the light turns off, then the wire is the reverse power.
Red wire connects to Anode +12V Black wire grounded Power Jack Find Anode +12V How to use the detector to find the power from the Anode +12V? 1 Tweak the key to the right side of the cigarette lighter. 2 Clip the pincers to the metal of the car body. 3 Use the red pen to find the power by thrusting into the thick tape. Make sure the penpoint touch the wire core. 4 If the LED light is on, find out the light wires. 5 Tweak off the key, if the light turns off, then the wire is the anode +12V.
6 Connect the anode +12V power wire with the red wire of the receiver and tie them together with the electronic tape Find Ground Wire Start the car and tweak the key reverse. Clip the pincers to the reversing wire. Use the red pen to find the power by thrusting into the tape (most of the ground wire are black wires). If the light is on, the wire is ground wire.
The whole connection is finished! Then you can see the back situationsvia the LCD monitor.While reversing, the LCD monitor will display the back situations. However, it will convert into standby mode in non-reversing status. Maintenance Do not shake or strike the product. Do not disassemble or repair the camera; doing so may cause damages to the product. Do not use solvent such as gasoline, cleaner or antistatic spray to clean the screen. Turn off the camera/receiver if the system is not in use.
628*582(PAL) nsmission Frequency ISM 2,400~2,483MHz Transmission Distance Approximal 50m Without Block Operating Temperature -30~75℃/-22℉~+167℉ Storage Temperature -40~80℃/-40℉~+176℉ Operating HumidityCa ≦80%RH Operating Conditionm Car, Bus and Truck Signal Noise Radioera 40dB(AGC OFF) Horizontal Resolution View Angle Minimum Illumination Weatherproof Degree Power Supply Dimensions Weight Display Receiving Sensitivity LCD Resolution Signal Noise RadioDi Operating Temperature 380TV Lines 95° 1
* Specifications are subject to minor change without prior notice. TROUBLESHOOTING When you experience the operation problems, please check and try the following yourself before claiming that it is the defective product or consulting the experienced technician. Abnormal Phenomena Monitor does not work The video is unclear Possible Reasons/Solutions Check if the fuse is connected well. Check whether the camera/LCD monitor connected to power supply and powered on.
cold or too hot.