
User's Manual
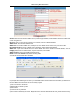
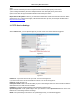
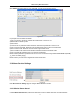
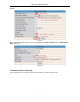
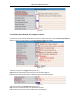
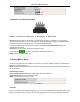
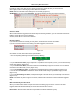

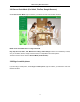
Table Of Contents
- 1 WELCOME
- 2. SOFTWARE OPERATION
- 3 Settings as Administrator
- 3.1 Multi-Device Settings
- 3.2 Network Settings
- 3.3 Basic Network Settings
- 3.4 Wireless Lan Settings
- 3.5 ADSL Settings
- 3.6 UPnP Settings
- 3.7 DDNS Service Settings
- 3.8 System Settings
- 3.9 Alias Settings
- 3.10 Date &Time Settings
- 3.11 Users Settings
- 3.12 PTZ Settings
- 3.13 Indicator Settings
- 3.14 Backup & Restore
- 3.15 Other Settings
- 3.16 Mail Service Settings
- 3.17 FTP Service Settings
- 3.18 Alarm Service Settings
- 3.19 Send Mail on Alarm
- 3.20 Path Settings
- 3.21 Server Push Mode (For Safari, FireFox, Google Browser)
- 3.22 Sign in mobile phone
- 4. APPENDIX
- 5. Specifications
- 6. OBTAINING TECHNICAL SUPPORT

MoreSecurity,MoreConvenience
3.20 Path Settings
Î
Figure 10.8
Here you can set record path and alarm record path for the camera.
Figure 10.9
Record Path: Here you can set the manually record path. Click , then start manually record, the
record file will be saved to the specified path here set.
Alarm Record Path: Here you can set the alarm record path. When the motion triggered, and record enable, it
will start alarm record automatically, the record file will be saved to the specified path here set
.
Figure 11.0
NOTE: If you couldn’t set the path here in Windows 7 or Vista, please do it as below:
Windows7 or Vista’s security level is higher than Windows XP/2000, for “Path Settings”
1. User could add the Device IP address to the IE’s ‘Trusted sites’ firstly. The step is:
“IE browser→Tool→Internet Proper→Security→Trusted sites→Sites→Add”.
2. You can also run the IE as administrator, input the IP address of the camera manually. (Figure 11.1)
Figure 11.1
48