Dreamer 1 User Manual www.potensic.
CONTENTS INTRODUCTION 01 MAINTENANCE 01 PACKAGE INCLUDES 01 PRODUCT DIAGRAM 02 BLADES 03 BATTERY 04 CAMERA 05 MICRO SD CARD 05 REMOTE CONTROLLER 06 PHONE CLIP 08 REMOTE CONTROLLER CHARGING 08 CONTROLLING THE AIRCRAFT 09 DRONE APP “POTENSIC PRO” 10 CONNECTION 13 SPECIFICATION 21 DRONE STATUS AND INDICATOR STATUS DESCRIPTION 23 NOTES AND DISCLAIMER 23 WARNING 25
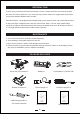
INTRODUCTION Thank you for purchasing the Potensic Dreamer 1 Drone. Please check this user manual carefully and save it for future reference. If you need any help, please contact our support team and provide your product Amazon/Website order number. Potensic Dreamer 1 is equipped with intelligent flight control system, which can realize the functions of way-point flight, intelligent follow, and auto return home.
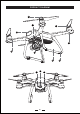
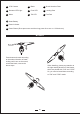
PRODUCT DIAGRAM 4 7 3 2 6 5 1 8 11 10 02 12 9
1 2.7K Camera 4 Blade 7 Shock Absorber Plate 2 Dreamer LED Light 5 Front LED 8 Landing Gear 3 Motor 6 Tail LED 9 Foot Pad 10 Smart Battery 11 Power Indicator 12 Power Button (Short press once and then long press 2s to turn on / off the drone) BLADES Press down and rotate according to the marked direction of blade locking until it can not be turned; unload the blade, reverse the above steps.
BATTERY BATTERY CHARGING When the drone's power is too low, please fly the drone back and charge the battery in time. Connect the adapter to charge the battery. When charging, the indicator flashes. When full charged, the battery indicator lights will be off. The full charging time is about 2 hours. WARNING 1. Please charge the battery with a professional charger. 2. Do not charge on the carpet in case of fire. 3. Recharge every 3 months or so to keep the battery active. 4.
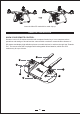
CHARGING INDICATOR STATE LED 1 LED 2 LED 3 LED 4 Current battery capacity 0%~25% 25%~50% 50%~75% 75%~100% Full Flashing status Lights out state CAMERA 1. Install the shock absorber ball on the shock absorber board and install the anti-tripping device. 2. Insert the power cable and steering wire of the camera into the connector of the aircraft adapter board, respectively. 3. Close the connecting wire cover. MICRO SD CARD Inset the Micro SD card into the camera SD card slot.
Insert the Micro SD card with its metal chip up. REMOTE CONTROLLER KNOW YOUR REMOTE CONTROL Dreamer1 uses a 2.4G remote controller with complete function keys. It can complete various operations and settings of aircraft and the camera within a maximum communication distance of 500 meters and display high-definition pictures on mobile devices in real time through App “Potensic Pro”. The remote controller is equipped with rechargeable lithium batteries, which can work continuously for up to 4 hours.
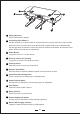
8 10 7 11 1 Folding Antenna Receive transmission signals 2 Controlling Stick (Mode1 ) Pull the left stick up or down to take off and land the drone, pull the stick left or right to let the drone turn left or turn right. Short press the left stick to switch GPS mode or Attitude mode. Pull the right stick up or down to control the drone fly forward or backward, pull the stick left or right to let the drone left side or right side fly. 3 Power Button Long press to turn on / off the remote.
PHONE CLIP Pull the remote control plate, and put your phone or tablet into it. Phone clip telescopic range: 97-178mm. REMOTE CONTROLLER CHARGING CHARGING INSTRUCTIONS Connect the Micro USB interface of the remote controller to charge the most commonly used 5V/2A charger. Full charging takes about 2 hours.
CONTROLLING THE AIRCRAFT There two remote control modes for controlling the aircraft, mode 1 and mode 2. And the remote control is set to mode 1 by default.
DRONE APP “POTENSIC PRO” FOR ANDROID USERS Please search and download the drone App “Potensic Pro” in Google Play or scan the below QR to download the App. Compatible with phone with Android 5.0 or above version. For Android FOR IOS USERS Please search and download the drone App “Potensic Pro” in App Store or scan the below QR to download the App. Compatible with phone with iOS 9.0 or above version.
DRONE FLIGHT MODE Dreamer 1 uses a new generation of Potensic flight control, which supports the following flight modes GPS mode: Accurate hover, pointing flight and other intelligent flight modes are realized under the GPS mode. Under the GPS mode, when the GPS signal is strong, it can be positioned accurately. when the GPS signal is weak, the aircraft can not be positioned accurately, and it only provides attitude stabilization, and does not support intelligent flight function.
11 Camera Setting 16 Attitude Ball / Map 12 Flight Height 17 Flight Mode Setting 13 Flight Distance 18 One-button Return 14 Flight Speed 19 One-button Take-off / One-button Landing 15 Drone vertical flight speed 20 Camera Pitch Adjustment FLIGHT MODE 1 2 3 4 5 6 7 8 1 Normal / Sport Mode Switch 5 Circle Flight Mode 2 Headless Mode Switch 6 Way-point Flight Mode 3 Unlock / Lock 7 Following Mode 4 App Remote Control 8 GPS Mode / Attitude Mode 12
INTRODUCTION OF SETUP INTERFACE 1 2 3 4 5 1 Main Controller Settings 4 About Smart Battery 2 Calibration Settings 5 More 3 Remote Controller Settings FLIGHT Matters Needing Attention When Flying 1. Make sure the remote controllers, smart flight batteries and mobile devices fully charged. 2. Check whether the fuselage is complete and the propeller is properly installed. 3. Whether the camera and the platform work properly after the power is turned on. 4. Make sure the App working properly. 5.
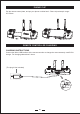
First, insert the battery into the drone and short press the battery switch and then long press the battery switch again for 7 seconds. At this time, the battery indicator is always on and the drone is turned on. Then, press down the middle key of the right stick and the Power Button together for a long time to enter the binding state (Pic 1). The four footlights will flash, the remote control power lights will flash slowly.
Pic 1 Pic 2 GYROSCOPE CALIBRATION During the flight, if the flying direction of the drone is deviated greatly, you need to place the drone on the horizontal flat and start gyroscope calibration. First: open the App, and click Second: choose “Gyroscope Calibration”. At this time, the drone will enter calibration status, then, the drone 4 LED lights will slowly flash 3 seconds. The Pop-ups will display calibration successful tip , indicating the calibration is successful.
Unlock the drone first: Push the left stick to down right and right stick down left together (Pic 1) to unlock the drone or just click the unlock key on the App. Then long press 1 second "take off and land" key, you will hear a short "di" sound or click icon on the APP. Then the drone will fly up slowly and hover at an altitude of about 1.2 meters. Pic 1 RETURN TO HOME(RTH) The Intelligent Return (RTH) function enables the aircraft to return to the final recorded take-off point.
App Control: Click the "HOME" icon icon on the APP to start One-button return. And click the to cancel auto-return. *Low power return: Intelligent Return: When the power of the aircraft is less than 20%, the aircraft will automatically start the return mode. At this point, the remote control will emit “di” sounds, the battery power icon flashes on the App, and the Return icon lights up when the drone is flying back.
How to Start Headless Mode Put the drone on the ground with its head forward and its back against you, then pair the drone with the remote control. And click the headless mode button on the App to enter the headless mode and click the headless mode icon again to exit. Under the headless mode The forward direction is the direction the pilot faces where the pilot pairs the drone with the transmitter. If the pilot pushes the direction stick forward / backward, the drone will fly forward / backward.
FOLLOWING FLIGHT MODE Click the icon to start the Following Mode. The normal flight altitude must be more than 5 meters, and the GPS signal is greater than or equal to 6 stars. The drone will follow the mobile phone. WAY-POINT FLIGHT MODE Click the icon to start the Way-point Mode. Set several position point on the map, then the drone will fly according to the point you have set. Totally 1-15 position points can be set. At each point, the map will be marked with its serial number.
SPECIFICATION DRONE Flying weight: 740g Maximum ascending speed: 5 m/s (sport mode); 3 m/s (normal mode) Maximum descent speed: 3 m/s (sport mode); 3 m/s (normal mode) Maximum horizontal flight speed: 8 m/s (sport mode); 5 m/s (normal mode) Flight time: about 30 minutes Working ambient temperature: 0°- 40° C Satellite positioning systems: GPS + GLONASS Working frequency: 2.402 - 2.483GHz and 5.725 - 5.850GHz Transmitting power: 2.4GHz:<18 dBm 5.8GHz: <24 dBm Hovering accuracy (vertical): +0.
SMART BATTERY CHARGER Capacity: 3000mAh Voltage: 15.2V Battery type: Li-Po 4S Energy: 45.6Wh Battery overall weight: 255g Working environment temperature: -10°~40°C Maximum charging power: 26.25W Rated input: 100-240V ~ 50 / 60Hz, 1.5A Rated output: 17.5V, 1.5A Rated power: 26.25 W COMMON PROBLEMS AND SOLUTIONS Problems Solutions Equipment not connected properly. Restart the aircraft and remote control. Can't unlock the drone.
DRONE STATUS AND INDICATOR STATUS DESCRIPTION Light Status The First Second Normal Status The 2nd Seconds 1/4 Time 1/4 1/4 Low Battery of drone Four lights continue to flash slowly Binding state / boot Four LEDs continuousfast flashing Attitude Mode Four LEDs Solid on Light on Front LEDs solid light on Light on Light on Light on 1/4 Light off Light off Light on Light off Continuous loop...... Continuous loop...... Always Continuous loop......
SAFETY PRECAUTIONS: This R/C flying model can be dangerous when in use, please make sure you keep it far away from any persons or spectators when flying. In-correct installation, poor conditions, or users not familiar with operation may cause damage to the aircraft or injure people or may cause an unexpected accident. Please pay close attention to flying safety and learn to recognize more dangerous conditions which may cause an accident due to your own negligence. 1.
radiate radio frequency energy and, if not installed and used in accordance with the instructions, may cause harmful interference to radio communications. However, there is no guarantee that interference will not occur in a particular installation.
12. Built-in rechargeable 3.7V Li-ion battery included in the transmitter. 13. Only the original charger made from our factory can be used. 14. Charger is not a toy. 15. When charging the battery, please conduct it under the surveillance of an adult. Please also keep it far away from any combustible object when charging. Please keep this aircraft within eyesight when charging. 16. Please DO NOT make it short-circuited or squeeze the battery so as not to cause an explosion. 17.