Instruction Manual CU450-2/CU460-2 FM Portable Radio Thank you for purchasing a COVALUE two-way radio. This simple to use radio adopts the latest advances in technology, providing reliable communication in today’s demanding communication environment. Notice to the User: · Please read this instruction manual before operating this radio. · It’s prohibited to use the radio or charge it at any area with a potentially explosive atmosphere (where the air contains gas, dust and smog, etc.
RF ENERGY EXPOSURE AWARENESS AND CONTROL INFORMATION, AND OPERATIONAL INSTRUCTIONS FOR THE OCCUPATIONAL USE REQUIREMENTS BEFORE USING YOUR PORTABLE 2-WAY RADIO, READ THIS IMPORTANT RF ENERGY AWARENESS AND CONTROL INFORMATION AND OPERATIONAL INSTRUCTIONS TO ENSURE COMPLIANCE WITH THE FCC/IC’S RF EXPOSURE GUIDELINES NOTICE: This radio is intended for use in occupational/controlled conditions, where users have full knowledge of their exposure and can exercise control over their exposure to meet FCC/IC limits.
a RF exposure product label. Also, COVALUE’s user manual, or product manual, or separate safety booklet includes information and operating instructions required to control your RF exposure and to satisfy compliance requirements. Compliance with RF Exposure Standards COVALUE’s 2-way radio complies with the following RF energy exposure standards and guidelines: • United States Federal Communications Commission, Code of Federal Regulations; 47 CFR §1.1307, 1.1310, 2.1091 and 2.
IC Warning : This device complies with Industry Canada licence-exempt RSS standard(s). Operation is subject to the following two conditions: (1) this device may not cause interference, and (2) this device must accept any interference,including interference that may cause undesired operation of the device. Under Industry Canada regulations, this radio transmitter may only operate using an antenna of a type and maximum (or lesser) gain approved for the transmitter by Industry Canada.
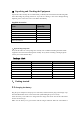
CONTENTS ■ Unpacking and Checking the Equipment -----------------------------------Supplied Accessories---------------------------------------------------■ Preparation ----------------------------------------------------------Charging the Battery Installing/Removing the Battery Pack Installing the Antenna Installing the Optional Speaker/Microphone Installing/Removing the Belt Clip ■ Radio Overview ■ Basic Operations ■ Programmable Button Function ■ VOX (Voice Operated Transmission) ■ Radio Setting TOT (Time
■ Unpacking and Checking the Equipment Unpack the radio carefully. We recommend that you identify the items listed in the following table before discarding the packing material. If any items are missing or have been damaged during shipment, please contact the carrier or the dealer immediately. Supplied Accessories Item Quantity Antenna 1 Battery 1 Charger 1 Power Adapter 1 Belt Clip 1 Instruction Manual 1 1、Open Package Inspection First, take the radio out of the package box carefully.
lighted, the charger begins to charge the battery. After charging for about 3 hours, the red LED will turn OFF and the green LED will light indicating the battery has been fully charged. On the first charge, please leave the battery in that state of green indicator for 1~2 hours before you remove it from the charger to achieve the best performance of the battery. Then you can disconnect the power adapter from the AC outlet. If the Red LED flashes quickly (0.2s on 0.
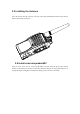
Installing/Removing the Battery Pack Installing/Removing the Battery Pack To install the battery, please place it into the groove on the top of the radio chassis about 5mm away from latch. If the radio has the belt clip installed, you will have to press one side of the clip, to raise it and slide the battery in proper position. Press the battery with your fingers and push the battery until you hear a latch click, the battery is now installed.
2.3 Installing the Antenna Screw the antenna into the connector at the top of the radio by holding the bottom of the antenna and turn it clockwise until secure. 2.4 Install external speaker/MIC Open the cover of the jack for external speaker/MIC, and then insert the plug of the external speaker or microphone into the jack on the radio. When inserting the accessory plug, make sure it is properly aligned ( straight) to avoid internal damage to the connector in the radio.
2.5 Installing/Removing the Belt Clip Use the 2 screws (M2.5x8.0) supplied with the radio and fix these screws on the holes in the radio clip and into the holes in the aluminum case. If you want to remove the clip from the radio, just unscrew them, and remove the clip, you can put the screws back to make sure you do no loose them.
3、Radio Overview ① PTT ( PUSH-TO-TALK) Button To make a call, press and hold the PTT button, then speak into the microphone in normal voice. Release the PTT button to receive signals.
Rotate to select channel 1~16. ⑤ Power/Volume Knob Turn clockwise to switch on the radio. Turn counterclockwise till a click is heard to switch off the radio. Rotate to adjust the volume after turning on the radio. ⑥ LED Indicator LED Indicator Status/Alert. Green LED lights when a carrier is detected in the current channel. Red LED lights during transmission. Flashes orange when receiving the Radio ID 5-Tone signaling or 2-Tone signaling or MDC signaling. Red led flashes when scanning or low battery.
3. Select a Channel: Rotate the channel selector to the desired channel. If channel annunciation has been set, the current channel number will sound. When a signal is received, it will be heard in the speaker.
4. Make a Call: To make a call, press the PTT, and speak in normal voice and please keep your mouth about 10 cm (3-4 inches) away from the microphone to achieve optimal voice quality.
5. Receive a Call: Release the PTT button and adjust the volume at the proper position to receive calls. The dealer can set CTCSS/DCS, 5-Tone or 2-Tone or MDC on your radio. On the channels programmed with Selective Signaling, you will not hear calls except those from the radios in the same group and sending the proper ID.
Cancel Emergency Call Man-Down Scan Noise Channel Delete Call Forward H/M/L Power Switch Squelch Adjust Monitor Momentary/Call Cancel Monitor/Call Cancel Squelch Off Momentary/Call Cancel Squelch Off/Call Cancel Lock Keyboard Battery Check Surveillance CTCSS Scan/Forever Save CH CTCSS Scan/Save CH When pressing a Key, notice the different beeps you will hear No beep, key pressed not acknowledge one beep, feature enable two beeps, feature disable “Error” beep, key pressed invalid Voice prompt, state after k
is safe, otherwise, the radio will enter emergency state automatically. Emergency Call When you press the top button set as “Emergency Call”, the radio will enter emergency state, the radio can sound alarm tone or transmit ID code or background tone to your partners or the system, the detail setting is programmed by your dealer. Cancel Emergency Call Press the top button set as “Cancel Emergency Call” to cancel Emergency function. Scan a) Press the button set as “Scan” to start or stop scanning.
Monitor/ Call Cancel Press the side button set as “Monitor” to turn off CTCSS, DCS, 5-Tone,2-Tone and MDC and to hear the signals that cannot be heard when in normal work. Press again the Monitor key to return to normal work. When in selective call state, press this key to exit selective call. Squelch Momentary/Call Cancel Press the button set as “Squelch Momentary” to turn on the squelch; release it to exit.
VOX allows hands-free transmission on the radio when using the appropriate earphone/headset. Two types of VOX are available: built-in and external. If VOX has been set, when speaking voice reach the preset volume, VOX will activate the radio to transmit automatically. ■ Radio Setting TOT (Time-out Timer) 1) TOT dispatch time The TOT Dispatch Time is the maximum period of time that the radio is allowed to transmit continuously in normal dispatch mode.
Channel Annunciation The dealer can enable or disable this option. When switching to a channel by rotating the channel knob, the current channel number will be heard. CTCSS/DCS The dealer can set CTCSS/DCS on the radio channels to ignore calls on the same channel from irrelevant radios. If a channel has been set with CTCSS/DCS, the squelch will be activated only when it receives the proper CTCSS/DCS signals. And only the radios set with the same CTCSS/DCS signaling as those on yours can hear your call.
When pressing PTT button, the radio will transmit from the last channel that received a call. 4) Last used When pressing PTT button during the scanning, the radio will transmit from the last channel you used to talk. C ) Priority Scan During scanning, if the priority channel has been set on the radio, when the priority channel receives signals the radio will automatically switch to the priority channel even the normal channel is receiving signals at that time.
set by the dealer. 1) 2Tone decode If the received 2 tone is same as the template chosen then it can decode successfully. After the radio received the correct 2 tone signaling, according to the Receive squelch mode set by the user, the squelch will be ON. Then, the radio can receive the call and the orange LED light flashes. After decoding successfully, the radio can work according to the decode call response set by the dealer. 2) 2Tone encode The encoding template is set in the 2 tone call list.
is too small. 6 z z z Make sure the antenna is the originally supplied one. Check if the battery power is in the normal state. Ask your local dealer to adjust the squelch level. z z Make sure the PTT button has been pressed completely. Battery power may be insufficient. Recharge or replace the battery pack. Transmitting frequency has not been set on the channel and the radio has been remote killed. Unable to transmit. z z 7 Noise is too loud. z Battery power may be insufficient.
■ Settings (by the Dealer) Model: ____________ Serial No.
Lone Work Emergency Call Cancel Emergency Call Man-Down Scan Noise Channel Delete Call Forward H/M/L Power Switch Squelch Adjust Monitor Momentary/Call Cancel Monitor/Call Cancel Squelch Off Momentary/Call Cancel Squelch Off/Call Cancel Lock Keyboard Battery Check Surveillance CTCSS Scan/Forever Save CH CTCSS Scan/Save CH Side Button 1 None (No Function) Annunciation Selection Talkaround Call1/Call2/Call3/Call4 Lone Work Emergency Call Cancel Emergency Call Man-Down Scan Noise Channel Delete Call Forward H
Side Button 2 None (No Function) Annunciation Selection Talkaround Call1/Call2/Call3/Call4 Lone Work Emergency Call Cancel Emergency Call Man-Down Scan Noise Channel Delete Call Forward H/M/L Power Switch Squelch Adjust Monitor Momentary/Call Cancel Monitor/Call Cancel Squelch Off Momentary/Call Cancel Squelch Off/Call Cancel Lock Keyboard Battery Check Surveillance CTCSS Scan/Forever Save CH CTCSS Scan/Save CH Note: