
Product Info
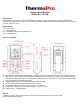

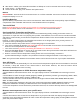


Table Of Contents
- Congratulations on your purchase of the Professional Remote Cooking Thermometer, a programmable radio frequency food thermometer. You will now be able to remotely monitor the time and temperature of food cooking on your grill, smoker or oven.
- Buttons
- Buttons
- Measure meat temperature to USDA doneness temperature range
- 1. Press MODE to select thermometer mode. The upper display will show a small MEAT and a meat type such as BEEF.
- 4. Once the temperature of meat reaches the preset doneness level, the receiver will beep and the LCD backlight will turn red.
- Measure meat temperature set to your specific taste
- Procedure for typical use on an outdoor grill
- The following typical example will go through the steps to have the Professional Remote Cooking Thermometer alert you to when a beef steak is cooked to medium (USDA doneness level) and remind you to rotate hot dogs in 5 minutes.
- 1. Turn on the grill.
- 2. Follow the synchronization/pairing procedure.
- 3. Place steak and hot dogs on grill rack.
- 4. Insert probe sensor into the center of thickest portion of the steak. Avoid touching bone or heavy fat areas. Assume the meat temperature is 45 (F.
- HELPFUL HINTS
- HELPFUL HINTS
- Always wear a heat resistant glove to touch the stainless steel probe sensor or wire during or just after cooking. Do not touch with bare hands.
- Cleaning
- Always wear heat resistant glove to touch the stainless steel probe sensor or wire during or just after cooking. Do not touch with bare hands.
- Keep the stainless steel probe sensor and wire away from children.
Wire Stand – Allows you to stand the transmitter on tabletop or it can be reversed and used as a hanger.
Power source – 2 AAA batteries.
Sensor Socket Hole: plug in for stainless steel probe sensor
Buttons
ON-OFF/ºF/ºC /– Press and hold for 2 seconds to turn on or off the transmitter. Press once to select the transmitter
temperature display in ºC or ºF.
Installing Batteries
Open the battery compartment of the receiver and insert two “AAA” batteries with correct polarity. Open the battery
compartment of the transmitter and insert two “AAA” batteries with correct polarity.
Turn On/Off Unit
Press and hold ON/OFF/°F/°C button on the receiver for 2 seconds to turn on/off the receiver.
Press ON-OFF/ºF/ºC / button on the transmitter for 2 seconds to turn on/off the transmitter.
Synchronize/Pair Transmitter and Receiver
The transmitter and receiver were already paired at our manufacturing facility. Usually you do NOT need to re-
synchronize or re-pair the units. You just plug in the probes, insert batteries, turn on the receiver and the transmitter
and wait for a few seconds, you will see the temperatures shown on both receiver and transmitter and the units are
ready for use.
However, in some unusual cases, the transmitter and receiver are no longer paired, then you may need to re-
synchronize them by following the below steps:
a. Insert the stainless steel probes into the corresponding plugs in the transmitter.
b. Turn on the transmitter by pressing and holding the ON/OFF/ºF/ºC button for 2 seconds. The transmitter will
show the current temperatures on its LCD display.
c. Turn on the receiver by pressing and holding the ON/OFF/°F/°C button for 2 seconds.
d. Press and hold Mode button on receiver for 2~3 seconds to enter the synchronization mode which will last for 60
seconds. The display shows “---” and it is flashing.
e. Wait for a moment until the temperature reading shows on the receiver display, it means the
synchronization/Pairing is complete. Your professional remote cooking thermometer is now ready for use.
Note: The synchronization between the transmitter and the receiver won’t be lost even if you replace the batteries.
Auto Off Feature
The receiver will turn off automatically if it has not received the temperature signal from the transmitter for more than
30 minutes, a beep will sound for one minute before it shuts down. However, the Auto Off feature will be
automatically disabled if the timer is running.
Measure meat temperature to USDA doneness temperature range
1. Press MODE to select thermometer mode. The upper display will show a small MEAT and a meat type such as
BEEF.
2. Press MEAT to select meat type. PROG (program), GBEEF (ground beef), GPOUL (ground poultry), BEEF, VEAL,
CHCKE (chicken), PORK, POULT (poultry), LAMB & FISH.
3. Press TASTE to select the level of doneness for the meat type selected. RARE, MED RARE, MEDIUM, MED
WELL and WELL DONE.
Note: The temperature displayed to the right of the actual meat temperature PROBE TEMP will show the preset
temperature TEMP SET according to USDA doneness levels. Example: Beef will be Well Done at 165 °F.
4. Once the temperature of meat reaches the preset doneness level, the receiver will beep and the LCD backlight will
turn red.
Measure meat temperature set to your specific taste
1. Press MODE to select thermometer mode. The upper display will show a small MEAT and a meat type such as
BEEF.
2. Press HR or MIN to raise or lower the set temperature. As you press HR or Min the display changes to PROG
(program). Press and holding the button will raise or lower the temperature setting rapidly. Pressing MEAT will return
you to the preset USDA ranges.