
Service manual


www.enc.net.cn/en Tel/Fax:86-755-26984485/26985120 3 Installation and wiring
12
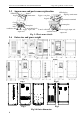
3.2 Parts disassembly and installation
3.2.1 Key board disassembly and installation
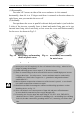
(1) Disassembly
Let the forefinger press finger inlet on
the keypad,depress fixing flexible plate
on the top lightly, draw it outward, then
you can disassemble the keypad.
(2) Assembly
First place the fixing hook at the bottom of keypad onto mounting claw on
keypad mounting hole, let forefinger press fixing flexible plate on top of
keypad and then push it inside, release it in proper location(after a crisp
sound), see Fig. 3-3.
3.2.2 Plastic/metal cover disassembly and installation
3.2.2.1 Plastic cover disassembly and installation:
(1) Disassembly
Put the finger into handle hole on the bottom of cover, lift it in force, till
buckle between cover and unit body off, draw the cover backward, then you
can disassemble the cover.
(2) Assembly
1> tilt the cover for 5~10 degree;
2> put the mounting claw into relevant hole on the unit body and then press
downward in force, see fig. 3-4.
3.2.2.2 Metal cover disassembly and installation
Mounting claw
Mounting claw
Hook
Fig.3-3 mounting sketch of keypad
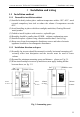
inverter
inverter
Leading
divider
Fig. 3-2 mounting of multiple inverters