Robotic Vacuum Cleaner Instrcution Manual
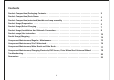
Contents ................................................ Product Composition/Parts Name . . . . . . . . . . . . . . . . . . . . . . . . . . . . . . . . . . . . . . . . . . . . . . . . . . . . . . Product Composition/watertank/dustbin and mop assembly . . . . . . . . . . . . . . . . . . . . . . . . . . . . . . . . . Product Usage/Preparation . . . . . . . . . . . . . . . . . . . . . . . . . . . . . . . . . . . . . . . . . . . . . . . . . . . . . . . . . . . Product Usage/Robot Charging . . . . . . . . . .
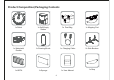
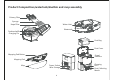
Product Composition/Packaging Contents 1x Robot 1x Self-Empty Station 3x Dust Bag 1x Mopping Pad 1x Watertank/ Dustbin 1x Cleaning Brush 1x Charging Cable 2x Side Brushes Instruction 1x HEPA 1x Sponge 1x User Manual 2 1x Mop
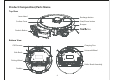
Product Composition/Parts Name Top View Laser Head Recharge button Start/Pause button Surface Cover Bumper Dustbin Button Buttom View Cliff Sensors Charping Pins Universal Wheel Side Brush Driving Wheel Roller Brush Assembly Dustbin 3
Product Composition/watertank/dustbin and mop assembly Primary Filter Sponge Hepa Filter Water Inlet Watertank Dustbox baffle Charging Pin Dust Bag Dust Cover Mopping Pad Button Signal Indicator Mopping Pad Mop Power Socket Wire Storage 4 Charging Pins Dust Collecting Mouth
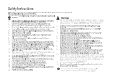
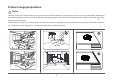
Product usage/preparation ! Notes 1.Before starting the vacuum cleaner, clean up wires and sundries scattered on the ground, and remove easy-to-fall, fragile, valuable and potentially dangerous items. Avoid being entangled, jammed, dragged, or knocked down by the main unit; otherwise, personal or property damage may be resulted. 2.Avoid using this product in a watery area, otherwise the fan may be damaged and the performance of the vacuum cleaner will be affected. 3.
Product usage/preparation 1.Before using the robot, please remove the protective strip from 3.Place the Self-empty Station on a hard and level surface against the wall. Connect the power supply. Do not place any items 1.5 ft or 0.5m to the left and right and 5 ft or 1.5 m in the front of the self-empty station. Confirm that the dust bag has been installed and the dust cover has been closed. both sides. 2.Install the side brush.
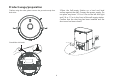
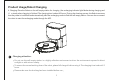
Product Usage/Robot Charging 4. Charging: Place the Robot on the self-empty station for charging (the recharging indicator light flashes during charging and it’s steady when charging is finished. The charging time is about 6.5hours.) During the cleaning process, the Robot can sense that the power is insufficient and automatically start the recharging mode to find the self-empty station. You can also command the robot to start the recharging mode through the APP.
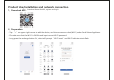
Product Use/installation and network connection 1、Download APP:Download Smart Life APP, register and log in 2、Preparation - Tap “+”on upper-right corner to add the device, and choose vacuum robot(Wi-Fi) under Small Home Appliance - Pls make sure that the Wi-Fi is 2.4GHz and input correct Wi-Fi password. - Long press the recharge button 3s’ , robot will prompt “Wi-Fi reset”and Wi-Fi indicator starts flash.
Product usage/use instruction ! Power On/Off Long press Notes: The robot can not start cleaning if the battery is too low. Please start cleaning after charging. key to power on the robot, power indicator light on Please tidy up all kinds of cables(including the power cable of the self-empty station) and robot enters into standby mode.
Charging Auto mode: The robot will automatically back to the self-empty station for charging after cleaning is finished. Manual mode: Press button to start recharging during pause state. The power indicator light blinks in breathing manner while charging. Clean a pointed zone You can specify a target point on the APP map, the robot will automatically plan a route to the point.
Set a restricted zone/ invisible wall APP setting and the robot has to generate a map for cleaning. After cleaning starts, the robot may move to a place beyond the selected zone. You can set a restricted zone or invisible wall in the app. After Make sure that you have cleared the obstacles on the ground around the selected the setting is completed, the robot will not enter the restricted zone, which cannot be used for safety isolation zone or cross the invisible wall for cleaning.
Scheduled cleaning You can set the scheduled cleaning time in the app. The robot will automatically start cleaning upon the specified time, and If the robot cannot access a zone for cleaning due to a closed return to the self-empty station after it completes a cleaning. door or a high door sill, the resumable cleaning function will be affected. Clean a divided zone You can set the cleaning of a divided zone after the map generated in APP. The robot start cleaning based on your DND mode selected zone.
Product usage/mopping ! Charging attention: Do not use the mopping function on a carpet. Please empty the water tank and clean the mop in time aftermopping finished. A. Add water ! Notes:The B.Install/uninstall the mopping pad water tank can be added with detergent or 84 disinfectant as cleanser (concentration ≤5%), and non-specified cleanser should not be used. C.
Component Maintenance/Regular maintenance Regular maintenance To achieve the best cleaning effect, clean and maintain the robot regularly according to below table. Determine the frequency of cleaning and maintenance according to your use habits.
Component Maintenance/Main Brush and Side Brush A. Open the roller brush cover assembly B. Take out the roller brush C. Use a tool to clean the tangled hair D.
Component Maintenance/Charging Electrode,Cliff Sensor, Drive Wheel And Universal Wheel ! Notes:Charging electrode, cliff sensor and bumper assembly contain sensitive electronic components, please use dry cloth to clean them, and do not use wet cloth to prevent damage caused by water.
Replace the dust bag ! Notes: Replace the dust bag when the dust is full.
Trouble shooting Error prompt Solution Laser head is blocked or stuck The laser ranging sensor is blocked or jammed by a foreign object. Remove the obstruction or foreign object. If it cannot be removed, move the robot to a new position and then start it. Collision sensor get stuck The bumper is stuck. Tap the bumper for several times to remove the foreign object. If there is no foreign object, move the robot to a new position and then start it Wheel suspend The wheel is suspended.
Trouble shooting Fault type Solution Fail to power on the robot The battery power is insufficient. Please use the robot after charging on the self-empty station. The battery temperature is too high or too low. Please use the robot when the ambient temperature is 0°C to 40°C. Fail to charge the robot The self-empty station is not connected to the power supply. Please check whether the self-empty station indicator is on.
Fault type Solution The Wi-Fi network cannot be connected. The Wi-Fi function is not activated. Reset the Wi-Fi connection, and try again. The Wi-Fi signal is not good. Ensure that the robot is located in a place with good Wi-Fi signals. The Wi-Fi connection is abnormal. Reset the Wi-Fi settings, download the mobile app of the latest version, and try to connect to the Wi-Fi network again. The Wi-Fi network suddenly cannot be connected. The family router settings may be incorrect.
Parameters Classification Robot Self-Empty Station Battery Cleaning Parameters Tobot ! Items Parameters Diameter Φ350mm Height 98mm Net weight 3.24kg Self-empty Station Size 280*193*320mm Weight 3.5KG Voltage 14.
Security Information Hazardous Substance Component Type Hexavalent Cadmium (Cd) Polybrominated chromium and its biphenyls (Cr(VI)) and its compounds (PBB) compounds Lead (Pb) and its compounds Mercury (Hg) and its compounds Plastic parts O O O O O O Metal parts X O X O O O Circuit module of the Robot X O X O O O Electronic component O O O O O O Battery O O O O O O Power cord (Metal part) X O X O O O Poly Brominated Diphenyl Ethers(PBDE) 〇:: It means that the co
! Product name: Robot Vacuum Cleaner Product model: G3 Manufacturer: Shenzhen Free Dynamics Development Co., Ltd. Address: Room 1201, South Block, Yuanxing science and technology building, Nanshan District, Shenzhen, China Web.: www.freedynamics.com Frequency Range: 2412MHz-24 2MHz Max. Power: 3 dBm SIMPLIFIED EU DECLARATION OF CONFORMITY The simplified EU declaration of conformity referred to in Article 10(9) shall be provided as follows: Shenzhen Free Dynamics Development Co., Ltd.
! FCC STATEMENT : This device complies with Part 15 of the FCC Rules. Operation is subject to the following two conditions: This device may not cause harmful interference, and This device must accept any interference received, including interference that may cause undesired operation. Warning: Changes or modifications not expressly approved by the party responsible for compliance could void the user's authority to operate the equipment.