
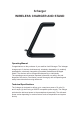
Operating and Safety Instructions
country specifications. To achieve maximum charging speed, a power supply
of
QC3 (9V/3A) is recommended. QC2 (9V/2A) is also possible but will not
deliver
full power. Your 3charger can now wirelessly charge your smartphone, Apple
Watch and earbuds. Please also refer to the section ‚Using the 3charger‘.
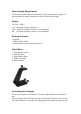
Using the 3charger
After you have connected the 3charger correctly, you can start using it.
• Charge your Apple Watch on the slightly indented upper charging surface
(Position 3). To do so, place the Apple Watch on the charging surface with the
display facing upwards for the magnets to lock the Apple
Watch into the correct position. Charging begins and is indicated by the
status light on the back of the 3charger.
• On the front side (Position 1), you can charge your qi-compatible
smartphone. Place your smartphone on the smartphone holder. Charging
starts and is indicated by the status light on the back of the 3charger. Your
smartphone can be charged both vertically and horizontally.
• On the bottom charging area (Position 2), you can charge your wireless
charging capable earbuds or another qi-compatible device. Place the
device in the center of the bottom surface. Charging begins and is indicated by
the status light on the back of the 3charger.
• Do not place credit cards, security badges, passports, or key fobs
between the 3charger and your smartphone, as their magnetic strips
or RFID chips could be damaged. If you keep sensitive devices of this
type in your smartphone case, remove them before charging, or make
sure they are not positioned between the 3charger and the back of the
smartphone.
Status Indicator
Charging begins as soon as a compatible device is placed correctly on a
charging area. The status indicator lights on the back show the charging
process.
Compatibility
Smartphones - Any qi-compatible device
Watches - All Apple Watch Models to date
Earbuds - Any qi-compatible earbuds