. Preface Thank you for purchasing this digital video camera.Before use,please read this manual carefully.Keep this manual in a safe place for future reference. The latest information at the time of compiling this manual is used for reference for the content of this manual.The screen displays,illustrations and other information adopted in this manual are to visually elaborate the operation of the video camera.
Sliding the tab downward to protect existing data;sliding the tab upward to erase writing protection.When taking pictures,please slide the tab upward. Usage Instructions for SD card ● Before using a new memory card or card with data unidentified by the video camera or pictures took by other video camera, please make sure the card been formatted. ● Before inserting or pulling out the card ,please keep the power of the video camera off.
4. Features The video camera includes several features and functions : Digital video camera(4K/24fps ) Digital camera(30 million pixels ) 3.0〃HD touch screen Mass Storage(removable disk) 16x zoom Thermal night vision Remote control External hot shoe Recording while charging is supported Support HDOUT Support external MIC Support WIFI(preview,payback,a key to share) Support interval video and interval photography ( That is time-lapse photography.
5.
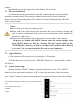
6.Buttons and Indicators Buttons/ Indicators Functions MENU MODE Hot shoe 1.Power on and off 2.It functions as confirmation in menus 3.It functions as stop or play in playback 4.When power is on, press it will turn on the infrared light/fill light, and then press it again will turn off T : zoom in(When selecting the mode, press it to move to the right) W : zoom out(When selecting the mode, press it to move to the left) 1.Taking photos 2.Press it to pause when recording video 1.
camera. Install the battery in the right place of the battery slot correctly. 7.2 SD card installation As indicated aside the card slot,insert the SD card into the the card slot with the metal pins towards inside.(The camera is turned on after the SD card is installed) Remove the card by pressing down.(The camera will turn off automatically when SD card is removed out) ──────────────────────────────────── Notes: Turn off the power before replacing card. Insert card in the right direction.
The menu selected will have a red triangle in the top right corner.
7.5 Functions of the camera Enter the video mode automatically after the camera is turned on.The modes can be switched by pressing MODE button (or click the icon in the upper left corner of the display screen and you will find the pop-up menu ). Switch modes as following : Select UP and DOWN by pressing the arrow buttons; select LEFT or RIGHT by pressing W/T buttons or directly click on the icon on the touch screen.
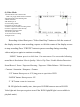
(1)Video Mode 1.Record Mode is the current mode. Click it to pop up mode selection interface 2.Recording time and remaining time 3.WIFI connected 4.IR fill lamp is on 5.Current charge status 6.Exposure of current video 7.Click it to turn on/off the recording sound 8.Click it to playback videos directly 9.Resolution of current video 10.Current system time 11.Click it for direct setting 12.
(2) Video Lapse Mode 1.Record Mode is the current mode. Click it to pop up mode selection interface 2.Recording time and remaining time 3.WIFI connected 4.IR fill lamp is on 5.Current charge status 6.Exposure of current video 7.Click it to turn on/off the recording sound (No sound in current mode recording) 8.Click it to playback videos directly 9.Resolution of current video 10.Current system time 11.Click it for direct setting 12.Digital zoom (3) Slow Motion Mode 1.Record Mode is the current mode.
“Photo”:Press it to take photos. “T/W”:Press T to zoom in;press W to zoom out. IR fill light:In the standby state ,short press POWER button to turn on IR/fill light and short press again to turn off the IR/Fill light. “Mode”:Press MODE button or click Icon 1 to select modes. “Menu”:Press MENU button or click Icon 9 to enter menu. “UP”:Short press to +EV; it stands UPWARD in the menu. “DOWN”:Short press to -EV;it stands DOWNWARD in the menu. (5) Photo Lapse Mode: 1.Interval Photo Mode is the current mode.
(7) Motion Detection Recording: 1.Record Mode is the current mode. Click it to pop up mode selection interface 2.Recording time and remaining time 3.WIFI connected 4.IR fill lamp is on 5.Current charge status 6.Exposure of current video 7.Click it to turn on/off the recording sound 8.Click it to playback videos directly 9.Resolution of current video 10.Current system time 11.Click it for direct setting 12.Digital zoom (8) Video Playback: 1.Video Playback is the current mode.
(9)Photos Playback: 1.Photo Playback is the current mode. Click it to pop up mode selection interface 2.File and name of the current photo selected 3.Current charge status 4.Click it to return to Photo Mode 5.Current system time 6.Click it to set menus 7.Click it to page down 8.Current page/total pages 9.Click it to page up 8. WIFI: (1)WIFI can be found by scanning the OR code and downloading related APP as following: Android IOS (2)Please scan the Android OR code above to download Android APP.
Disconnecting WIFI: When connected to WIFI, press “UP” button for 3 seconds, disconnect the WIFI, and the camera will return to normal condition. Note: When a recorded video is played on the phone, whether online or downloaded to the phone, the playback may not flow smoothly or the image may disappear within seconds. This is because the running memory of the phone is smaller or its running speed is slower. Please choose the player with large memory and faster running speed. 9.
10. MIC INPUT When an external HS microphone is needed,plug the external microphone into the MIC interface of video camera to record video or audio for better audio effects. 11. HD OUTPUT When the video and sound of the video camera are needed to output to the HD TV, insert the public port of the HD cable into the HD interface of the video camera, and connect the HD input port to the HD input interface of the HDTV. Please stop recording / playing videos before accessing / unplugging the HD cable.
for cleaning optics.If necessary, please use lens cleaner. Do not use organic solvents to clean the video camera. ● Do not touch the lens surface with fingers. Specification Image sensor CMOS Picture Resolution 30M,24M,20M,14M,12M,8M,5M, 3M,2M,1.2M,VGA, Memory Fill light IR-CUT SD (4GB--128GB) IR night vision Support IR—CUT Files format JPEG, MOV Recording resolution 4K/24FPS,2.
Operating system requirements Dimension Net weight Windows 98,98SE,ME,2000,XP,Vista,win7,win10 126mm ×58mm × 57 mm 295g (with battery) Note:Specifications is based on the latest information when the manual is drafted.They are subject to change without prior notice, please refer to the actual camera. Troubleshooting The camera does not turn on when battery installed. The power is low,please replace it with new battery. The package of the battery is not removed. Battery counter - attired.
Warning: Changes or modifications to this unit not expressly approved by the party responsible for compliance could void the user’s authority to operate the equipment. NOTE: This device complies with part 15 of the FCC Rules. Operation is subject to the following two conditions: (1) This device may not cause harmful interference, and (2) this device must accept any interference received, including interference that may cause undesired operation.