
User's Manual


Quick Operation Guide of Wireless NVR Kit Quick Operation Guide of Wireless NVR Kit Quick Operation Guide of Wireless NVR Kit Quick Operation Guide of Wireless NVR Kit
5 6 7 8
6 Local Operation
Necessary Operation: NVR can only be recording and
remote access,after perform necessary operations.
Optional Operation:You can decide whether to do this
as you like,such as video playback,backup, device
operation,etc.
6.1 Necessary Operation
Step 1: Power on
Check the power supply is plugged into an
electrical outlet,and turn on the button.Then the power
LED should red,and the video will automatic display on
the monitor,after several minutes.
Step 2: Login
(1)Click right mouse button, log-in menu pops up.
(2)Enter the correct password, default password is
admin.
Note: Please modify the user password before using the
product to protect your privacy.
Password modification: " Main menu → The system
menu → Account →Modify Pwd →Enter the old password:
(admin) → Set a new password → Save "to change
passwords.
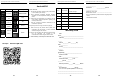
Step 3: Format the hard disk
Only NVR can record after format hard disk.
(1) Right click to login and enter “Main
menu→System→HDD manager”.
(2) Select the hard disk,and click “Format Disk” button .
(3) The hard disk status would turn on “in use”.It’ll display”
” on each live view channel,and start record.
(1) HD manager
(2) Display “ ”on live view
Step 4: Network configuration
You can remote access NVR via phone or internet after
configure network parameter successful.
(1) Conform network cable is connected to LAN
correctly for access the internet.
(2) Enter into”Main menu→System→Network Config”
menu.
(3) Select”DHCP”,and click “save” button,it”ll request IP
address from the DHCP server automatically.
(4) The configuration is Sucessful,if the IP address is
not 0.0.0.0.After refresh. Otherwise,please set the
IP address and gateway information Manually.
(1) P2P status
(2) Network configuration
6.2 Optional Operation
(1) Video playback
Steps:Right click to select playback → login→ select
singal or multi channel playback mode →select channel
→select date →double click to start play
record.
(2) Video backup
Steps:Insert U disk to USB interface→Right click to
select Main menu→login→select backup→select
channel→set starting time and ending time→click
“Search”button→select the record→select or create new
file→click “Backup” button to backup record.
(3) Add camera
Add or replace wireless camera,please fellow the steps
below.
a) Wait 1.5 minutes for camera start up.
b) Enter ”Main menu→Pair IPC”, delete camera which
status is " not connected" in the Channel list.
c) Click ”Pair” button,and pop-up a
window,"Pairing,pus and hold IPC button ".
d) Push the pair button in IPC within 5 seconds.
e) It mean pair successfully when dispaly "connected"
in status column.
f) Repeat step c and d, then click [OK] button ton
finish.
(1)Right click menu