
User's Manual
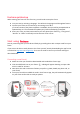


This micro USB port is for uploading photos from USB drive only, it is not for connecting computer.
Can import photos from USB flash driver to photo frame, can’t copy photos from photo frame to
USB flash driver, can’t play photos from USB flash driver directly.
Remarks: The usb flash drive is recognized as “SD card” when it was inserted in the frame.
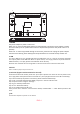
2. USB
3. RESET
Use a needle or paper clip to reset unit.
5. DC
Connect DC adapter to power on the device.
1. POWER
Load external micro SD memory cards here. (Can import photos from micro SD card to photo frame,
can’t copy photos from photo frame to micro SD card, can’t play photos from micro SD card directly).
If you want to backup the photos in the frame, please follow the below steps:
step 1: get a micro SD card(maximum 32GB), and put it in the micro SD card slot.
step 2: tap the screen and go to “Settings”
step 3: go to “Backup and Restore”
step 4: tick “ Automatic backup”
step 5: tap “Backup frame to SD card”
Then you will see a sentence “Last successful backup: 29 December...” under “Backup frame to SD
card”.
Use power adapter to power on the frame.
When it is on, press and hold power button for approximately 3 seconds to access reboot or power
off menu. Short press on power button will turn off/onscreen (but leave the photo frame in on
position).
Power off: To avoid any possible damage to the frame, please do not unplug the power adapter
from the frame directly, please always press the power button for 2 seconds and tap “Power off” .
ENG-1
4. Micro SD (Support maximum 32G micro SD card)
4
2 5 3
1