User Manual We have tried our best to ensure that the contents of this manual are correct and latest. However, there is no guarantee that everything is correct. If the contents of this manual do not conform to the current product, please follow this product. We reserve the right to change the content or technical specifications without prior notice. If the accessories do not match the items in the actual package, please follow the actual package.
Instructions for the use of baby monitors Thank you for buying our products, This manual provides you the monitor information and methods of using the monitor. 1. Safety instruction 1.1 this baby monitor is not a substitute for responsible adult supervision. 1.2 this product shall be placed in a place that is not accessible to the baby and shall be kept in a distance of at least 1.5 m from the baby to ensure that the baby has a corresponding safe range with the product. 1.
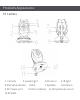
Products Appearance TX Camera 1. Camera 2.power light 5.Microphone hole 9.DC Power port 12.Bracket 6.Mat 3.IR sensor 7.Speaker 10.Pair code key 4.IR light 8.antenna 11.
Handheld display 1.Power port 3.boot Key 6.OK key 9.Intercom key 2.Power indicator and voice volume lamp 4.Camera switching key 7.direction key 10.Reset Key 13.battery cover 14.antenna 11.Speaker 15.LCD 5.Menu Key 8.Music key 12.
Button introduction 1.Power On / off key: long press to turn on/off machine and short press to turn off the screen after boot 2.Ok key: implement menu execution instructions 3.Pair code key :Perform the pairing effect of the camera on the code 4.Menu / return key: implement the pop-up of the menu, as well as the return of each submenu to the next level 5.Up key: realize menu setting item up option scroll. And a quick increase in screen brightness. 6.Down key: implement menu settings to scroll down options.
Button introduction 1. TX camera 1.1 This machine uses DC adapter with output 5V/1A 1.2 Power the device on and the blue led indicator lights on, indicating that the machine is turned on and is working Note: Use only the supplied power adapter. 1.3 Night vision: the baby device has 10 infrared light, which are used to complement the light in the dark, and the user gets a clear image. 1.
2.RX display 2.1 This machine is powered by a 3.7v lithium battery or a DC ad apter output of 5V/1A, The power Adapter can be used for charging when the lithium battery is low Note: Use only the supplied power adapter. 2.2Turn on the device and long press the boot key ,then enter into the initial system screen. 2.3This machine can support two cameras to monitor 2.4The monitor screen icon is shown in the following figure 2.4.1) 2.4.
2.4.4) The music icon , the device has 8 pieces of music totally, and the user select #1 - 8 as a single loop, and if you select 9, all the musics will be loop played. 2.4.5) speaker icon temperature for baby room, 2.4.6) (Fahrenheit or Celsius can be choosed on the menu) 2.4.7) 2.4.8) Time icon(AM means morning, PM means afternoon) battery icon Menu Option The menu options are shown in the following figure Press menu / return key to pop-up menu, which contains 6 items: 2.5.1) 2.5.
2.5.3) Time setting 2.5.5) Camera setting 2.5.4) 2.5.6) Temperature setting Voice control setting You can select the menu by right or left key to move the Cursor , Press the up and down keys to make the selection. then Press the ok key to confirm. Press the menu/ return key to exit the setup menu 2.5.1 Breast-feeding reminder setting Enter the feeding reminder setting, there are 5 alarms to choose from the following figure.
2.5.2 Music selection setting Enter the music settings item, there are 10 sub options settings as shown below Select the music settings, press up and down key to select, then press OK key to confirm. (music settings have 10pcs sub options: off, loop, and 8 pieces of music) the default is OFF 2.5.3 Time setting Select the time setting, press up and down key to change the value, and press the ok key to move the cursor. Set the hours, minutes, seconds in turn. and AM, PM, press OK key to confirme 2.5.
2.5.5.)Camera select the camera setting, there will be a loop, delete and add ,three sub options, use the up and down key to select , when you press the ok key to select the loop settings item, and the three sub options will pop-up as follows Select by up and down key, and press the ok key to confirm (check the camera 1 means the camera 1 is locked in the monitor screen. select camera 2 means the camera 2 is locked in the monitor screen.
Select by up and down key. Press the ok key to confirm (delete item means to delete the camera that has been paired successfully). it means the deletion is successful when the icon * on the upper of the camera disappears.when the added item is selected to press the ok key. The two sub-options are shown as follows figure Use the up and down key to select, press the ok key to confirm, at this time the power indicator flashes.
2.5.6.)Voice control setting Enter the voice control settings as shown in the following figure Select the voice control setting, press up and down key to select, pressing ok key will appear off, low, medium and high, four sub-options , then press up and down key to select , then press OK key to confirm.
Installation method 1) put the TX camera on the working table at the corresponding height. where the baby can be monitored , and adjust the angle of TX camera. 2) fixed with a three-foot bracket and adjust the angle. Maintenance of Monitor Keeping the lens clean can help you monitor the clearest picture. Gently wipe the fingerprints and dust on the lens and LCD screen by soft gauze.In order to avoid the danger of electric shock. Don't open the machine or fix it by yourself. Keep the machine dry.
FCC Caution This transmitter must not be co-located or operating in conjunction with any other antenna or transmitter. Any Changes or modifications not expressly approved by the party responsible for compliance could void the user's authority to operate the equipment. This device complies with part 15 of the FCC Rules.
—Reorient or relocate the receiving antenna. —Increase the separation between the equipment and receiver. —Connect the equipment into an outlet on a circuit different from that to which the receiver is connected. —Consult the dealer or an experienced radio/TV technician for help. RF Exposure Statement This equipment complies with FCC radiation exposure limits set forth for an uncontrolled environment.
(1) l'appareil nedoit pas produire de brouillage, et (2) l'utilisateur de l'appareil doit accepter tout brouillage radioélectrique subi, même si le brouillage est susceptible d'en compromettre le fonctionnement. The device is compliance with RF exposure guidelines, users can obtain Canadian information on RF exposure and compliance. The minimum distance from body to use the device is 20cm.