Model No.
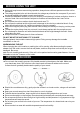
IMPORTANT SAFETY INSTRUCTIONS! PLEASE READ THEM BEFORE OPERATING THIS EQUIPMENT. 1.Read these instructions. 2.Keep these instructions. 3.Heed all warnings. 4.Follow all instructions. 5.Do not use this apparatus near water. 6.Clean only with a dry cloth. 7.Do not block any ventilation openings. Install in accordance with the manufacturer’s instructions. 8.Do not install near any heat sources such as radiators, heat registers, stoves, or other apparatus (including amplifiers) that produce heat. 9.
BEFORE USING THE UNIT As the unit may become warm during operation, always leave sufficient space around the unit for ventilation. The voltage supplied to the unit should match the voltage as printed on the rear panel. If you are in any doubt regarding this matter, consult an electrician. Choose the installation location of your unit carefully. Avoid placing it in direct sunlight or close to a source of heat. Also avoid locations subject to vibrations and excessive dust, heat, cold or moisture.
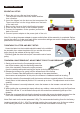
CONTROLS AND FUNCTIONS 1 5 6 2 7 8 9 10 3 13 4 11 12 14 15 17 16 1.Transparent Lid 2.45 RPM Adapter 3.Turntable Platter 4.Moving Magnetic Cartridge 5.Tonearm Counterweight 6.Downforce Scale Dial 7.Tonearm Clip 8.Tonearm Lift lever 9.Tonearm 13 14 10.Speed Selector 11.Pitch Control 12.Power Switch/Volume Control 13.Speakers 14.Lid Hinges 15.Power Jack 16.Right Speaker Jack 17.
INITIAL SETUP ESSENTIAL SETUP 1. Place the unit on a flat and level surface. The selected location should be stable and free from vibration. 2. Insert the hinges into the slots on the transparent lid. Then insert them into the hinge holders on the back of the main unit. 3. Remove the tie-wrap that is holding the tonearm. 4. Place the slip mat on top of the turntable platter. 5. Connect the speakers to the speaker jacks at the back of the unit. 6. Connect power adapter to the power jack of the unit.
OPERATING INSTRUCTIONS TURNTABLE OPERATION Connect the included power adapter to the turntable and switch the unit on by turning the POWER SWITCH (12) located on the front panel. Remove the stylus protector from the stylus. 1.Set the SPEED SELECTOR (9) to desired speed (33 1/3 ,45 rpm). Place the record on the slip mat. For 45 RPM records, place the 45 RPM adapter(2) on the center spindle before placing the record on the platter. 2.Remove the tie-wrap on the tonearm and unlock it.
TROUBLE SHOOTING TURNTABLE OPERATES BUT EMITS NO SOUND OR SOUND NOT LOUD ENOUGH 1.The stylus protector is still on. Remove the stylus protector. 2.Tonearm is lift up by the lever. 3. Speakers are not connected with the turntable. Insert the speakers cable firmly into the jacks on the back of the turntable. 4. Stylus is broken or missing. Check the stylus assembly and replace if necessary. 5.The stylus assembly may not be fully seated in the cartridge body. Check the cartridge and adjust if necessary.
TURNTABLE MAINTENANCE Turntable Body · When the turntable body is dirty or dusty, first disconnect the power adapter, and then wipe off the dirt and dust with a soft,dry cloth. · Do not use benzenes,thinners, etc · When storing theproduct for a long time, disconnect the adapter from the outlet and wrap the productin plastic; do not allow it to become damp; the drive belt should be removed to prevent Unequal stretching.
FCC Statements This equipment has been tested and found to comply with the limits for a Class B digital device, pursuant to Part 15 of the FCC Rules. These limits are designed to provide reasonable protection against harmful interference in a residential installation. This equipment generates, uses, and can radiate radio frequency energy and, if not installed and used in accordance with the instructions, may cause harmful interference to radio communications.