MARS T1000 User Manual Version 1.3.
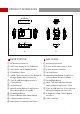
DESCRIPTION Thank you for purchasing Hollyland MARS T1000 full-duplex wireless intercom system. With the DECT protocol technology, MARS T1000 is widely used in the areas of studio, stage events, EFP, webcasting, filmmaking etc. With a clean line of sight (LOS), the transmission range of MARS T1000 reaches up to 300m with fullduplex wireless communication and carrier-grade voice quality. KEY FEATURES 1000ft Communication Range, Carrier-Grade Voice Quality 1.
DESCRIPTION APPLICATIONS Filmmaking Live Broadcasting Corporate Events Production Crew Communication Stage Activities Emergency Dispatch Webcasting 2
PACKING LIST ① ② ③ ④ ⑤ ⑥ ⑦ ① ② ③ ⑤ ⑥ ⑦ Base Station x1 Beltpack x4 Professional Dynamic Side-Ear Headset x5 1.9G High-Gain Base Station Antenna x3 Type-C Cable x4 4-Pin XLR Adaptor x1 Quick Guide x1 * The exact quantity may vary on products configuration. Please take the actual quantity as standard.
PACKING LIST OPTIONAL ACCESSORIES: (Not included in the standard packing list) Headset Professional Electret Side-Ear Headset Side-Ear Mobile Earphone Air Duct Earphone Earmuffs Professional Dynamic Double-Sided Headset TALLY Cable TALLY Set (TALLY Switcher, Connector, External TALLY Light) Antennas Dual polarization high-gain panel antenna Antenna Extender Packing Hard Case Package Installation Base Station Ear Hanger Beltpack Cold Shoe Charger 5-Port USB Beltpacks Charger (Ca
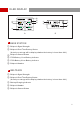
STANDARD SETUP Intercom 4 wire The base station of this wireless full-duplex intercom system supports up to 4 beltpacks. The base station and the beltpacks support dynamic and electret mics. They could be switched by selecting different applications in the menu. The 4-pin audio interface on the base station enables the device to connect with other audio systems, which can increase the quantity of beltpacks and also the wireless communication range.
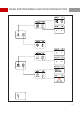
PRODUCT INTERFACES PIN1-PIN8 PIN1 M G R L ① PIN4 PIN2 PIN3 ② ③ ① 3.
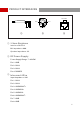
PRODUCT INTERFACES ① ① ②③ ② ③ ⑤ ⑥ ⑤ ⑥ ④ ⑦ ⑧ ⑨ ④ ⑦ A ① ② ③ ④ ⑤ ⑧⑨ ⑩ ⑪⑫ ⑬ ⑩ A B BASE STATION RF Antenna Interfaces DC Power Supply (4-Pin XLR Male) 4-Pin Audio Input / Output (RJ45) F970 Battery Plate 4 USB Type-A Interfaces (For Beltpacks B ① ② ③ ④ ⑤ Charging and Cable Connection) ⑥ ⑦ ⑧ ⑨ ⑩ ⑪ ⑫ ⑬ Type-C USB Debugging Interface Power Switch Enter Menu/Click to Confirm) Down/Right Button ⑥ ⑦ Power and Volume Control Knob 3.
OLED DISPLAY ④ ⑤ ⑥ ① ② ③ ④ ① ② ⑤ ③ A A ① ② B BASE STATION Beltpack Signal Strength Beltpack Real-Time Battery Status (Actual percentage will be displayed when the battery is lower than 20%) ③ ④ ⑤ ⑥ B ① ② Beltpack Current Status F970 Battery 1 Low Battery Indicator F970 Battery 2 Low Battery Indicator Beltpack Number BELTPACK Beltpack Signal Strength Beltpack Real-Time Battery Status (Actual percentage will be displayed when the battery is lower than 20%) ③ ④ ⑤ Battery Charging Indicator Belt
BASE STATION MENU FUNCTION INTRODUCTION 0 0 0 Version(V1.0.6.
BASE STATION MENU FUNCTION INTRODUCTION Long press the Menu/Confirm/OK button for about three seconds to enter the root menu, select the folder and press “OK” to enter the next menu. Each menu feature is introduced as follows. 1 Select "Mic Options" and press "OK" button to enter the secondary menu of Mic Setting 1.1. Select "Mic Type" and press "OK" to enter the third-level menu of Mic Setting; 1.1.1. Select “Dynamic” and press "OK" to switch to dynamic mic mode; 1.1.2.
BASE STATION MENU FUNCTION INTRODUCTION 4 Select “System” and press “OK” to enter the secondary menu of system setting 4.1. Select “Information” and press “OK” to enter the third-level menu of Information inquiry; 4.1.1. “Mic Type” displays the current mic type; 4.1.2. “Mic Gain” displays the current mic gain; 4.1.3. “Input Gain” displays the current 4 wire input gain; 4.1.4. “Output Gain” displays the current 4 wire output gain; 4.1.5. “Version” displays the current firmware version number; 4.2.
BELTPACK MENU FUNCTION INTRODUCTION RSSI: Mic Type: Application: Version: 25 Dynamic Quiet 1.2.4.0 Long press the "OK" button for about three seconds to enter the root menu, select the menu and press "OK" to enter the next level. Each menu feature is described as follows.
BELTPACK MENU FUNCTION INTRODUCTION 1 Select “Pair” and press “OK” button to enter the secondary menu of the registration feature 1.1. Connect the beltpack with the base station with a USB cable and select any ID from 1 to 4 then press “OK” to register the beltpack. “Pairing...” will be displayed on the main interface of the beltpack and the base station. Unplug the USB cable after “Pairing Successful” is displayed on the screen of both of them.
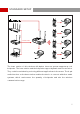
INSTALLATION ① ① Base Station Installation 1. Install antennas as demonstrated. 2. Connect the power adapter and the headset. 3. Press the power switch to power it on.
INSTALLATION ② Beltpack Installation 1. Connect headset as demonstrated. 2. Turn the power and volume control knob to turn on the beltpack. 3. When the status of the beltpack turns from “LOST” to “MUTE”, long press the “MUTE/TALK” button on the side of the beltpack to switch it to “TALK” mode to communicate. If the beltpack operator doesn’t want to talk with the base station, double click the “MUTE/TALK” button on the side of the beltpack to switch to “MUTE” mode.
INSTALLATION ③ Repairing If any beltpack ID is lost while using the system resulted by incorrect operation or other reasons, connect the base station and the beltpack through the standard USB type-C data cable. Enter the pair menu and selects a master station vacancy ID for registration on the beltpack. “ Pairing... ” will appear on the main interface of the base station and the beltpack.
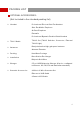
PARAMETERS Base Station Beltpack 2Antenna Interfaces 4-Pin XLR Male DC Input 3.5mm Headset Interface RJ45 Interface 4 wire audio interface USB Type-C Interface Double USB Type-A Interfaces 2Antenna Interfaces 3.5mm Headset Interface 3.
FAQ SAFETY NOTE Do not place your beltpacks on heating equipment, cooking equipment, highpressure containers (such as microwave ovens, induction cookers, electric ovens, heaters, pressure cookers, water heaters, gas stoves, etc.) to prevent the battery from overheating and exploding. The original mating type of charger, data cable, and battery must be used.
FAQ NO SOUND BETWEEN THE BASE STATION AND BELTPACK 1. Confirm if the “REMOTE MIC KILL” button on the base Station is on. If the red light is on, click on it to turn it off. 2. Check the current status on the beltpack screen. If it’s on “MUTE”, long press the “MUTE/TALK” button on the side to switch it to “TALK”. 3. Check if the headset functions well and if you wear the headset and mic properly.
FCC WARNING This device complies with part 15 of the FCC Rules. Operation is subject to the following two conditions:(1) This device may not cause harmful interference, and (2) this device must accept any interference received, including interference that may cause undesired operation. Any Changes or modifications not expressly approved by the party responsible for compliance could void the user's authority to operate the equipment.
FCC WARNING FCC EXPOSURE TO RADIO FREQUENCY (RF) SIGNALS For beltpack: This is a radio transmitter and receiver. It is designed and manufactured not to exceed the emission limits for exposure to radio frequency (RF) energy set by the Federal Communications Commission (FCC) of the U.S. Government. These limits are part of comprehensive guidelines and establish permitted levels of RF energy for the general population. The guidelines are based on the safety standards previously set by both U.S.
HollylandTech HollylandTech HollylandTech sales@Hollyland-tech.com www.hollyland-tech.