Digital Photo Frame User manual
Catalog User manual................................................................................................................................... 1 1 Getting Started .......................................................................................................................... 3 1.1 Introduce the Whale Photo Frame ........................................................................... 4 1.2 Download the Whale Photo App .....................................................................
2.4.9 Slideshow ........................................................................................................... 10 2.4.10 Horizontal/Vertical rotation ........................................................................ 11 2.4.11 Video Content Settings ................................................................................ 11 2.4.12 Weather&Time ............................................................................................... 11 2.5 Settings ...........................
.1.2 Log out................................................................................................................ 22 4.2 Photo sharing ............................................................................................................... 23 4.2.1 Photo selection ................................................................................................. 23 4.2.2 Photo editing .................................................................................................... 23 4.
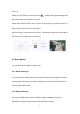
If you are new to using Whale Photo: 1. Power on; 2. Start by following the Whale Photo quick setup on page or follow the on screen guide. Once you have set up your Whale Photo, start connecting with your friends and family. 1.1 Introduce the Whale Photo Frame Whale Photo Frame displays wonderful moments shared by mobile devices. Touch-screen operation is easy to use, making sharing photos and videos smoother and more convenient. 1.
2 How to use Whale Photo Frame 2.1 Quick setup When starting your frame for the first time, you will need to setup the frame. ●Whale Photo Frame may request to upgrade to the latest version. If so, it is recommended to upgrade the photo frame before proceeding. ●Choose a language. This will be the language used throughout Whale Photo Frame. ● Connect the photo frame to the Internet via Wi-Fi. ●Set the date and time and set the time zone if needed. ● Name the photo frame (E.g.
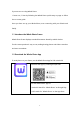
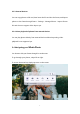
(See 1.2). ●Click the "Add friend" icon on your frame . A dialog will appear showing both QR code and SN code (valid for 12 hours). ●Now share either the QR code or the SN code through your preferred way E.g. SMS, E-Mail, IM, phone call, to your friend. Once the frame is connected to your friend’s Whale Photo App, you will be able to find them on the sharing list on the frame. 2.3 Share photos You can share photos/videos in three ways. 2.3.
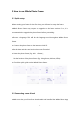
2.3.3 External Devices You can copy photos to SD card, then insert the SD card into the frame, and import photos to the frame through Frame - Settings - Manage Photos - Import Photos. SD card does not support video import yet. 2.3.4 Direct playback of photos from external devices You can play photos directly from external devices without importing, video playback is not supported yet. 2.4 Navigating your Whale Photo You interact with your frame through its touchscreen.
2.4.1 Power Icon Click the power icon , you can choose from three options: power off, restart, and sleep. Click to power off, click to re-boot, click to switch to sleep mode. Note: Remember always to turn the frame off properly by using the physical button on the device or tapping the power off icon in the interface. Do not dis-connect the power source directly while the photo frame is running. 2.4.2 Connecting with your friend Tapping this icon initiates the code generation.
⚫ In the gallery, you can play a particular category individually; ⚫ In the gallery, you can view photos directly on the SD card/USB. 2.4.4 Loop/ Sequence To set the picture display mode: select [Loop], the current photo or video will be presented in a loop; select [Sequence] to play the contents of the gallery in sequence. 2.4.5 Settings For more options in settings. 2.4.6 Hide/Show photos Hide the current photo.
2.4.8 Adjust photos You can adjust the photo up, down, left and right to choose the best display content. You can also adjust it 90 degrees clockwise. After adjusting it, click OK to return to the home page. 2.4.9 Slideshow Set the playback effect through the menu's [Slideshow]. Above 6 effects are provided, but only valid for the photo slideshow.
2.4.10 Horizontal/Vertical rotation Automatically rotate the content based on actual positioning (horizontal/vertial) of the frame. 2.4.11 Video Content Settings Video_volume: You can set the volume from the menu. Pause: You can pause a playing video. 2.4.12 Weather&Time Display the weather and time of the current area. 2.5 Settings 2.5.
Set/Change the name of the frame. The frame name is also displayed in connected mobile devices, under the list of connected photo frames in the App. Frame location Set/Change the location of the photo frame. This location is displayed in the list of connected photo frames of your friends and family, helping to identify multiple frames. Time zone Set time zone for a photo frame. Language Set language used for a photo frame. Automatic date&time Use network-provided time.
2.5.2 Photo management Memory usage The Manage Photo section shows you the number of photos stored in the frame and the storage space occupied/remained. Show/Hide photos Select the photo you want to hide by tapping the photo. Hidden photos will not be deleted from the frame and can be re-displayed at any time. ⚫ You can view only the hidden photos or the displayed photos. Delete photos Select the photo you want to permanently delete from the frame by tapping the photo.
(E.g. a microSD card). To export photos: Select to the photos to be exported from the photo frame. Tap the export button to start. 2.5.3 Manage account This contains all connected accounts that are authorized to send photos to your frame . Add a new account To add a new authorized account, tap the device share button, and then share the displayed SN code and QR code in a way you prefer. Account Settings Once an account is removed from the list, it will not be able to share photos to the photo frame.
Font size Provide 4 kinds of font size options. Sleep mode When the sleep mode is on, the screen is turned off during a specific time to reduce energy consumption. The default setting is to turn off the screen at 23:00 and to turn it back on at 07:00. This can be changed by setting your preferred sleep mode start/end time. Photos can still be received when the sleep mode is on. Playback mode settings Determine how the photo will be displayed Loop: lock the current photo or video or dispay in a loop.
Set whether to display the photo description sent by the friend with the photo. Select to display the photo description. When unchecked, the photo description is hidden. Fill frame Set the default photo frame settings. When checked, the photo will fill the device screen; When unchecked, the photo will fit to the device screen (blur bands will fill the edges). Slideshow Provide above 6 slideshow effects. You can set your preferred photo display mode. Photo display mode Set the the order of photo rotation.
2.5.6 Notifications Notification volume setting Adjust the notification volume of the photo frame. 2.5.7 Wi-Fi Set the Wi-Fi connection. Wi-Fi details Display Wi-Fi details, such as Wi-Fi name, Wi-Fi strength, Wi-Fi status, etc. Add a hidden Wi-Fi Add a hidden Wi-Fi manually. 2.5.8 Help Quick setup Check the quick setup that pops up when you start the photo frame for the first time. Support For FAQ, technical support and feedback. Privacy agreement Display the content of the privacy agreement.
2.5.9 About Software version update Check the photo frame software version update. Firmware version update Check the photo frame firmware version update. System version update Display Android system version information. Mac address Display the Mac address of the photo frame. 3 How to use Whale Photo APP 3.1 Quick Setup APP is equivalent to a transfer tool, you can log in with a visitor account or with an email account.
3.2 Photo Share Sharing photos is divided into picture share and video share. Photo share: select pictures (up to 10 pictures) - select photo frames - edit pictures (adjust focus areas and name photos) - send. Video share: select video (only one video can be selected, 30 seconds length video) - select photo frame - edit video (video length and video naming) - send. 3.3 History You can check the status of photo sending tasks and perform some quick actions on the sending history side.
Clear: clears the history data (does not delete the task in the sent state). Resend: you can resend this photo to other frames. Withdraw: Deletes local history data and frame photos, as long as the history record on the app exists and the frame is online, you can withdraw the photos. 3.4 Connected frames Manage connected frames and support add/remove/rename operations.
Note: This function involves voice assistant operation, see 5 - Voice Assistant for details. 4 How to use Whale Photo Web Whale Photo Web is a pc online transferring tool for Whale Photo Frames. Through the Whale Photo Web , you can share up to 500 photos to the photo frame at once. 4.1 Log in and log out 4.1.1 Scan code login Visit the website to get access to Whale Photo Web: https://whalephoto.zeasn.
4.1.2 Log out To switch accounts for sharing, Log out the current account in the upper right corner, and scan the code to log in another account.
4.2 Photo sharing 4.2.1 Photo selection After logging in, select photos to share in two ways. 1) Click the button to open the local folder and select photos; 2) Drag photos or a folder directly to the area, then click [Next] to upload; NOTE: 1) Hold down Ctrl to select batches or drag photo(s) to the area. 2) Currently supported photo formats: JPG, JPEG, PNG. 3)Currently supported video formats: MP4. 4.2.
photos, and more. 1)Adding more photos onto the existing list. 2)Select All: Click [Select All] to select all photos, and the number of selected photos will be displayed in the upper left corner. Click [Select All] again to undo. 3)Remove: Selected photo(s)can be removed from the current transfer list by clicking [Remove]. 4)Renaming multiple photos: Selected photo(s) can be renamed in batch on the page. 4.2.3 Video editing When the video is on the list to be transferred, the video title can be edited.
4.2.4 Frame selection When finishing editing all photos, click [Next] to select a photo frame. If there is a binding device, the online photo frame information will be displayed; and if there is no binding device, you will be prompted to go to the APP to bind one.
26
4.2.5 Send Select the photo frame and click [Send]. Then, a task will be created in the taskbar. Check the photo sending progress on the page or click [History] to view it. 5)Renaming a photo: Supports name re-editing for a selected photo.
NOTE: Exit the editing mode, select a photo frame to complete photo sharing. Photo(s) cannot be shared under editing mode. 4.3 Photo sharing The Taskbar displays the photo transfer tasks for users to check sending progress. The Taskbar supports quick operations, including re-send, withdraw, delete and more. 1) View history: Click [View History] to jump to the history record. The functions of the history record are the same as Taskbar; but in here, you can view the transmission details of a single task.
5) Delete: Delete current task. 4.4 History History obtains the same functions as Taskbar but in here, you can view the details of a task to check the transferring status of photo(s) (successful, transferring, failed). 4.5 Profile 4.5.1 Profile Basic information is displayed under the profile section. 1)Connected frames : Display information of connected frames, name, location and status.
2)Privacy Policy: Displays Privacy Policy and Terms of Use. 3)Support: displays contact information of the support team. 5 Switching languages Currently, switching amongst 13 languages is supported. 6 Warranty, compliance, technical support and safety information For detailed information about warranty, hardware compliance, technical support and safety, please refer to the information in the package.
FCC Statement Changes or modifications not expressly approved by the party responsible for compliance could void the user's authority to operate the equipment. This equipment has been tested and found to comply with the limits for a Class B digital device, pursuant to Part 15 of the FCC Rules. These limits are designed to provide reasonable protection against harmful interference in a residential installation.