
User's Manual
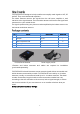
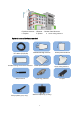

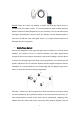
Table Of Contents

7
• Make sure the place where you install the booster is near to one existing
electrical outlet. It should also be well ventilated, away from excessive heat,
moisture, and direct sunlight.
Install tools and accessories:
No.
Name
Specification
Quantity
Remark
1
Plastic expansion bolt
Φ 8
5
Standard accessories
2
Tapping screw
M6*50
4
Standard accessories
3
Hanging folder
1
Standard accessories
4
Reciprocating drill
1
Engineering-owned
5
Shot bit
Ø8
1
Engineering-owned
The booster has LCD display and intelligent self-adaptive system, LCD displays
real time working state, and intelligent self-adaptive system can automatically
calculate and adjust the booster to obtain its best performance, so it is very easy
to install for end-user.
General installation steps:
Step1. Install your outdoor antenna on the roof where there is the strongest signal.
Step2. Install the indoor antenna where you want to improve the signal.
Step3. Mount your signal booster, connect the cables to the signal booster from the
outdoor antenna and indoor antenna at the designated ports, and connect the
booster to the AC supply (make sure all the cables are connected).
Step4. Plug in the booster to a power supply and self-adaptive system will
automatically adjust best performance in 30 seconds. (NB! Before you plug it in,
make sure all the cables are connected firmly!). For more details refer to “Booster
Commissioning”.