Version Number: 1.
Version Number: 1.0 CONTENTS 1. Introduction and Intended Use..............................................................................................3 2. Important Information on Blood Pressure and its Measurement...........................................5 3. Components of your blood pressure monitor.........................................................................7 4. Using your Monitor for the First Time.....................................................................................
Version Number: 1.0 measuring device for use by adults on the upper arm at home or in your doctor’s/nurse’s office. It enables very fast and reliable measurement of systolic and diastolic blood pressure as well as pulse through the oscillometric method. This device offers clinically proven accuracy and has been designed to be user friendly. Before using, please read this instruction manual carefully and then keep it in a safe place.
Version Number: 1.0 Warning: Do not use cuffs, AC adapters or batteries other than those included with this product or replacement parts supplied by the manufacturer. Warning: Do not use the batteries and the AC adapter to provide power at the same time. Warning: This system may fail to yield specified measurement accuracy if operated or stored in temperature or humidity conditions outside the limits stated in the specifications section of this manual.
Version Number: 1.0 variety of situations through feedback from the nervous system. To adjust blood pressure, the strength and speed of the heart (Pulse), as well as the width of circulatory blood vessels is altered.Blood vessel width is controlled by fine muscles in the blood vessel walls. Your level of arterial blood pressure changes periodically during heart activity: During the “blood ejection” (Systole) the value is highest (systolic blood pressure value).
Version Number: 1.0 and 159mmHg and/or the diastolic blood pressure values between 90 mmHg and 99mmHg, consult your physician. Regular self-checks are necessary. If you have blood pressure values that are too low, (i.e., systolic values under 105mmHg and/or diastolic values under 60 mmHg), consult your physician. Even with normal blood pressure values, a regular self-check with your blood pressure monitor is recommended. You can detect possible changes in your values early and react appropriately.
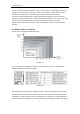
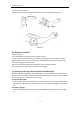
Version Number: 1.0 Picture-03 Picture-04 Picture-05 3.2. The symbols on the LCD display 1. Systolic blood pressure 2. Diastolic blood pressure 3.Pulse display 4. Irregular heartbeat symbol 7. Mute symbol 5.Average symbol 6. Bluetooth symbol 8. Battery low symbol 9. Memory symbol 10. Heartbeat symbol 3.3.
Version Number: 1.0 1. Talking function 2.One user: 120 sets memory 4. Average value function 5. Battery display 3.Irregular heartbeat checking 6. Auto power-off 7. Built-in chargeable lithium battery 10.Volume adjustment 11. Date/time display 12. Cuff and main unit are integrated as one part 13. Bluetooth function Note: Arm circumference should be measured with a measuring tape in the middle of the relaxed upper arm. Do not force cuff connection into the opening.
Version Number: 1.0 5. Measurement Procedure Note: You should always be seated and calm before and during measurement. 5.1. Before measurement: • Avoid eating and smoking as well as all forms of exertion directly before measurement. These factors influence the measurement result. Find time to relax by sitting in an armchair in a quiet atmosphere for about ten minutes before taking a measurement. • Remove any garment that fits closely to your upper arm. • Always measure on the same arm (normally left).
Version Number: 1.0 sure the tube is not kinked. f)Remain seated quietly for at least two minutes before you begin the measurement. Artery Picture-06 5.4 Measure Procedure Refer to picture 07 1. Sit comfortably in a chair with your feet flat on the floor. 2. Stretch your arm forward on the desk and keep relaxing, make sure the palm of hand is upturned. Make sure arm is in correct position, to avoid body movement. Sit still and do not talk or move during the measurement.
Version Number: 1.0 App 01 App 02 App 03 c) Connect Bluetooth After the setting is finished, click the HOME button on the top right corner as picture App 01, then select Bluetooth Device button. A moment later, the device will be connected as picture App 05 and App 06. App04 App05 App 06 d) Start the measurement Once the Bluetooth is connected, click the “START” button on the App to start the testing as picture App 06.
Version Number: 1.0 App 07 App 08 e) Checking the measurement In the frame of home interface, it will show the last measurement as picture App 09. You can check the measurements with detail by clicking the History button as picture App 10 and app 11 . App 09 App 10 App 11 2) Operate on the device Press the Stop/Start button as the power on (blue indictor is turned on). The pump begins to inflate the cuff.
Version Number: 1.0 3. Any reading can be affected by the measurement site, the position of the PATIENT, exercise, or the PATIENT’S physiologic condition. 4. Performance of the AUTOMATED SPHYGMOMANOMETER can be affected by extremes of temperature, humidity and altitude. 5. To stop the inflation or measurement, push the START/STOP button. The monitor will stop inflating, start deflating, and will turn off. 6.
Version Number: 1.0 SYMBOL CAUSE CORRECTION No display Weak battery or improper Replace both batteries with new ones. appears placement Check the battery installation for proper placement of the battery polarities. Er1 Sensor abnormal Check if the pump is working or not. If it is working, then the problem is sensor abnormal. Please send it to the local distributor. Er2 Monitor could not detect pulse Check if the air releasing is too slow or wave or cannot calculate the not.
Version Number: 1.0 Er 8 The demarcation is incorrect Please send back to the local or the device has not been distributor demarcated The above symbols will appear on the display when measuring abnormal SYMBOL DESCRIPTIONS The following symbols may appear in this manual, on the Digital Blood Pressure Monitor B66T, or on it's accessories. Some of the symbols represent standards and compliances associated with the Digital Blood Pressure Monitor B66T and its use.
Version Number: 1.0 Follow instructions for use IP21 The degree of avoid ingress of water or particulate matter into ME equipment 5.7. Memory At the end of a measurement, this monitor automatically stores each result with date and time. Each unit stores 120 sets measurements. Viewing the stored values Press MEM button, it will seek for the memory record. 5.8. Discontinuing a Measurement If it is necessary to interrupt a blood pressure measurement for any reason (e.
Version Number: 1.0 Your blood pressure monitor is guaranteed for 2 years against manufacturers’ defects for the original purchaser only, from date of purchase. The warranty does not apply to damage caused by improper handling, accidents, professional use, not following the operating instructions or alterations made to the instrument by third parties. Warranty only applies to the instrument. All accessories including the cuff are guaranteed for one year, USB charging cable is not included.
FCC Statement: This device complies with part 15 of the FCC Rules. Operation is subject to the following two conditions: (1) This device may not cause harmful interference, and (2) this device must accept any interference received, including interference that may cause undesired operation. This equipment has been tested and found to comply with the limits for a Class B digital device, pursuant to part 15 of the FCC Rules.