(it) innovative technology: Modern Bluetooth’ Stereo Turntable Model: TUT-420 Instruction Manual PLEASE READ THIS INSTRUCTION MANUAL CAREFULLY BEFORE USE AND KEEP IT FOR FUTURE REFERENCE.
SAFETY INSTRUCTIONS 1. Read these instructions — All the safety and operating instructions should be read before this product is operated. 2. Keep these instructions — The safety and operating instructions should be retained for future reference. 3. Heed all warnings — All warnings on the appliance and in the operating instructions should be adhered to. 4. Follow all instructions — All operating and use instructions should be followed. 5.
20. This equipment is a Class Il or double insulated electrical appliance. It has been designed in such a way that it does not require a safety connection to electrical earth. A 0) pm mm men | outercourse | Lemma lateral tri is intern to alert Is 18 user 8 0 the pretense of undulated ‘dangerous. | FISK OF ELECTRIC SHOCK, presence of Important operating and 21. voitage® within the product's enclosure that DO NOT REMOVE HOVER (OR BAGGING.
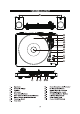
TURNTABLE LAYOUT NEON AON © 06 ROLODEX HEE 16117) Speakers 10. Power/Function LED Indicator Turntable Platter ". Volume Control Knob Felt Mat 12. Stylus (Needle) Cartridge Lift Lever 13. External Speaker Jacks Tone Arm Clip/Rest 14. Function Selection Switch Auto & Manual Stop Control Switch 15. L/R RCA Output Jack Speed Control Selection Switch 16. DC IN Power Jack Turntable Shaft 17.
TURNTABLE OPERATION SET UP An AC/DC adapter with an output of 12V DC 2.0A is included with the Modern Bluetooth Stereo Turntable. This adapter is required for operating the unit. 1. Connect the external speaker cables from the EXTERNAL SPEAKER JACK on the back of the unit to each speaker. NOTE: The external speaker cables are color coded, the red cable is plugged into a red jack on both the unit and speakers (black cable into the black jacks). 2.
HOW TO REPLACE THE TURNTABLE NEEDLE Removing the Stylus from the Cartridge 1. Place a screwdriver at the tip of the stylus and push downward as shown in direction “A”. WARNING: when applying force to stylus, too much may damage or break the stylus. 2. Remove the stylus by pulling the stylus forward and pushing downward. Installing the Stylus 1. Hold the tip of the stylus and insert the stylus by pressing as shown in direction “B”. 2.
[deed =nS Warning: Changes or modifications to this unit not expressly approved by the party responsible for compliance could void the user authority to operate the equipment. NOTE: This equipment has been tested and found to comply with the limits for Class B digital device, pursuant to part 15 of the FCC Rules. These limits are designed to provide reasonable protection against harmful interference in a residential installation.
WARRANT Innovative Technology Electronics LLC. Limited Warranty: 90 Days Labor, One Year Parts Innovative Technology Electronics LLC. (IT) warrants the product to be free from “Defects” in materials under normal use for a period of “One Year” from the date of the original purchase. The Warranty is “Not” transferable. IT agrees, within the initial “90 Day” period, to repair or replace the product if it is determined to be defective at “No Charge”.
WARRANTY Innovative Technology Electronics LLG, Limited Warranty: $0 Days Labor, Uns Year Parts Innovative Technology Electronics LEC: (TT) whatsits ths tropic to be free from “Defects™in materials Under normal use Tor a period of “One Year? from the date of the origins! purchase. The ‘Warranty bs “Not” transferable. IT agrees, within the initial "90 Day” period, to reportorial replace the product if it is determined to be defective at "No Charge”.