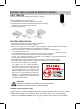
FCC NOTICE: This device complies with part 15 of the FCC Rules. Operation is subject to the following two conditions: (1) this device may not cause harmful interference, and (2) this device must accept any interference received, including interference that may cause undesired operation.. Any changes or modifications not expressly approved by the party responsible for compliance could void the user's authority to operate the equipment.
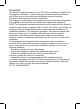
PROdUCT OvERvIEW TOP VIEW 1 STANDBY MODE 2 3 WPS VOL- 4 5 6 VOL+ 1.STANDBY/MODE Button 2. /WPS Button 3. /VOL- Button 4. 5. 6. /VOL+ Button (Microphone On/Off) Button (Communication) Button REAR VIEW FRONT VIEW 7 AUX IN 2 FM ANT AUX IN 1 L R OPICAL IN 8 10 9 11 12 9 7. Communication Status LED Indicator 8. Remote IR Sensor 9. Built-in Microphone 10. Display 13 14 16 16 16. Speaker 3 16 16V,3A 15 11. FM Antenna 12. OPTICAL IN Port 13. AUX IN 1 Jack 14. AUX IN 2 Jack 15.
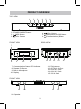
REMOTE CONTROL 1 2 MODE TUNE- 6 7 8 TUNE+ 9 10 3 4 11 WPS 5 NHS-5002 1. Power Button 6. 2. (Previous)/ TUNE- Button 7. MODE Button 3. VOL - (Volume down) Button (Mute)Button 8. (Next)/TUNE+ Button 9. (Play/pause) Button 4. (Microphone On/Off) Button 10. VOL + (Volume up) Button 5. (Communication) Button 11.
BATTERY INSTALLATION OF REMOTE CONTROL FIRST TIME USE ●Remove and discard the insulation film as figure on the right. ●Replacing Batteries For Remote Control 1. Push and slide out the battery holder as figure 1 below. 2. Replace the battery with a new CR2025 button cell as the polarity markings on the rear of the Remote Control. 3. Close the battery holder. Fig.1 Fig.2 Fig.3 BATTERY PRECAUTIONS Follow these precautions when using a battery in this device: 1.
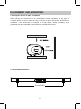
PLACEMENT AND MOUNTING 1. Placing the device on table - Ventilation When placing the Sound Bar on an entertainment center, bookshelf, or any type of enclosed space, be sure to allow at least 2-3 inches of space around the Sound Bar for ventilation. If the Sound Bar is enclosed in a tight space, without ventilation, heat generated from the Sound Bar could produce a potential heat hazard. 2. The Installation Distance AUX IN 2 FM ANT AUX IN 1 OPICAL IN L R DC 16V,3A 29.
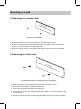
Mounting to a wall 2.1 Mounting to a wooden wall 29. 1 in che s (screws not included) A. Mark the position of the mounting screws on the wall using a pencil. B. Drill the screws directly into the marks that you have made on the wall and leave approx. 0.3 inches length to hook the sound bar. C. Put the sound bar onto the mounting screws. Make sure they are firm and stable. 2.2 Mounting to a brick wall 29. 1 in che s (screws and plastic fixing plug are not included) A.
GENERAL OPERATION 1. Connect the AC/DC adapter to the unit and wall outlet. "WAIT" will sppear on display. 2. Press and hold the STANDBY/MODE button on the unit or press the Button on remote control to turn on the unit. Press the STANDBY/MODE button on the unit or press the MODE button on remote control repeatedly to turn to desired mode as below: WIFI..................................................................................................WIFI Mode BT...............................................
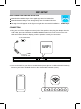
WIFI SETUP APP dOWNLOAd ANd INSTALLATION Download the MUZO Player from Apple App store for iOS devies. Download MUZO Player from Google Play store for Android devices. The App icon will appear as the figure on right after successful installation. MUzO Player CONNECTION 1. Plug one end of the adapter to DC IN jack of the speaker, then plug the adapter into the wall outlet, press and hold the STANDBY/MODE button on the unit to turn on the unit.
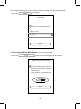
4. Inputing the WiFi password to make the speaker to connect to WiFi network(router), to continue. Press the Next < WIFI INFO 1 Please enter Wi-Fi password: Wi-Fi: XXXX Password: Please enter Wi-Fi password Next 5. Press and hold the WPS button on top of the speaker. Press the Next button on your MUZO Player to continue. < PRESS TO ENTER SETUP M... 2 Press the WPS key on device to put the device into network setup mode.
6. There will be voice instructing like " searching for WiFi connection", " waiting for WiFi connection" during the connecting process. < PLEASE WAIT 3 Wait for device to be connected to Wi-Fi... Don't operate device during Wi-Fi setup. Please wait for compltion of setup patiently. It's usually finished in 60 seconds. Cancel If you hear voice prompt for erro message. please go back and retry 7.
HOME PAGE INTERFACE Click the " MUZO " on screen to enter homepage, operate as below instructions and the screen instructions. Some platforms may need registration. Touch to search online songs Search Touch to listen the collected favorite songs Favorites Touch to listen native songs D D My music Touch to listen radio, talks, sports, etc.
SPOTIFY OPERATION Before use, you have to create an spotify premium account for log in. 1. Tap "Spotify" on MUZO homepage. 2. Input your account and password to log in. 3. Open the Spotify on your phone, tablet or PC, and play any song. 4. Tap the connect icon . 5. Pick your device from the list. Licenses The Spotify Software is subject to third party licenses found here: www.spotify.com/connect/third-party-licenses. IHEARTRADIO OPERATION Before use, you have to create an iHeartradio account for log in.
AMAZON LINK PLAY ALEXA VOICE CONTROL Before using Amazon linkplay Alexa voice control function, you must get an Amazon prime account, creat an account on Amazon website. 1. Touch Amazon on homepage, the log in window will pop up, input your account and password to log in. 2. If you have logged in before, the figures below will appear and operate as the tips. Amazon login successful Next 3.
COMMUNICATION INDICATOR STATUS communication status indicator FRONT VIEW OF THE UNIT SPEAKER STATUS LED STATUS Idle White LED ON Listening Blue LED ON Thinking Blue LED ON Talking Blue LED blinks Microphone Off Red LED ON 15
BLUETOOTH OPERATION Pairing the speaker with Bluetooth devices (phone or music device) 1. Plug one end of the adapter to DC IN jack of the speaker, plug the adapter into the wall outlet, press and hold the STANDBY/MODE button to powr on the unit, wait until "WIFI" appears on display. 2. Press the MODE button repeatedly until the "BT" blinks on display. Now it is in pairing mode. 3. Activate the Bluetooth function on your Bluetooth device (phone or music device).
RAdIO OPERATION Befor using your unit for FM reception, unwrap and fully extend the antenna wire. You may need to adjust the position of the antenna wire for maximum signal strength. 1. Plug one end of the adapter to DC IN jack of the speaker, plug the adapter into the wall outlet, press and hold the STANDBY/MODE button to powr on the unit, wait until "WIFI" appears on display. 2. Press the MODE button repeatedly until the "RADIO" blinks on display. 3.
AUX IN 1 OPERATION 1. Connect the external audio device to the unit by an audio connection cable with 3.5mm stereo mini jacks as: ~ Insert one end to the Phone; Line Out or AUX Out Jack on the external audio device. ~ Insert the other end to the AUX IN jack on the rear of the main unit. AUX IN 1 MP3 (Audio Connection Cable supplied) Mobile Phone Connect to the Phones; AUX Out; Line Out Jack of the external devices (Such like MP3 Player; cell phones; iPod/iPad ... etc) 2.
AUX IN 2 OPERATION An external Video/audio player(such as TV, DVD Player, VCR etc.) can be connected to this unit and heard through the speakers. 1. Plug one end of RCA White and Red cable into the LINE IN jacks on the rear of the unit. Plug the other end of RCA White and Red cable into audio out jacks of TV or external device as the illustration shown as below. AUX IN 2 L V L R white plug R red plug Audio out jacks of TV/DVD/VCR/DVR etc 2.
OPTICAL IN OPERATION 1. Connect the Optical out jack from the external audio Player (such like TV, DVD Player BD Player …etc.) to the OPTICAL IN jack on the top of unit by the Optical Connection Cable (not supplied) as the figure below: ( F or PCM format only ) OPICAL IN Optical Connection Cable ( not supplied ) TV; DVD player; BD player... etc. 2.
TROUBLESHOOTING Check the following before requesting service: SYMPTOM POSSIBLE CAUSE POSSIBLE SOLUTION No sound or sound weak Volume level of paired/connected device Rise the volume level of the is in low level paired/connected device Sound distortion Volume level of the connected/paired Reduce the volume level of the device too high connected/paired device BT not f unctioning The external BT device had NOT paired to Pair the external BT device to the the unit unit The external BT device too
LIMITED WARRANTY NAXA LIMITED WARRANTY (“Warranty”) — For Product Categories Listed in Chart Below (as applicable, “Product”). Before returning your Product for service under this Warranty, please read the instruction manual carefully and visit our website at www.naxa.com for product updates and extended support documentation (e.g., Frequently Asked Questions, Common Troubleshooting Guides, etc …). If you are still having trouble with your Product, please contact Naxa Customer Support.