TOWER TOWER STEREO STEREO SYSTEM SYSTEM Owner's Manual PLEASE READ BEFORE OPERATING THIS EQUIPMENT.
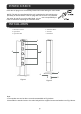
POWER SOURCE Insert the AC plug into a conveniently located AC outlet having AC 120V~60Hz. NOTE: The AC plug supplied with the unit is polarized to help minimize the possibility of electric shock. If the AC plug dose not fit into a non polarized AC outlet, do not file or cut the wide blade. It is the user's responsibility to have an electrician replacing the obsolete outlet. INSTALLATION 1. Remote Sensor 2. Speakers 3. Speaker Net 4. Wooden Base 5. Screws 6.
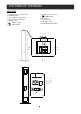
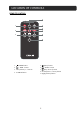
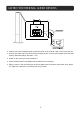
LOCATION OF CONTROLS MAIN UNIT 1.ST/MO (Stereo/ Mono) button 2.SOURCE button 3.VOL- (Volume Down) button 4.VOL+ (Volume Up) button 5.AUX IN 2 jack 6. / TUNE+ button 7. / TUNE- button 8. (Play/Pause) button 9. POWER button 10.Indicator 11. FM Antenna 12.AUX IN 1 jacks 13.
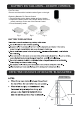
LOCATION OF CONTROLS REMOTE CONTROL 4 1 POWER 1 2 2 5 SOURCE 3 6 7 TUNE+ TUNE- VOL 3 8 ST/MO 9 EQ 1. POWER button 2. / TUNE - button 3. VOL (Volume)+/- buttons 4. SOURCE button 5. (Mute) button 6.
BATTERY INSTALLATION--- REMOTE CONTROL -First Time Use Remove and discard the insulation tab as figure on the right -Replacing Batteries For Remote Control 1. Push and slide out the battery holder as figure 1 below. 2. Replace the battery with a new CR2025 button cell as the polarity markings on the rear of the Remote Control. 3. Close the battery holder. Fig.1 Fig.2 Fig.3 BATTERY PRECAUTIONS EFFECTIVE DISTANCE OF REMOTE TRANSMITTER Remote Sensor, on the front of main unit Approx.
GENERAL OPERATIONS 1. Insert the AC plug into a conveniently located AC outlet having AC 120V~60Hz. 2. Move POWER ON/OFF switch on the rear of the unit to ON position to switch the unit to Standby mode and the indicator will turn Red. 3. Press Power button on the unit or remote control to power on the unit. The Red Standby indicator will turn off. The Source indicator will light. 4.Press the SOURCE button repeatedly to switch to desired mode.
LISTEN TO FM RADIO 1.Power on the unit as previous procedures. 2.Press the SOURCE button repeatedly until the color of the indicator turns Green. 3.Press and hold the /TUNE - or /TUNE + buttons until the indicator start blinking. The unit will start to search next (or previous) available FM radio station then plays. 4.Repeat the same procedures until the desired radio station are received. 5.If the received FM stations are in stereo mode, the unit will play in stereo mode automatically..
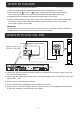
LISTEN TO EXTERNAL AUDIO DEVICES AUX IN 2 jack INDICATOR AUX IN 2 ST/MO SOURCE VOL- VOL+ TUNE- TUNE+ INDICATOR AUX IN 2 POWER 1. Connect one end of supplied audio connection cable to the AUX IN 2 jack on the top of the unit. 2. Connect the other end to the AUX out/Line out/Phone jack on the external player (such like iPod, iPhone, iPad, MP3 player, Discman... etc.). 3. Power on the unit as previous procedures. 4. Press SOURCE button repeatedly until the indicator turns Orange. 5.
BLUETOOTH PARING AND PLAYBACK 1. Power on the unit as previous procedures. 2. Press the SOURCE button on the unit or remote control until the indicator turns blue. 3. Turn on the BT function on the external BT device and play the music as usual. (Make sure the volume level of the external BT device is set to high level). 4. During palyback: Press the VOL (Volume) +/- buttons to adjust volume level. Press the / TUNE- or / TUNE + button to skip track. Press the (Play/Pause) button to pause.
TROUBLESHOOTING GUIDE Check the followings before requesting service SYMPTOM POSSIBLE CAUSE POSSIBLE SOULTION No power AC plug not connected to the wall outlet Plug to the wall outlet.
GENERAL SPECIFICATIONS Power Source...........................................................................................................AC 120V~60Hz Power Consumption...................................................................................................................45W Radio Coverage................................................................................................FM 87.5 -108.0 MHz Impedance of Speakers: Loud Speakers .......................................................
LIMITED WARRANTY Craig warrants this product to be free from manufacturing defects in material and workmanship under normal use for a period of 90 days from date of purchase. If service is required, please return the product to the store where it was purchased for exchange; or, pack the unit in the original packing material with all accessories if applicable, a copy of your sales receipt and a Cashier’s check or Money Order for $20.00 (to cover shipping and handling costs) payable to Craig Electronics Inc.