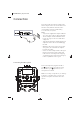
STVG888-ENG-v2_Layout 1 04/14 SB G/U CD PALY/PAUSE/ENTER MENU STVG888W www.singingmachine.com The Singing Machine® is a registered trademark or The Singing Machine Co., Inc.
STVG888-ENG-v2_Layout 1 04/14 Warnings WARNING: TO PREVENT FIRE OR SHOCK HAZARD, DO NOT EXPOSE THIS UNIT TO RAIN OR MOISTURE. CAUTION RISK OF ELECTRIC SHOCK DO NOT OPEN FCC WARNING: Changes or modifications not expressly approved by the CAUTION: TO REDUCE THE RISK OF ELECTRIC SHOCK, DO NOT REMOVE COVER (OR BACK). NO USER-SERVICEABLE PARTS INSIDE. REFER SERVICING TO QUALIFIED SERVICE PERSONNEL. The Caution marking is located on the bottom panel.
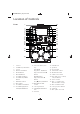
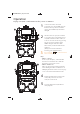
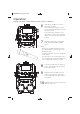
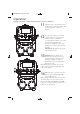
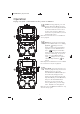
STVG888-ENG-v2_Layout 1 04/14 Location of Controls 1. 2. 3. 4. 5. 6. 7. 8. 9. 10. 11. 12. 2 3 4 5 6 7 8 9 10 11 12 13 14 15 16 21 22 23 24 25 10 26 CD G/U SB 20 PALY/PAUSE/ENTER 1 MENU Front 27 28 29 17 18 17 30 19 19 Camera POWER ON/OFF Button Screen BLUETOOTH Button MODE Button RECORD Button SD CARD Up Button SD CARD Left/MENU Button BALANCE Control Mic Holders SD CARD Down Button SD CARD Right/PLAYPAUSE/ENTER Button 13.
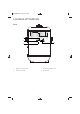
STVG888-ENG-v2_Layout 1 04/14 Location of Controls Rear 1 2 4 3 1. AUDIO OUT Left Jack 2. VIDEO OUT Jack 3. AUDIO OUT Right Jack 4.
STVG888-ENG-v2_Layout 1 04/14 Connection Connecting the Unit to an External TV, Stereo, etc. Your Singing Machine is designed to connect to your TV the same way you would connect most video cameras, DVD players or video game consoles, as follows: 1 Connect the Audio/Video cable’s yellow plug to the yellow VIDEO OUT jack on the STVG888W and the other end to the external unit’s yellow Video In jack.
STVG888-ENG-v2_Layout 1 04/14 Connection Insert the small end of the AC adapter into the DC IN jack on the rear of the unit. Insert the other end (with the 2 blades) into a conveniently located AC outlet having 110-240V AC, 50/60Hz. Notes: • Only use the supplied AC adapter. Failure to do so may cause a fire or damage the unit. • The AC adapter included with this unit is for its use only. Do not use it with other equipment.
STVG888-ENG-v2_Layout 1 04/14 Operation Playing a CD (with or without MP3+G files), CD+G or USB Drive 1 Connect the unit as described previously. Press the POWER ON/OFF button to the in position to turn the unit on; the POWER ON/OFF button will light. 2 CD: Press the CD Open/Close button to open the CD door and then insert a CD (with standard or MP3+G files) or a CD+G. Close the CD door by pressing the CD Open/Close button again.
STVG888-ENG-v2_Layout 1 04/14 Operation Playing a CD (with or without MP3+G files), CD+G or USB Drive 6 If listening to an MP3+G or CD+G files, view as follows: To view the image and lyrics on the screen, rotate the MONITOR control to the CDG position. To view the image and lyrics on an external TV (if connected), rotate the VIDEO OUT control to the CDG/USB position. 7 Adjust the volume to a comfortable level using the MASTER VOLUME control.
STVG888-ENG-v2_Layout 1 04/14 Operation G/U SB 12 CD MENU PALY/PAUSE/ENTER Playing a CD (with or without MP3+G files), CD+G or USB Drive ak 11 Adjust the Key to obtain the best key for the singer on the track. Adjust the key using the KEY – and KEY + buttons. 12 Press the AVC (Auto Voice Control) ON/OFF button to the On position and the vocals on a multiplex recording will be muted as soon as the singer begins singing into the microphone.
STVG888-ENG-v2_Layout 1 04/14 Operation Playing a CD (with or without MP3+G files), CD+G or USB Drive SB G/U CD PALY/PAUSE/ENTER ao MENU 15 ao SEARCH: During playback, press and hold the Skip Back /Skip Forward button to move the player backward or forward within a track to locate a specific musical passage. When you release the respective button, normal playback will resume. Note: The Search function is not available for CD+G playback.
STVG888-ENG-v2_Layout 1 04/14 Operation Playing a CD (with or without MP3+G files), CD+G or USB Drive 18 SB G/U CD PALY/PAUSE/ENTER as MENU 20 ar PAUSE: During playback, if you wish to pause the disc momentarily, press the Play/Pause button. Press again to resume normal playback. Note: Pausing the unit while playing a CD+G may distort the lyrics on the screen. This will remain until the screen is refreshed. 19 Press the playback.
STVG888-ENG-v2_Layout 1 04/14 Operation Using a Bluetooth Device u SB G/U CD PALY/PAUSE/ENTER MENU v 1 Connect the unit as described previously. Press the POWER ON/OFF button to the in position to turn the unit on; the POWER ON/OFF button will light. 2 Rotate the FUNCTION control to the BLUETOOTH position to select the Bluetooth mode; a tone will sound and the blue Bluetooth background light will blink rapidly.
STVG888-ENG-v2_Layout 1 04/14 Operation Using a Bluetooth Device G/U SB U CD MENU PALY/PAUSE/ENTER 6 V PLAY/PAUSE: Press the BLUETOOTH BUTTON to pause during playing, press again to resume playing. 7 Make sure the Bluetooth device has its volume set to mid range, then adjust the volume to a comfortable level using the MASTER VOLUME control. Note: If connected to a TV or other audio source, adjust the volume of the TV using its own volume control.
STVG888-ENG-v2_Layout 1 04/14 Operation Using a Bluetooth Device 12 BALANCE: Balance allows you to eliminate the lead singer’s voice by rotating the knob to the left when playing a multiplex recording, or eliminate the music by rotating the knob to the right. Note: When playing a music-only recording, the balance will shift to the right or left speaker. SB G/U CD PALY/PAUSE/ENTER al MENU am 13 13 Press the POWER ON/OFF button to the out position to turn the unit off.
STVG888-ENG-v2_Layout 1 04/14 Operation Using a Guitar, Keyboard or External Music Player v 1 Connect the unit as described previously. GUITAR/KEYBOARD: Connect the Guitar or Keyboard to the GUITAR/ KEYBOARD Ext. Input jack. LINE IN: Connect a music player using a 3.5mm standard audio cable from the external unit’s Audio Output/ Headphone jack to the STVG888W’s LINE IN Ext. Input jack. 2 Press the POWER ON/OFF button to the in position to turn the unit on; the POWER ON/OFF button will light.
STVG888-ENG-v2_Layout 1 04/14 Operation Using a Guitar, Keyboard or External Music Player SB G/U W CD MENU X PALY/PAUSE/ENTER at V 6 Connect microphone(s) as shown on page 5, and slide the ON/OFF switch to the ON position. 7 Adjust the MIC VOLUME control as desired. Increasing this control will increase the volume of the respective microphone. 8 Adjust the Echo control to add an echo effect to your voice.
STVG888-ENG-v2_Layout 1 04/14 Operation Recording the Camera and Singing on an SD Card u 3 To view the v i d eo on the screen, rotate the MONITOR control to the Camera position. 4 To view on an external TV (if connected), rotate the VIDEO OUT control to the Camera position. 5 Press the camera head and the camera will spring up. 6 Insert an SD card (up to 32GB) into the SD Card Slot on the right side of the camera.
STVG888-ENG-v2_Layout 1 04/14 Operation Recording the Camera and Singing on an SD Card 7 will Press the MODE button the appear on screen.and then press the RECORD button to start recording; a red and will appear on the screen and the red and RECORD button will start blinking. Note: If there is no SD card inserted, will appear. 8 Connect microphone(s) as shown on page 5, and slide the ON/OFF switch to the ON position. 9 Adjust the volume to a comfortable level using the MASTER VOLUME control.
STVG888-ENG-v2_Layout 1 04/14 Operation Recording the Camera and Singing on an SD Card 16 13 To stop and save the recording, Press RECORD button to stop recording; the RECORD button will stop blinking and the video and audio will be saved on the SD card. 14 To watch the recorded video, press the MODE button and then the SD CARD (R ight/PLAY-PAUSE -ENTER) button; playback will appear.
STVG888-ENG-v2_Layout 1 04/14 Operation Where to Download MP3+G Files To purchase and download karaoke music, please visit http://store.singingmachine.com to access over 12,000 of your favorite karaoke songs. You will need a USB flash drive (not included) to transfer the downloads to this unit. Follow these easy steps: Helpful Hints: The .mp3 and .cdg files are delivered for download in a single, compressed MP3+G.zip file. The MP3+G file cannot be played as a .zip file on a USB flash drive.
STVG888-ENG-v2_Layout 1 04/14 Care and Maintenance Care for Compact Discs Treat the compact disc carefully. Handle the compact disc only by its edges. Never allow your fingers to come in contact with the shiny, unprinted side of the compact disc. B E NZEN E C LE A N E R Do not attach adhesive tape, stickers, etc. to the compact disc label. Clean the compact disc periodically with a soft, lint-free, dry cloth. Never use detergents or abrasive cleaners to clean the compact disc.
STVG888-ENG-v2_Layout 1 04/14 Troubleshooting Guide Should this unit exhibit a problem, check the following before seeking service: No Power • Power is not on; press the POWER ON/OFF button to turn power on. • Make sure the unit is connected to AC power. No Sound – General • Master Volume is set to minimum; raise volume. • Correct Function was not selected; select using the FUNCTION button. No Sound – If connected to a TV • Volume on the TV is muted or too low.
STVG888-ENG-v2_Layout 1 04/14 Specifications AUDIO Output Power (Maximum)...................................................................................................... 10W (RMS) Output Impedance .............................................................................................................................6 Ohms CD PLAYER Frequency Response ......................................................................................................... 100 Hz-20 KHz Signal to Noise Ratio......
STVG888-ENG-v2_Layout 1 04/14 Visit Our Website: www.singingmachine.com Visite nuestro sitio web: www.singingmachine.com Visitez notre site Internet au: www.singingmachine.