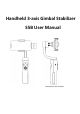
Handheld 3-axis Gimbal Stabilizer S5B User Manual *Smartphone not included
CONTENT ● Package List................................................................1 ● Disclaimer and Warning.............................................2 ● Safety Operation Guidelines......................................4 ● Get to know the Stabilizer.........................................6 ● USB Connection.........................................................8 ● Mounting Mobile phone, Checking Balance..............9 ● Operating .................................................................
PACKING LIST The product should be packed with following items (including this user manual), If you are missing any items or components, please contact your dealer immediately! GIMBAL STABILIZER ×1 MICRO USB CABLE ×1 MANUAL ×1 STRING 1 ×1
DISCLAIMER AND WARNING Thank you for purchasing our Stabilizer. Before you start PLEASE read this manual and become familiar with Gimbals’ components and operating modes to ensure proper operation. The information contains herein affects your safety and your legal rights and responsibility. Failure to read and follow the instructions and warnings may result in serious injury to you or damage to your device or property.
DISCLAIMER AND WARNING WARNING Read the ENTIRE User guide to become familiar with the features of our Stabilizer before operating. Failure to operate the product correctly can result in damage to the product or personal property, and cause serious injury. This is a sophisticated product. It must be operated with caution and common sense and requires some basic mechanical ability. In-correct Use of product in a safe and responsible manner could result in injury or damage to the product or other property.
SAFETY OPERATION GUIDELINE The Stabilizer should be used in temperatures from 0℃ to 40℃. Use of the battery in environments above 40℃ can lead to a fire or explosion. Use of battery below 0℃ can lead to serious damage. IMPORTANT BATTERY SAFETY INFORMATION • DO NOT use any third-party or unknown accessories or batteries. • DO NOT disassemble the battery. • DO NOT short-circuit the battery. Short circuiting may occur when the battery touches other metal objects. • DO NOT charge the battery in direct sunlight.
SAFETY OPERATION GUIDELINE ■ CAUTION: 1. The Stabilizers a high -precision control device, damaged may be caused to stabilizer if it is dropped or subject to external force, and this many result in malfunction. 2. Make sure the rotation of Stabilizer axes is not blocked by external force when the stabilizer is power on. 3. 3. The Stabilizer is not waterproof or water-resistant. Prevent contacts of any kind of liquid or clear with. Prevent contacts of any kind of liquid or clear with.
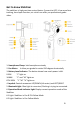
Get to know Stabilizer The stabilizer is high-precision control device. Connect to APP, it has more face tracking, time-lapse function, etc. which can offer you professional grade video. 1. Smartphone Clamp- hold smartphone steady. 2. Pan Motor- it allow you gimbal to rotate 330 degrees horizontally 3. Battery Level Indicator- The button shows how much power is left. 0-33% “L” light on 34-66% “L” and “M” lights on 67%-100% “L” “M” “H” lights on 4.
6.3 Light- Stabilizer in Lock Mode 7. Power ON/OFF and Press 2 times to bring the Mobile phone to bring the Mobile phone to its original position Power ON/OFF- press and holder the button (8) for 3-4 seconds until the three light (6.1 )(6.2)(6.3) flashes blue, than turn on (Default Mode: Pan & Tile Mode) Mode Button- in single press to switch mode from three operation modes 8. Zoom Control- It enables your lens of camera from wide angle to a closer shot of your subject 9.
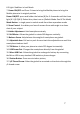
USB CONNECTION IN-USE CHARGING Connect the Micro USB Port on the side of stabilizer's handle to a power source SUCH AS a power pack (not include) to extend run-times. MOBILE CHARGING The USB port at the bottom of the stabilizer handle can be used for charging of your Smartphone while use. ■ An L-shape charging connector is required when the Smartphone is mounted horizontally on the mobile clamp.
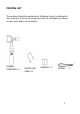
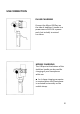
MOUNTING SMARTPHONE Place Smartphone to mounting clip as show. Slide the Smartphone to right until it touches Tilt Motor. ADJUST BALANCE If the Smartphone does not stay leveled when mounted, please do as following: Step 1: Loosen the Roll balance Knob. Step 2: Make small Adjustment by sliding the horizontal arm, until the mobile balance almost. Step 3: Tighten the Thumb Screw after the phone is well balanced in level to ensure normal operations.
OPERATING To Power On Press & Hold the Power/Shooting button for 3-4 seconds until the Mode Indicator light flashes blue, and then turns on All Follow Light in blue color finally. TO POWER OFF Press & Hold the Power/Shooting button for 3-4 seconds until the Mode Indicator light is off.
OPERATING MODES SWITCHING STABLIZER MODES a. The stabilizer enters default Pan & Tilt Following Mode each time when powered on. Step 2: Click power button to Switch into Pan Following Mode. Step 3: Single Press the power button to enter into Locking Mode Notes: The Joystick Function can be used in all 3 modes. (The any camera-position adjustment can be manually control by hands) Following Mode: Roll axes is locked. The camera pan and tilt are following the movement of camera.
CHANGE ORIENTATION 1. SWITCHING FROM HORIZONTAL TO VERTICAL Keep the phone facing yourself and rotate the Stabilizer handle over 70 degrees in counterclockwise direction, Stabilizer will enter vertical shooting Mode. (Phone camera upward) Keep the phone facing yourself and rotate the Stabilizer handle over 70 degrees in clockwise direction, Stabilizer enter vertical shooting. (Phone camera upward) 2.
HOW TO DOWNLOAD APP 1.Scan QR Code (For Android +iOS) and download below APP for accessing. 2. Find the “Gimbal Pro” App on Google Play & APP Store BLUEBOOTH CONNECTION 1. USING SMARTPHONE’S CAMERA Step 1: Power on the stabilizer Step 2: Turn on Bluetooth in your smartphone setting. Step 3: Find the Bluetooth name ‘Stabilizer_xxxxxx ’ to pair the Bluetooth. 3.
APP OVERVIEW 1. Photo & Video Switch 2. Panorama & Time-lapse 3. Shutter & Shooting 4. Toggle Camera 5. Gallery 6. Bluetooth 7. Face / Object Tracking 8. Mode Status 9. Gimbal Battery 10. Phone Battery 11. Flash 12. Home 13. Camera Modes 14. Mode Select 15.
PRODUCT SPECIFICATION 15
WARRANTY INFORMATION Warranty Period 1. The warranty period is 1 year from the original date of purchase. During the warranty period, under normal use, our company will at its option, repair and/or replace parts which determined by defective situation. 2. Warranty this product against effects in material or workmanship when it belong Normal consumer usage and conditions for the time periods. Warranty does not cover: 1.
FCC Statement
§ 15.21 Information to user. Any Changes or modifications not expressly approved by the party responsible for compliance could void the user's authority to operate the equipment. Specific Absorption Rate (SAR) information: This product meets the government's requirements for exposure to radio waves. The guidelines are based on standards that were developed by independent scientific organizations through periodic and thorough evaluation of scientific studies.
17
18