User manual of King Song Electric Unicycle MODEL:KS www.szkingsong.com Thanks for purchasing KingSong Self-balancing Unicycle. The user manual below is a quick and convenient guide to its main functions providing the user with trouble free use for pleasure, please read the instructions carefully before use. But we can not ensure all types of emergencies are covered. Therefore, we remind you to drive carefully, to ensure safety driving.
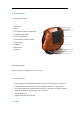
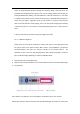
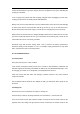
1. Product details 1.1 Diagram for reference 1 Back shell ○ 2 Motor ○ 3 Press button of battery compartment ○ 4 Front&Rear LED Lights ○ 5 Battery compartment ○ 6 Touch buttons & battery indicator ○ 7 Power button ○ 8 Rubber tire ○ 9 Metal Pedal ○ 10 Speaker ○ 1.2 Product Package Electric Unicycle x 1 ; Charger x 1; User manual x 1 1.
There are risks to ride or drive every vehicle. King Song electric unicycle is no exception. Please ensure this manual is read and understood beforehand, and do pay extra attention when riding. 2.1 Important 1. Do not make rapid acceleration or deceleration or over incline forward or lean backwards. 2. Do not use King Song electric unicycle if there are any risks in accidental falls. Safety first. 3.
3.1 USB Port to Charge Gadgets: Connect one end of the charge cable to the USB port, and another end to the gadgets like mobile phone, just plug and play 3.2 Front illuminating &Rear Braking Lights 3.3 BT Speaker: Activate the BT function of the electric unicycle, search available BT on your mobile phone, find and match the BT named “ King Song”, then you can play music freely after successfully connected. 3.
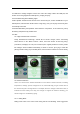
mode, the pedal will keep still when starting off or breaking. While, under soft mode, the pedal will slant alonging with the gravity center, that is, leaning forward when starting off, leaning backward when braking. The main difference of the two modes lies in : soft mode is suitable for long distance travel, which can bring a more comfortable riding experience, relieve the leg’s fatigue.
the touch button being activated, the indicator will flick to suggest you that your operation is effective. 3.83: USB Discharge port: Gadgets like mobile phone, Tablet can be charged 4.Precautions and preparation 4.1 Precautions 4.1.1. Use the auxiliary belt to ensure safety driving As beginners, can use the auxiliary belt to prevent the unicycle from scraping Tie the belt to the handle of the unicycle, tread one foot on the treadle, adjust the belt to a proper length.
and body shell. Find a friend to assist you if needed Tie the auxiliary belt to the handle, adjust it to a proper length. Please don’t speed up and reduce suddenly in order to keep good maintenance. Don’t lean too much in order to not to fall, speeding is prohibited. In case of falling, given the priority to body safety. Refer to the following driving steps to start learning. 4.3 How to use 4.3.
For novice,like riding bicycle, transfer your gravity center to the unicycle, tread the pedal forward slightly, meanwhile, kick the other foot backward slightly, the unicycle will go forward, try to keep balance during riding, and gradually put the other foot on the treadle. For intermediate learner, pay more attention to the following two points: keep at a certain speed, control the speed through leaning forward and backward. Try to extend the riding distance by repeated exercises. 4.3.
It takes around 90 mins to get 100% charge, when the red lights turn into green, indicating the charging is completed. If not in urgent need, please wait until charging complete before unplugging, because after charging, the protection circuit will perform flow equilibrium Battery level: A ten-bar LED indicator is used to indicate battery level. All ten-bar LED will light up when power level is more than 85% and will go off one by one as the level decreases.
side of the charger slot. After unscrewing the screws, rotate the shell body until you can dismantle the tire freely, avoid pulling out the electric cables around the handle area. After repairing, install the body shell and fix the screws. 7.
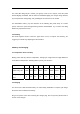
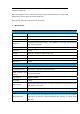
Speed Limit Protection Beep when exceed limit speed Beep when battery lower to 10%, the front of the pedal will rise gradually to lower Low Battery Protection the speed until stop Message Battery Indicator Highlight LED to indicate battery level Flicker when battery lower than 5%, LED bar all light up when the battery above Battery level 85%, then fade gradually with the battery consumption Buzzer beep when machine falling down to the ground, Beep when powering on, Sound Alerting Continual beep when low