
User's Manual


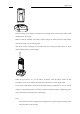
Table Of Contents
- 1. Package-opened Inspection
- 2. Preparation
- 3. Radio Overview
- 4. Basic Operation
- 5. Programmable Key Function
- 6. Auxiliary functions
- 6.1 TOT Timer
- 6.2 battery saving
- 6.3 Low battery alarm
- 6.4 Number announcement
- 6.5 Quite Talk (QT) / Digital Quiet Talk (DQT)
- 6.6 Dual Tone Multi-Frequency (DTMF) Coding
- 6.7 Talkaround
- 6.8 Scan
- 6.8.1 Start/End Scan Function
- 6.8.2 Nuisance Delete
- 6.9 Transmission Begin and Transmission End Signals (PTT ID)
- 6.10 Lone worker
- 6.11 Emergency Alarm
- 7. Wired Clone Mode
- 8. Trouble Shooting Guide
- 9. Major Specifications

Page 9 of 22
Insert the battery to be charged or the phone in the charger, please switch off the phone before
installing it into the charger.
Make sure that the terminals of the battery and the charger can contact with each other reliably,
when the red LED is on, the charging starts.
After about 5 hours of charging, the red LED will be out, and the green LED will be on, which
indicates that the battery is fully charged.
When the green LED is on, you can remove the battery, when the battery reaches its best
, he
te:
s not been charged when leaving the factory, please charge the battery before
performance, then you can remove the power adaptor from the AC power output socket.
If the yellow LED flashes, that indicates abnormal charging temperature or circuit and t
charger is in the protected status, in which you should not charge the battery compulsorily, please
remove the battery and shut the power of the charger.
No
The phone ha
using the phone for the first time.