
User's Manual
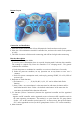

Buttons Layout
Connection and Installation
1, Insert the receiver to the socket of Sony Playstation2 Console and turn on the power.
2, Place the 4 X AAA batteries inside the controller first, and move the switch to the position
of “ON”.
3, The LED of receiver is flicker under connecting, and will last for light when connecting.
Function Description
1, Low Power Consumption Mode
To save the power consumption, there is a special “sleeping mode” built into this controller.
The wastage is 100µA only when the controller is in “sleeping mode”. The general
conditions are as follows:
a, Under the power-on condition for controller, no receiver is found over 15 seconds;
b, Under the power-on condition, no any operation acts on any button or axes over 3
minutes;
c. Under low power consumption mode, wake up by pressing START, L3 or R3, LED of
receiver is on
2, Definition of Turbo function
a, The buttons “□, ○, △, X, R1, R2, R3, L1, L2, L3” can be defined with Turbo
function.
b, Press “Turbo + any action button” at the same time for odd times, the button will be
with Turbo function. Press “Turbo + the defined action button” at the same time for
even times, the defined Turbo function will vanish.
3, FC function (“Force Connection”) between the appointed controller and the appointed
receiver
Appoint one RF controller with a appointed receiver when more RF controllers work in
the same operating circumstance. The method is to press down the FC group button
“Select + L3” on the controller (or the button “FC” on the receiver), then press the button
“FC” on the appointed receiver (or the FC group button “Select + L3” on the controller).
4, Macro function