WOHOME Smart Camera Instruction Manual Thanks for purchasing this Wire-Free battery camera.Please read this instruction manual carefully before using this product.
PACKING LIST Manual ① ② ③ ④ ⑤ ⑥ 1.Camera x1 2.Instruction Manual x1 3.USB cable x1 USB 4.Iron Ball Wall Mountx1 5.Screws x2 6.
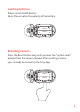
CAMERA STRUCTURE ① Lens ① ② ④ ⑤ ⑥ ⑦ ⑧ ② Mic ③ Light sensor ④ LED ⑤ Motion detection sensor ⑥ Charge LED ⑦ USB interface ⑧ Speaker 18650 Charge LED: Charging in Red;Full in Green. ① ② ③ ④ ① Resrt button ② Mirco-SD card ③ Power button ④ 18650 Battery ⑤ Flip Switch ⑤ Power button:Long press to turn on/off the camera. Note: The camera will turn on automatically when the battery is installed.
THE CAMERA OPERATING Inserting SD Card Please open the camera cover,and firstly insert the Mirco-SD card. Slide the SD card cover down ,then open the cover and inset the SD card.
Loading batteries Please install 18650 battery. Note: Please notice the polarity of the battery. - 18650 18650 18650 + + Resetting camera Press the Reset button long until you hear the "system reset" prompt from the camera speaker.After resetting camera, you’re ready to connect to the Tuya App.
NSTALL TUYA SMART APP The App is available for iOS,Android. Search“tuya smart”in App store or google play store,or scan below QR Code to download and install the App.
CONNECT THE CAMERA WITH APP 1.Account Registration and Login Please open Tuya App,and enter the App main interface. New users need to register by Email or Mobile number,click “Register”.Follow the steps to complete the registration of the account,and login.
Please log in directly if you already have an account. To input your account and password ,click“Log in”. 2.Add Device Click the Add Device and enter next interface.
Confirm the red indicator light rapidly blinks or a prompt tone is heard. Connect with your home Wi-Fi. Pairing the camera. The camera lens is aimed at the QR code on the phone screen with a distance of 15cm. It will sound”bugu”after the camera recognize the QR code.
Please click“Hear a prompt”if you heard it ,then will start connecting. The camera added successfully ,and enter to the main interface.
FUNCTION OVERVIEW Camera settings Wi-Fi Signal Image quality Sound on/off Full screen option Battery capacity Settings Click to enter detailed settings of the camera. You can check more about it in the section of Settings on page 13. Signal The camera may be disconnected if the signal is lower than 50%. Please move your camera to be closer to your router for better signal. Battery capacity Please charge the camera timely if the power is less than 2 bars.
Record Tap to start recording the current live streaming. Tap again to end and save it to the internal storage of your mobile device. Playback Tap to play the videos recorded in the MicroSD card. SETTINGS Click enter to the Settings page. There are only a few settings to make,so the process is quick and easy. To start setting up your camera.
Power management settings This function is it will push a notification if the battery is low .You can set the low battery alarm threshold ( 0% to 30%). Note: Firstly please enable Tuya App notification in mobile setting . Basic function settings Flip screen setting. The function is to flip the screen angle. Talk mode setting .Select one-way communication or two-way talk you want. PIR OFF means you shut down the function. Also ,you can set the PIR sensitivity for Low,Medium,High.
4.Please do not scratch or squeeze the PIR sensor to avoid lowering its detection sensitivity. 5.A mounting height of 2M is recommend to reduce false alarms caused by the movements of small animals on the ground. If it’s required, please mount the camera at a height around 1.5M. 6.When mounting the camera an appropriate angle between the PIR sensor and the monitoring area is recommended. 7.The effective distance between the PIR sensor of the camera and the moving objects id 2M to 8M.
FAQ Q1.The camera can’t connect to Wi-Fi. Make sure you select the right Wi-Fi network and enter the right password. Make sure your Wi-Fi is 2.4GHz. Make sure the camera and your mobile device are close to the router. Q2. How can I reset the camera? Please press the Reset button .There is beeping sound after a successful reset and the RED LED will flash slowly. Q3.
SPECIFICATIONS Lens Infrared LEDs PIR Motion Sensor 10 pcs Infrared LED s with 8 meters flash distance 6 meters PIR distance Storage Up to 128GB P ower consumption Standby 200uA Working 220mA Connectivity 802.11b/g/n Micro SD card W i-Fi@2.4G Battery 2x18650 batteries W i-Fi distance 60 meters (open space without obstacle)15 meters (indoor) USB Video Compression V oice Intercom Video resolution W orking Temperature Storage Temperature 17 FO V/130°W ide-angle lens (4Glass) D C 5V H.
FCC STATEMENT This equipment has been tested and found to comply with the limits for a Class B digital device, pursuant to part 15 of the FCC Rules. These limits are designed to provide reasonable protection against harmful interference in a residential installation. This equipment generates, uses and can radiate radio frequency energy and, if not installed and used in accordance with the instructions, may cause harmful interference to radio communications.
This device complies with part 15 of the FCC Rules. Operation is subject to the following two conditions: (1) This device may not cause harmful interference, and (2) this device must accept any interference received, including interference that may cause undesired operation. The device has been evaluated to meet general RF exposure requirement. The distance between user and products should be no less than 20cm. If you have any questions or problems. Please contact us by email:babymonitor@whomeshop.