
Users Manual Part 2

9 - 10 Operator’s Manual
9 Using the QC Program
1. Tap “Menu > QC > Setup”.
2. Tap the “QC Table” button to enter the QC table screen of the corresponding QC file.
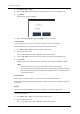
3. Tap “Delete”.
The following dialog box displays.
4. Tap to select “All records” and then tap “OK” to delete all records.
Communication
You can transmit QC data to the external data management software or LIS/HIS.
Before transmitting QC data, make sure the network is properly connected.
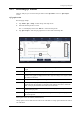
1. Tap “Menu > QC > Setup” to enter the QC file setup screen.
2. Select the desired QC file.
The “*” mark displays next to the “File No.” of the selected QC file.
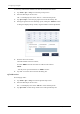
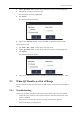
3. Tap the “QC Table” button to enter the QC table screen of the corresponding QC file.
4. Tap “Comm.”.
Communication starts. All QC data of the selected QC files will be transmitted by default.
NOTE:
• The QC data saved in the process of transmission will not be transmitted.
• If auto-communication is enabled and a sample is run during the transmission of the QC
data, then only when the QC data transmission finished will the auto-communication of
the sample result start.
Exporting data
Administrators may export selected or all QC records to an external USB device.
Before exporting data, make sure the USB device is firmly connected to the USB port on the side of
the analyzer.
NOTE:
The user should ensure the data safety of the USB devices connecting to the analyzer.
Export selected records:
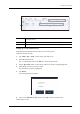
1. Tap “Menu > QC > Setup” to enter the QC file setup screen.
2. Select the desired QC file.
The “*” mark displays next to the “File No.” of the selected QC file.