
User's Manual


User’s Manual Wireless USB Adapter
Page 5
Wireless
Connection
1. After finishing driver installation, insert the USB adapter to Notebook or PC that
supports USB 2.0/1.1 interface.
Remarks: Make sure to connect the adapter to an USB port on your computer
directly rather than an USB hub. Although it might work when connecting with an
USB hub, the likelihood of configuration problems will be higher.
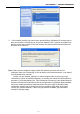
2. The system shows a wireless utility icon in the Windows system tray, which locates in
the bottom-right corner of your computer screen, and pops up a message that indicates
a new hardware is found and installed, something like this:
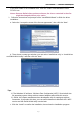
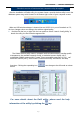
1. Double-click the utility icon or right click the icon and then select “View Available
Wireless Networks” to launch the utility, the Wireless Network Connection window
appears and displays your wireless network listed with the SSID you chose.
Notes: Before configuring your WiFi access, you need to have your network’s SSID
(service set identifier), security key and authentication type handy. Check the
documentation coming with your router, ask your network administrator to get the
information.
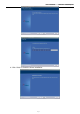
2. If you don't see your network, click “Refresh network list” in the upper left corner. If you
are locating within the valid range of hotspots or wireless routers, all available networks
will be recognized and listed automatically. Click your preferred network, and then click
“Connect” in the lower right corner.
Should the service " Wireless Zero Configuration ( WZC)" be applied.