Contents Introduction.......................................................................................................... 1 Main Features ...................................................................................................... 1 Packing List ......................................................................................................... 2 Computer Configuration Requirements(Windows XP System) .......................................................................................
Introduction Thank you for purchasing this portable digital Camcorder. This camera can be used to shoot video as well as taking photo separately. Additionally, you can use a SD card maximum up to 128GB to extend the memory of your camera. Main Features Video Resolutions: UHD(3840x2160 “DAR”24fps), QHD(2560x1440 30fps),FHD(1920x1080 60fps),HD(1280x720 120fps), VGA(640x480 30fps) 13.
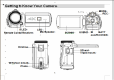
Support remote control Support Night Vision: IR CUT filter, support Image transferred from color to black and white Support LED light-compensating lamp Supports128GB external SD card(Highly recommend class 10 or above) Internal microphone and speaker Can be used to take videos or photos You can delete, protect your photos on the camera.
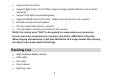
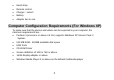
Hand strap Remote control Charger(select) Battery Adapter two in one Computer Configuration Requirements (For Windows XP) To make sure that the photos and videos can be exported to your computer, the minimum requirements are : Pentium 4 processor or above 2.8 GH, supports Windows XP Service Pack 2 System.
Computer Configuration Requirements (For Windows Vista) To make sure that the photos and videos can be exported to your computer, the minimum requirements are: 800MHz Processor and 512 MB RAM 20GB disk with at least 15 GB available Supports VGA (Video Graphics Array) USB ports CD-ROM Driver 4
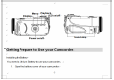
2. Insert the battery. 3. Install the battery cover. 4. Press the power button to open the camcorder, the battery status icon will be display in the lower right corner of the Screen. Full Power 5. Medium Power Low Battery. Battery Charge Indication 1. Connect the camera to the computer or charger with the USB cable to charge your camera, the charge indicator lights up, which means the camcorder is charging, the light will turn off automatically when the battery is fully charged. 2.
Remove the battery if not using the camera for a long time in order to extend the life of the battery. Inserting the SD card Please insert a SD card of maximum 128GB(Including 128GB)into the camcorder to extend the memory, the SD card will allow you to transfer the photo or video from the camcorder to your computer. The files saved in the SD card will not lost when the camera in a low power status or when the battery is removed. 1. Find the SD card slot on the bottom of the camera. 2.
Formatting the SD card will permanently delete all the data which saved in the SD card, including those protected files. Do not remove the SD card during formatting, or the SD card might be damaged. Make sure to format the SD card by using the camcorder. DVR Function Instructions. Open the screen and press the power button which located on the inside of the DVR to power on the camcorder.
camera will be turned off automatically later. Capturing the Videos Press the power button to turn on the camera, the camcorder requires an SD card for normal operation. Then the icon will display in the upper left corner of the screen. 1. Press the Rec button to start shooting. 2. The icon will display and start to flash, and the shooting time will display in the upper right corner of the screen. 3. Press the Rec button again to stop shooting. 4. The recorded file will be saved in MP4 format.
transferred. 4. Please insert a SD card for normal operation. 5. A message “Memory is full” will display when you attempt to take a video under the situation that the internal memory is full. Please insert another SD card with available space to take more video/photo. Resolution Under the video mode, you have five resolutions available for you to choose one of them. The higher the resolution you choose, the better video quality you will get, and better quality videos require larger memory. 1. 2. 3. 4.
1. Press the menu button or touch the MENU icon on the screen to enter the menu. 2. Select the White Balance icon by touching the screen. 3. Select by touching the screen: Auto, Daylight, Cloudy, Fluorescent or Tungsten. Color 1. Press the menu button or touch the MENU icon on the screen to enter the menu. 2. Select the Color icon by touching the screen. 3. Select by touching the screen:Standard, Sepia, Nonoohrome or vivid. Exposure 1.
Taking photo Insert an SD card and turn on the camera to ensure normal operation. Use the image displayed on the screen to structure your target. 1. Hold the camera firmly and press the shutter button which is near the ZOOM button on the top of the camera. 2. The photo you took has been saved into the memory. 3. The amount of photos you can capture with the memory card’s remaining capacity will be displayed in the upper right corner of the screen. 4. The number will decreases as you take photos. 5.
Setting the Resolution 1. Press the menu button or touch the MENU icon on the screen to enter the menu. 2. Select the Resolution icon by touching the screen. 5600x4200(24M) ,5200x3900(20M),4640x3480(16M),4128x3096 (13M), 3648x2736 (10M), 3648x2048 (7MHD), 2592x1944 (5M), 2048x1536 (3M), 1920x1080(2MHD)and 640x480 (VGA). Note: The selected resolution icon will display in the upper left corner of the screen.
Face Detect 1. Press the menu button or touch the MENU icon on the screen to enter the menu. 2. Select the Face Detect icon 3. Click the screen to turn on/off . by touching the screen. Note: The Face Detect icon will appear on the left of the screen. Multi-Snapshots 1. Press the menu button or touch the MENU icon on the screen to enter the menu. 2. Select the Multi-Snapshots by touching the screen. 3. Click the screen to turn on/off. Note:The icon if you select “on”.
Color 1. Press the menu button or touch the MENU icon on the screen to enter the menu. 2. Select the Color by touching the screen. 3. Select by touching the screen:Multi, Center,Spot. Exposure 1. 2. 3. Press the menu button or touch the MENU icon on the screen to enter the menu. Select the Exposure by pressing the screen. Select an exposure compensation value (From +3 to -3) from the display menu by touching the screen. ISO Press the menu button or touch the MENU icon on the screen to enter the menu.
2. 3. Press to enter the Playback Mode, the icon will be displayed on the screen. You can playback the photos or video on your camcorder. Swipe the screen or press the ZOOM button to view the files.You can delete or protect your files under the Playback Mode. Note:If there is no any media file saved in the memory, a message “No File” will display on the screen. Delete Files You can delete the unwanted files of your camera anytime.
Protecting You can protect your photos from being deleted by faulty operation by using this function. 1. In the Playback Mode press the menu button or touch the MENU icon on the screen to enter the menu. 2. Select the Protect icon by touching the screen. 3. Touch and select : Protect the current / unprotect the current / protect all or unprotect all. Note: If you choose to protect the current, the lock icon will display on the screen above the currently selected photo.
Setting In this mode, you can set the language, TV mode, button voice, auto power off, frequency, date & time setting, formatting and default settings. Language This camera supports 13 languages, including English, German, French, Spanish, Italian, Turkish, Russian, Portuguese, Dutch, Simplified Chinese, Traditional Chinese, Japanese and Polish. 1. Press the menu button or touch the MENU icon on the screen to enter the menu. 2. Touch and select the icon . 3. Touch and select the Language. 4.
Button Voice The camera will “beeps” or “buzzs” when you press any button. The sound is set to on by default, you can turn it off. 1. Select the setting icon by touching the screen. 2. Touch the screen to choose mute mode. 3. Turn it on/off by touching the screen. Auto Power off To save battery power, you can set the auto power off. After setting, the camera will turn off automatically when there is no any operation for a period of time. 1. Select the setting icon by touching the screen. 2.
1. Select the setting icon by touching the screen. 2. Touch the screen and select . 3. Touch the screen to choose:50Hz/60Hz. Time/Date This function allows you to set the correct date and time. 1. Select the setting icon by touching the screen. 2. Select the Date setting by touching the screen. 3. Touch the corresponding icon on the screen and use the up and down arrows to set the date and the time. 4.
3. Touch the screen to select “Yes” or “No”. Default Settings If your camera is in abnormal mode, you can set this function to restore all the settings to the factory default. 1. Press the mode button to enter the setting menu. 2. Select the icon by touching the screen. 4. Touch the screen and select default settings. 5. Touch the screen to select “Yes” or “No”. Connecting to the computer. Prepare a USB cable. 1. Turn on the camera and enter standby mode. 2.
Slideshow 1. Press the mode button to enter the menu. 2. Touch the screen and select the settings icon. 3. Touch the screen MENU icon and select setting slides playing time 3s / 5s / 10s. WIFI 1. Press the mode button to enter the setting menu. . 2. Touch the screen and select the WIFI icon 3. The Name and password will show on the screen. 4. Open your phone and open the WIFI search the name showed on the screen, enter the password and then you can enter the app to check real-time preview picture.
APP Operating Instructions 1. Press the settings of your phone , open the WIFI and search, choose the camera Name and Password:12345678 (The Name and Password will be displayed on the screen). 2. After the connection is successful, return to the main interface of your phone and enter the APP “LzxViewer” to preview the live screen.
3. You can switch the mode through the three icons in the bottom: Playback, Video, Photo. 4.
camcorder : Video Resolution, Photo Resolution, Exposure, Memory card capacity, Formatting, Change the Password / User name, reset all settings…… Using Hot Shoe 1. Fix the external MIC device on the machine's hot shoe interface, insert the 10PIN connector of the two-in-one adapter cable into the the machine's USB socket and attach the connector wire to the 3.5mm headphone jack of the provided adapter cable, then switch on the external MIC device, through which the video will receive audio. 2.
Video Resolution Screen Internal Memor External Storage HD Output Lens Digital Zoom Self-Timer File format Light Compensating Lamp IR Light Exposure Sensitivity White Balance Anti-Shake Continuous Shooting UHD(3840x2160“DAR” 24fps), QHD(2560x1440 30fps),FHD(1920x1080 60fps),HD(1280x720 120fps),VGA (640x480 30fps) 3.1" IPS Touch screen 1GB DDR3 (Buffer Memory) Supports 128GB SD Card ( Class 10 or above is strongly recommended) Yes f=4.88mm , FNo:2.
Hot shoe Face Detection Metering Microphone Speaker Remote Control Port System requirements Battery Working Temperature Charging current Yes Yes Center weighted average/AIAE/Automatic spot exposure Yes Yes Yes USB 2.0 Windows XP/Vista/Windows8/Windows10 Li-ion (3.
Shooting videos/taking photos Failed to shoot videos or take photos after the shutter button is pressed The battery power is low. Please charge the battery. The camera is not in the video/photo mode. Set the camera to the correct mode. The camera is powered off. Please restart your camera. The SD card is out of memory. Please delete unwanted files or replace it with another SD card. Power off The camera turned off automatically. The battery is depleted. The temperature is low.
Battery instructions Warning Improper use of the battery may cause leakage and contamination of the surroundings, it may also cause an explosion or a risk of fire and personal injury. The following precautions must be strictly observed. I Do not disassemble the battery or short circuit it. l Do not put the battery in a high temperature environment or into the fire. l Do not mix the using of old and new battery. l Do not mix different types of batteries.
FCC Compliance Notice This device complies with Part 15 of the FCC Rules. Operation is subject to the following two conditions: (1) This device may not cause harmful interference, and (2) This device must accept any interference received,including interference that may cause undesired operation. Any changes or modifications not expressly approved by the party responsible for compliance could void the user’s authority to operate the equipment.