
User Manual


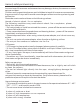


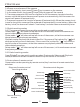
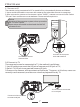
Table Of Contents

1.Install battery into the battery
compartment according to
this direction.
2.Push battery until a “Click”
is sounded
Notice:Before using electric supply must ensure the specifications of local
power supply meet requirements.Please ensure that the charging process is
ventilated and can't be coveredwith any object. After charging, remove the
power supply as soon as possible.When shooting during charging, it is forbidden
to use the computer to power the camera, otherwise it may damage the computer
2.2 Installation of battery
This camera uses a removable lithium battery, please install the battery correctly
before use. Below is the steps, please refer to the pictures:
1.Please ensure install the battery with the direction of metal contactors upward;
2.Follow the arrow direction on battery compartment, push the battery from down
to up until a “Click”sound .
Notice:Please install battery correctly, incorrect installation may damage the
camera or can't be powered on it and cause accidents.
Do not use substandard lithium battery and adaptor.
Adaptor specification: Input AC 100~240V/50~60HZ,output DC 5V/1.5A.
2.3 Charge the battery
2.3.1 Install the battery, connect camera with adaptor via USB cable, connect the
adaptor with electric supply. When charging the camera ,the indicator will light up,
after fully charging, the indicator light will be off.
2.3.2 Connecting to computer, the camera also can be charged. Install the battery,
connect camera with adaptor with USB cable. When charging the camera ,the
indicator will light up, after fully charging, the indicator light will be off.
2.3.3 Camera adaptor specification: Input AC 100~240V/50~60HZ,Output DC
5V/1.5A. Please check the local adaptor specification before use.
2.3.4 Shoot during charging. In order to support long shoot, the camera supports
to take photo or video during charging. When using this function, please connect
the adaptor with electric supply. After connecting according to 2.3.1, power on the
camera to shoot.
5
2 Start to use