Overview Thank you for purchasing this portable digital video camera, this camera features video recording at 4K. With resolution of 3840*2160 (60fps), it adopted Sony 1/3-inch image sensor,H.264 video encoding format, the video file storage usage is small while it has high image quality! You can connect your camera via Wi-Fi using your smart Phone remotely, to view the camera live screen and use your phone to record or shooting. Safety Instructions Do not drop, impact or puncture the camera.
TABLE OF CONTENTS Getting to Know Your Camera................................................... 1 Standard Accessories...........................................................1 Charging the Battery.............................................................1 Component Introduction.......................................................3 Getting Started............................................................................... 6 Inserting an Micro SD Card...............................................
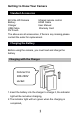
Getting to Know Your Camera Standard Accessories 4K Ultra HD Camera Infrared remote control Battery HDMI Cable Charger User Manual USB Cable Warranty Card DV Pouch The above are all accessories, if there is any missing,please contact the seller for replacement. Charging the Battery Before using the camera, you must load and charge the battery Charging with the Charger Connect to 100-220V socket 1.Insert the battery into the charger to charge it, the indicator light will be red when charging。 2.
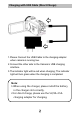
Charging with USB Cable (Direct Charge) 1.Please Connect the USB Cable to the charging adapter when camera is running low. 2.Connect the other side to the Camera’s USB charging interface 3.The indicator light will be red when charging; The indicator light will turn green when the charging is completed. Note: 1.When using the charger, please install the battery in the charger slot correctly. 2.For direct charge, please use the 5V/2A-2.5A charging adapter for charging.
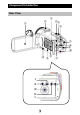
Component Introduction Rear View ② ① ③ ④⑤ ⑥ ⑦ ⑧ ⑨ ⑩ ⑭ ⑬⑫ Ⅰ Ⅱ Ⅲ Ⅳ Ⅴ ⑪
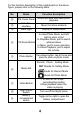
For the function description of the related parts in the above figure, please refer to the following table. No. ① ② ③ ④ ⑤ Name Function description IPS Touch Panel Screen preview and video/photo playback Hot shoe interface State Light Mount hot shoe products Display of mode status In video/Photo Mode, pull left/ right to zoom in/out In Playback Mode, pull to switch T/W Zoom Button photos/videos In Menu, pull to menu selection.
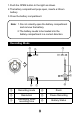
⑩ ⑪ Battery Compartment Load NP-120 Battery 5PIN Micro USB interface: Access the USB Cable to charge; HDMI:External HD Cable to connect to TV; MIC:Connect to an external microphone Press to enter the Menu Press to switch screen display mode I/O Interface Menu Button DISP Button ⑫ Power Button Power On/Off Playback Button Press to enter the playback mode Press to delete recent videos or photos “Delete” Shortcut ⑬ ⑭ Built-in microphone Micro SD slot Recording sound Open and insert the Micro SD Card
For the function description of the related parts in the above figure, please refer to the following table No.
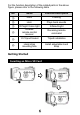
1.Open the Micro SD cover. 2.Insert the memory card in the direction shown until you hear“Clicks”. 3.Close the Micro SD cover. ※Open the Micro SD cover and press the memory card. Note: 1.When using for the first time, format the Micro SD Card On this unit. The Micro SD card needs to be Class U3. 2.Do not forcefully remove the SD card while working, otherwise it may cause loss of files or machine damage.
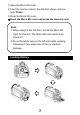
1.Push the OPEN button to the right as shown. 2.The battery compartment pops open, inserts a lithium battery. 3.Close the battery compartment. Note:1.Do not violently open the battery compartment and remove the battery. 2.The battery needs to be loaded into the battery compartment in a correct direction.
⑦ Micro SD installed ⑧ Menu 1.Press the power button or open the screen to turn on the camera, push the mode switch button to the video mode to enter the video mode. 2.Set the option you need by the Video setting menu. 3.Press the Rec button to start shooting. 4.Press the Rec button again to stop shooting. 5.Press the photo button to pause when recording and press it again to continue.
Exposure Compensation Image Stabilization PreRecord Loop Video Time Lapse Video Interval Time Lapse Video Shooting Time Slow Motion Movie Fast Motion Movie Wind Noise Redution -2.0/-1.0/+0.0/+1.0/+2.0 On/Off On/Off Off/1 Min/3 Min/5 Min Off/1 Sec/3 Sec/5 Sec/10 Sec/30 Sec/ 1 Min Unlimited/5 Min/10 Min/15 Min/20 Min/ 30 Min/60 Min On/Off On/Off On/Off 1.Press the “Power button” to turn on the camera. 2.Press the “Menu button” or touch the icon on the screen to enter the menu. 3.
Photo Mode ① ② ③ ④ ⑤ ⑥ ⑦ Photo mode ⑤ Menu ② Resolution ⑥ Micro SD installed ③ Remaining number of shoots ⑦ Battery Status ④ Zoom ① 1.Press the “Power button” or open the screen to turn on the camera, push the mode switch button to the Photo mode to enter the Photo mode. 2.Set the option you need by the Photo setting menu. 3.Press the "Photo button”, finish the photo .
Photo setting menu Enter the menu by button or touch. You can set the resolution, white balance, exposure and other function parameters to get better photo results in the menu. Name Resolution ISO Exposure Compensation Time Lapse Photo Interval Time Lapse Photo Shooting Time Photo Burst Fast Motion Movie Function Description 28MP/24MP/20MP/16MP/14MP/12MP/1 0MP/8MP/7MP/5MP/3MP/2MP/VGA Auto/100/200/400/800/1600/3200 -2.0/-1.0/+0.0/+1.0/+2.
Wind Noise Redution On/Off 1.Press the power button to turn on the camera. 2.Press the menu button or touch the icon on the screen to enter the menu. 3.By switching the “T/W zoom button” or swipe screen to select the setting option freely. 4.By touching or pressing the “Photo button” to select the option, for example: Resolution, enter the option menu, select the resolution you need, press to return to the main menu, press again to return to the standby main interface.
Set Name Function Description Power Frequency Sounds 50HZ/60HZ Shutter Off/On Boot-Up Off/On Beep Off/On Volume 0/1/2/3 Auto/Daylight/Shade/Tung sten Light/White Fluorescent Normal/BW/Natural/ Negative/Warm/ Brightness Contrast White Balance Effect Date&Time Y/M/D Screen Saver 1/3/5/Off Auto Power Off 1 Min/3 Min/5 Min/Off Power-On Auto Record Off/On
USB MSDC/UVCMJPG Telescopic Pattern Off/On Language 12 Languages Date Stamp Off/Date/Date&Time Format Card Yes/No System Restore to Factory Stetting/System Info/Card Info 1.Press the “Power button” or open the screen to turn on the camera, push the mode switch button to the SET mode to enter the SET mode. 2.By switching the T/W zoom button or touching to select the Set option. 3.By touching or pressing the “Photo“button to select the option. 4.press to return to the main menu.
1.Press the “Power button” or open the screen to turn on the camera, push the mode switch button to the SET mode to enter the SET mode. 2.By switching the T/W zoom button or touching to select the Slide Show option. 3. Enter the slide show interface, click for 3 second, 5 second, 10 second playback interval, and click Start slide show 4. Press "Photo button" to pause the slide show, and press "Video button" to stop the slide show. Wi-Fi And APP Using You can control the camera remotely by using APP.
APP Connecting 1.Press the “Power button” or open the screen to turn on the camera, push the mode switch button to the SET mode to enter the SET mode. 2.By switching the T/W zoom button or touching to select the Wi-Fi option. 2.Enter the Phone setting – Wi-Fi, find the Wi-Fi name HDV_xxxx,Touch and input the password 12345678. 3.Enter the APP , Touch “Connect device” to enter the user interface.
APP Video Mode 1.Touch the mode. on the App user interface to enter the Video 2..Touch the icon , “REC” will be displayed at the top left of the interface and flashes on the live preview, Start recording. 3.Touch the icon again , Stop recording. APP Photo Mode 1.Touch the mode. on the App user interface to enter the Photo 2.Touch the icon in live preview mode. 3.The app will sound "click". 4.Finished.
Name Description Wi-Fi Name Can be modified Wi-Fi Password Can be modified Video Resolution Select different resolution Voice Recording On/Off Voice recording Date Display On/Off Date Display Photo resolution Select different resolution Exposure value Adjust the parameters to get desired results Memory Space View the remaining space of the memory card Format the memory card Remote to format memory card Factory Setting Restore factory defaults APP Version Current APP Version FW Versio
My Device You can playback recorded videos and photos download them to your phone through APP. Video Back Photo Select video/photo Thumbnails Delete Download A.Play Files Online 1.In the main interface of “My Device”, select “Video” or “Photo” to enter the thumbnail preview interface. 2.Select any thumbnail to play the file (Photo or video). B.Online Download 1.In the main interface of “My Device”, select “Video” or“Photo” to enter the thumbnail preview interface.
2.Select one or more of files, tap the Download button to download to your phone. 3.You can view the downloaded video or photo in“My Download”page. C.Delete Files Online 1.In the main interface of “My Device”, select “Video” or“Photo” to enter the thumbnail preview interface. 2.Select one or more of files, tap the Delete button to delete the photo or video. My Files This function allows you to view the video & photo you downloaded, and you can clip, add sticker, word or filter to your photos. A.
1.In the main interface of “My Download”, select “Video” to enter the thumbnail preview interface. 2.Tap the video that you want to edit, and tap“Edit” to enter the video clip screen. 3.Move the sliders on both sides of the video timeline to change the start and stop times, tap Done, then tap Save as New Clip. You can share it to your social media platform. NOTE: 1.At least 8 seconds of video is required when cutting. 2.You can preview after editing. B.Photo Editing 1.Enter”My Files|”,swipe left.
2.Select the photo you need Touch”Edit” 3.Add filter, sticker, words and press“Save”. 4.You can Save or Share the photo. NOTE:For Android: You must disconnect the camera Wi-Fi first and share after connecting network. Play Back This function allows you to play recorded video or photo in the camera Video 1. Press in the video mode to enter the video playback six palace interface. 2. Click a video thumbnail to enter the preview . 3.Select any one of the video thumbnail to enter the preview screen. 4.
Photo 1. Press in the Photo mode to enter the photo playback six palace interface. 2. Click a photo thumbnail to enter the preview . 3.Switch to the previous or next by “T/W Zoom “button. 4.By tapping or pressing the “Menu button”, you can delete or unlock files. Connecting to TV When connect the HDMI to your camera’s HDMI output and your TV, the image on your screen can also be displayed on your TV screen. 1.Press the power button or open the screen to turn on the camera and enter the standby state. 2.
3.Turn the TV to the HDMI channel, the preview screen will appears on the TV. Connecting to the Computer This function allows you to use your camera as a MSDC disk or PC Camera MSDC Mode 1.Power on the camera and enter the standby mode. 2.Enter the USB function in the setting menu and select the option "MSDC", then exit the menu mode. 3.Connect the camera and computer with the cable. 4.
and the "removable disk" appears on the computer, and the function is turned on successfully. PC Camera Mode 1.Power on the camera and enter the standby mode. 2.Enter the USB function in the setting menu and select the option "UVCMJPG", then exit the menu mode. 3.Connect the camera and computer with the cable. 4.The camera preview screen enters the "connected" mode. Open the video device software on the computer end to see the lens screen. The function is turned on successfully.
4K:3840*2160(60fps)/3840*2160(30fps) 2.
Troubleshooting Trouble Possible reason Solution Cannot power on Battery is not inserted correctly/dead Insert battery correctly/ Charge Unclear Focus Out of focus range / lens dirty Shooting in focus able range/Clean the lens Unable to use memory card/unable to record Card damage / Micro SD card does not meet requirement Replace the Micro SD card / Format the Micro SD Card / Use the U3 Card Fail to use it as a PC Cam USB Cable is loose / Computer system version is not compatible Replace the U
FCC Statement This equipment has been tested and found to comply with the limits for a Class B digital device, pursuant to part 15 of the FCC Rules. These limits are designed to provide reasonable protection against harmful interference in a residential installation. This equipment generates, uses and can radiate radio frequency energy and, if not installed and used in accordance with the instructions, may cause harmful interference to radio communications.