
User's Manual
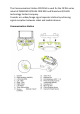

12. LED brightness: brightness of the LED.
13. Photo: press for taking photo.
14. Charging port: insert the 5V/3A adapter to charge the battery
15. Micro SD slot: can insert a micro SD card to download the data from internal camera of
robot.
16. Button to adjust holder width.
17. Holder for mobile phone or pad
Note:The device is restricted to indoor use only when operating in 5150 to 5250MHz frequency range.
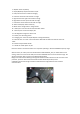
1. ON/OFF: Power on/off key.
2. Depth (ON/OFF): Depth information on/off
3. Lock/unlock: Lock and unlock the imaging
4. Left stick: choose left side of video or image.
5. Right stick: choose right side of video or image
6. Right wheel: choose up side of video or image
7. Left wheel: choose down side of video or image
8. Video record/stop: Video record key
9. Mode select: change video or image modes.
10. Tether port: insert hole of the communication tether.
11. Ethernet port: a Ethernet output port.
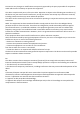
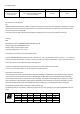
When it works, the router processor will broadcast a SSID: FIFISHRC_xxxx; in mobile device’s wifi
setting, choose to connect to this SSID, then launch FIFISH APP and can see the camera image. The
signal transmission path can refer to the block diagram above:
Image from Camera of the Robot go through PLC modem and PHY via Ethernet to arrive the router
processor, processor then forward these data to 5GHz Radio chip via PCIE, at the
end,Radio chip send the image and video to mobile device using PCB antenna for wireless
communication.