INSTRUCTION MANUAL Before using the TV, please read this manual thoroughly, and retain it for future reference. Sm Art Virtuoso Model: RNSMU5036 LISTED "This product has been manufactured and sold under the responsibility of Curtis International Lid. RCA, the RCA logo, the two dogs (Nipper and Chipper) logo, ere registered trademarks or trademarks of Technicolor (8 A) or its affiliates and sre used under license by Curtis international Lid.
English CONTENTS 1 SAFETY 1 PRECAUTION IMPORTANT 2 Breviary 2 INSTRUCTION 3 ACCESSORIES 3 4 GETTING 3 STARTED Remote Control 4 CONTROL Front View 5 5 REFERENCE Side View 5 GUIDE Back View 6 g WALL MOUNT 7 INSTALLATION Installation 8 Antenna Connection g AV Connection 9 HDMI Connection 10 CONNECTIONS Power Cord Connection 10 Optical audio output Connection 11 Putting The Unit On A Proper Place 12 8 INITIAL SETUP Turning The Unit On For The First Time 12 Source Selection 12 Picture Menu 13 Sound Menu 14 Chann
CONTENTS USB MEDIA PLAYER SMART Tv OPERATION Display MODE Video Formats SPECIFICATION TROUBLE SHOOTING TV Symptom GUIDE WARRANTY CARD The pictures, functions and other information provided in the manual are for reference only. If it does not mach the actual object, please refer fo the actual product.
SAFE PRECAUTION * CAUTION MARKING WAS LOCATED AT THE REAR OF THE APPARATUS. DO HOT EXPOSE THIS UNIT TO RAIN OR MOISTURE AVIS RISQUE DE CHOC ELECTRIC — HE PAS SOUVENIR WARNING: TO REDUCE THE RISK OF ELECTRIC SHOCK, DO NOT REMOVE COVER (OR BACK) NO USER SERVICEABLE PARTS INSIDE. REFER SERVICING TO QUALIFIED SERVICE PERSONNEL.
IMPORTANT SAFETY INSTRUCTIONS 10)Protect the power cord from being walked on or pinched particularly at plugs, convenience receptacles, and the point where they exit from the apparatus. 11)Cnly use attachments / accessories specified by the manufacturer. 12}Use only with the cart, stand, 1)Read these instructions. 2)Kaep these instructions. 3)Heed all warnings. folio all instructions. 8)Do not use this apparatus near water. Nisan only with a dry cloth. 7)00 not block any ventilation openings.
ACCESSORIES Please check and identify the supplied accessories. Remote control Battery(AAA) Instruction Manual LETTER CTT x2 Base stand screws Troubleshooting instructions card... — x1 GETTING STARTED USING THE REMOTE CONTROL ‘Point the remote control at the remote sensor located on the unit. ‘When theirs is a strong ambient light sources, the performance of the infrared remits sensor ‘may be degraded, causing unreliable operation.
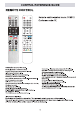
REMOTE CONTROL Remote control system code: TC9012 Customer code: OF POWER((Y): Turns the TV on or off. MUTENESS: Mute or restore the sound Number buttons: Choose the channel directly LIST: Access the Shanna! list. SOURCE: Select the input source mods. HOME(4} ): Enter the home page. : Increases or decreases the TV volume. HIGHCHAIR : Change to the previous or next program. GC: Setup the mode of closed caption. ii : Direct access to estranges application. GUIDE: Shows Electronic Program Guide.
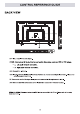
CONTROL REFERENCE GUIDE FRONT VIEW About remote control working distance and angle, see next page. Power/Standby Indicator: Blue and red dual-color LED. It shows red when the TV is turned off and blue when turned on. Remote Control Sensor: Remote control IR sensor, which receives infrared ray sent by remote control. NOTE: if there is a protective film around the screen, remove the protective film before using the TV. Power/Standby indicator Remote Control Sensor BOTTOM VIEW 1.
BACK VIEW OPTICAL: Digital TV sound output. CABS : Connect an AV device that has composite video jacks, such as a VCR or DVD player. ® L: Left audio channel connection. * R: Right audio channel connection. LAN: Connect the Internet. HDMI: (High-Definition Multimedia Interface} Provides an uncompressed digital connection. Please tinier io the setup menu te turn lon. RF: Connect to receive the signal from your antenna or cabs through a coaxial cabs.
WALL MOUNT INSTALLATION INSTALLING / REMOVING THE BASE STAND WARNING : The LED Display Is very fragile, and must be protected st ali times when removing the base Bland. Be sure that no hard or sharp object or anything that could scratch or damage the LED display comes into contact with it Do NOT exert pressure on the front of the unit at any time because the screen could crack. 1. Disconnect all cables or cords connected to the unit. 2.
Installation Your TV is packaged with the stand and the cabinet separated. Before using the TV, install the stand as described below, or if you want to mount it to a wall, ses page 7 for mounting advice; the wall mount itself is not supplied. IMPORTANT! ¢ Make sure the TV set is unplugged from the power supply before installing or removing the stand. * The TV panel may be awkward to install on your own. We recommend you ask someone to help with installation and/or removal of the stand.
CONNECTIONS CONNECTING ATV ANTENNA / CABLE / SATELLITE To view television channels correctly, a signal must be received from one of the following sources: An indoor or outdoor aerial antenna A cable system ~ A satellite system NOTE For receiving over-the-air TV broadcasts, we recommend that you use an external fixed antenna. Should you require the use of a temporary antenna, please ensure that you purchase an antenna with sufficient ability io receive in weak signal areas. se f\ wi Only when you are in clos
CONNECTIONS CONNECTING HIGH-DEFINITION (HD) SOURCE USING CONNECTION HDMI (High Definition Multimedia Interface} supports both video and audio on a single digital connection for use with DVD players, DTV, biopsy boxes and other digital AV devices. HDMI was developed to provides the technologies of High Bandwidth Digital Content Protection (PHD) as well as Digital Visual Interface {D1} in one specification. PHD is used to protect digital content transmitted and received by Del-compliant or Compliant displays.
CONNECTIONS Connection to a Home Theater Audio System For BEST audio performance How To Setup SPIFF Mode Connecting to a Home Theater System Press the MENU button on the remote control Dolby Digital can deliver optimal 2 channel Press the arrow button to select SPIFF Mode in stereo or surround sound with five discrete sound menu. full range channels plus a sixth channel for Press OK bunion enter the Sub-menu. a sub woofer.
PUTTING THE UNIT PROPERER PLACE When you tum on your television set for the first ime, be sure fo place it on a solid stable surface. To avoid danger, do not expose the TV fo water, or a heat source {8.g. lamp, candid, radiator). Dio not obstruct the ventilation grid at the rear and be sure to leave sufficient gaps around the unit. TURNING THE UNIT ON FOR THE FIRST TIME After you have initially connected your TV antenna or cable, turn the television ON.
Picture Menu Press MENU button to display the main menu. Press 4/¥ bunion to select PICTURE in the main menu, it will highlight the option. Picture Mode Bear Aspect Ratio an 16:9 ADVANCED Melee ate LI NETWORK MPEG Noise Reduction EB i el Dynamic oy CHANNEL Ln eo 8 Picture Mode: Choose among Standard, Movie, User and Dynamic/Soccer depending on the region. it will be set to “User” mode automatically when you adjust any of the following six items.
Sound Menu Press MENU button to display the main menu. Press 4/¥ bunion to select SOUND in the main menu, it will highlight the option. STL Balance Se Auto Volume ei NETWORK Se PICTURE of mania Pele ae ea ele ie a Lats Sound Mode: Choose among Standard, Music, Movie, Soccer and User depending on the region, User. it will be set fo "User" mode automatically when you adjust the value of 120Hz, 500Hz,1 kHz, SK Hz or kHz. Balance: Control the sound balance between the right and sft speaker.
Channel Menu Press MENU button to display the main menu, Press 4/7 bunion to select CHANNEL in the main menu, it will highlight the option. Cle hl » lei Le DTV Manual Tuning ae ell Says as eet Te ATV Manual Tuning Program Edit Signal information Antenna Type: Select the tuner mode between Antenna and Cabs. Auto Tuning: Select "Auto Tuning" fo search the programs automatically. If you want to stop the auto tuning, press EXIT button. Then Select “Yes” to exit searching and "No" to continue searching.
Time Menu Press MENU button to display the main menu. Press 4/9 button to select TIME in the main menu. it will highlight the option. Auto Sync re Clock pA Sleep Timer SOUND Eo Ce enlarge TE Summer i SETUP ADVANCED ay Tut Auto Sync: Select the mode of auto sync to be “Auto” or “Manual”. Clock: Setup the TV clock. tis available only when Auto Sync is set to "Manual. Sleep Timer: Set to turn off the TV set automatically. Choices are 120, 180 and 240 minutes. Time Zone: Select the time zone.
Setup Menu Press MENU button to display the main menu. Press A/V button fo select Setup in the main menu, it will highlight the option. Bs Lh English Audio | language sooth ole oli) CHANNEL lr as gel lg Gods NETWORK eal 08D Language: Select your desired OSD language. Audio Languages: Set the primary or secondary digital audio language corresponding to the signal{Only for some regions}. Closed Caption: Setup the function of Closed Caption. You can set the options you want according to the menu options.
Advanced Menu Press MENU button to display the main menu. Press 4/¥ button to select advanced in the main menu, it will highlight the option. hE a Coa ADVANCED NETWORK end en Heroic of Set Ly elt RRT Setting pac input the initial password “8000" or your own password to access this feature, then press OK button fo enter the following features. Lock System: Select On to enable the following three menu items. Set Password: Use fo change the current Lock Password. United States: Set united states rating.
Network Menu Press MENU button to display the main menu. Press 4/¥ button to select Network in the main menu, it will highlight the option. Wired Network Dt We se wow on a Sadie ADVANCED Eel PICTURE ole dle So Wired Network: 1. Connect the network cable fo the LAN port at the back of the TV. 2 Access main menu and select "NETWORK™ sub-menu. 3. Select "Wired Network", and then select "Auto Input”, wait a few seconds, the network configuration will be finished successfully. 4.
USE Media Menu Note: Before operation MEDIA menu, Plug in USB device. Press arrow button to select “MORE” in the Home Page, press “OK” button to enter sub-menu. Then press €/p button to select Media Player in this menu. Press “OK” button to enter. Press 4/b button fo select the option you want fo adjust in the main Media menu, then press *OK> button to enter. Support format: JPEG, BMP and PNG for photo, MP3 for music.
Photo Menu Press 4/P button to select photo in the main menu, then press "OK” button to enter. Press menu button to return back to the previous menu and exit menu to quit. Crass €/P button fo select the file you want to watch in the file selecting menu, then press “OK” button to start playing, press media button to display and operate file details. NOTE: it can not play TEXT and MOVIE format.
Smart TV Operation Press HOME bunion on the remote control to enter the Main Launcher. Press the arrow buttons €/B to select the APP, then press “OK” button to enter. Wie ome] ae LJ ah Note: Depending on the country where the TV is installed, certain apps may not be available. NETFLIX | Press the arrow buttons
to select the Netflix, then press “OK” button to enter.KE Press the arrow buttons €/b to select the Facebook, then press “OK” button to enter. After enter the FACEBOOK you can see below login interface with 8 random code, first pls visit hitp:fiwww Facebook com/device on your smart phone or computer and enter this code. Second input your Facebook account and password then login in. Third enter the 8 random code which marked in the first picture. Then you can success to use Facebook.
© Kids Press the arrow buttons 4/b to select the Kids, then press “OK” button to enter. After enter the kids you can see below login interface, You can choose the operation you want according to the screen information. HI Parent, welcome to YouTube Kids! Air ok hE oh aes] HE SEA el ASST UA LON Lat SR aE a Press the arrow buttons <€/k fo select the timeshare, then press “OK” bunion to enter. Press the arrow buttons €/p to select the Yahoo, then press “OK” button to enter.
VIDEO FORMATS SUPPORTED COMPONENT / HDMI INPUT MODE Horizontal Vertical Resolution | Scanning Frequency Scanning Frequency Format ( KHz) (Hz) 720 X 480 15.73 59. 84 4801 720 X 480 31.5 58. 94 480p 1280 x 720 45 60 720p 1920 x 1080 33.75 80 10801 1920 x 1080 27 24 1080p 1920 x 1080 8750 80 1080p 3840 X 2160 53.9 24 2160p 3840 X 2160 87.5 30 2160p 3840 X 2160 134.5 80 2160p NOTE: The above listed formats are also related to the AV devices you are about to connect.
TROUBLESHOOTING GUIDE SYMPTOM ™v Bad Picture (snow, multiple images distortion, blurry} No sound. Black and While picture. No picture or sound. Colored patches of premature. Panel function key does not respond correctly. The display monitor's panel gods hot, Unusual dots Stripes on screen The top of the monitor gets hot Unable tb celesta certain channel Disorder display at power on. CAUSE (AND REMEDY) » Check the location of the antenna and adjust it if necessary.
To make a warranty claim, do not return this product to the store. Please email or call 1-800-968-9853. 1 Year Warranty This product is warranted to be free from defects in material and workmanship for a period of one (1) year from the date of original purchase. During this period, your exclusive remedy is repair or replacement of this product or component found to be defective, at our option; however, you are responsible for all costs associated with returning the product to us.
MANUEL D'UTILISATION Avant d'utiliser le TV, veuillez lire attentivement ce manuel et le conserver pour référence ultérieure. Smart Virtuose (us Morel: RNSMU5036 ŒRSTED. ‘Ce produit a 618 fabriques et vendu sous la responsabilités de Courtils International Lid. RCA, I2 logo RCA, ie loge des deux chiens (Nipper st Chiperie, sont des marques déposées ou des marques commerciales de Technicolor (S.A. jou de ses affiliés of sont utilisés sous licence per Cutis international Lid.
MISES EN GARDE DE cucurbite CONSIGNES DE SÉCURITÉ IMPORTANTES ACCESSOIRES PREPARATIE GUIDE DE référencer DES COMMANDES MONTAGE MURAL CONNEXIONS INSTALLATION RAPIDE RÉGLAGE INITIAL Du serviteur Français CONTENU Télécommande Vue De Devant Vue De Coté Vue Arriéré Installation Connexion Antenne Connexion AV Connexion HDMI Branchement du cordon d'alimentation Connexion Optimal audio output Mise De L’appareil Dans Une Place Propre Mise En Circuit Initiale De L'Appareil Sélection De Source Menu Image Menu Son Menu
CONTENU Lecture Média USB OPÉRATION DE TV intelligente MODE D’AFFICHAGE Formats Vidéo caractéristiques GUIDE DE PANAGE Symptôme TV GARANTIE LIMITÉE Les images, fonctions ef autres informations fournies dans ce manuel sont fournies a litre indicatif. 8'f ne correspond pas & "objet réel, veuillez vous reporter au produit réel.